BabyTrend 1871CT - SPUNKY TRAVEL SYSTEM User Manual
Page 9
34
34
35
33
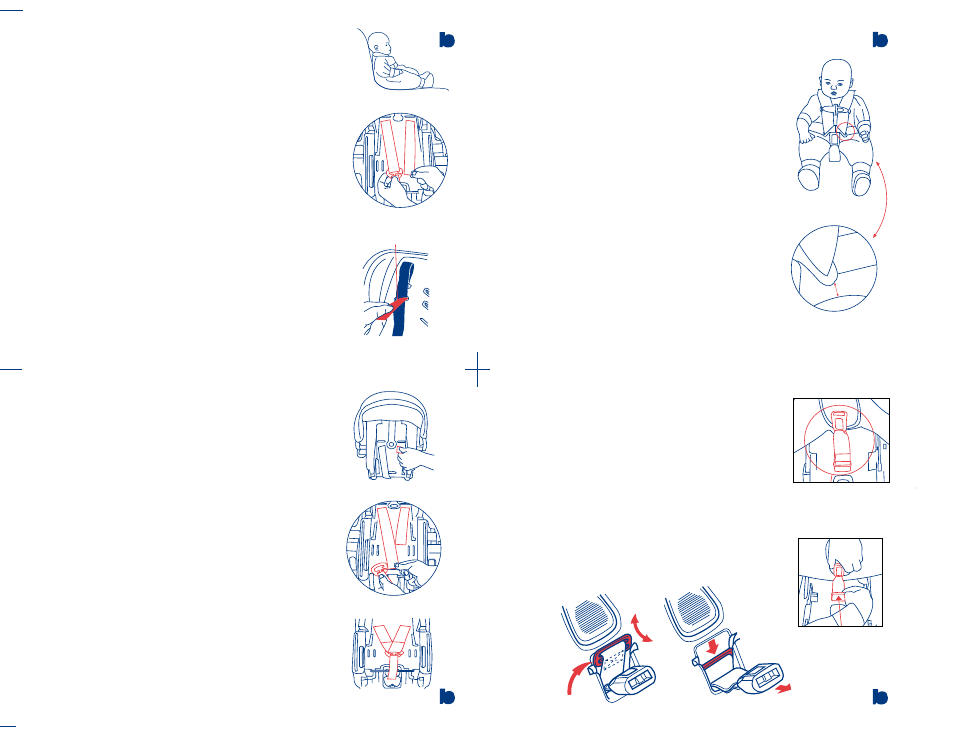
b) Fixed Back Safety Seat
The fixed seat back version of the Safety Seat features
three height adjustments for the harness shoulder straps.
The harness straps must be used in the slots that
position the straps to be even with or just below your
child's shoulders. (See Fig. 31-1) The harness straps
are adjusted as follows:
i) Remove the Safety Seat from the Base and rotate the
Carry Handle to the back position. Place your child
in the Safety Seat such that your child's bottom is all
the way to the rear and bottom of the seat. (Fig. 32-1)
ii) Determine which pair of slots will position the
harness straps even with or just below your child's
shoulders. DO NOT use harness slots that will
position the harness straps above your child's
shoulders as the harness straps in this position will not
restrain a small child in a sharp turn, sudden stop or
crash.
iii) If the Harness Straps require adjustment, remove
your child from the Safety Seat. Rotate the handle to
the upright carry position.
iv) Loosen the harness straps by depressing the Harness
Adjuster Button located below the flap just ahead of
the Harness Buckle and pulling on the harness
straps.
v) Turn the seat over. Locate the Belt Adjuster Plate
near the bottom of the seat. Please see figure 32-2.
Remove both Harness Straps from the Belt Adjuster
Plate. From the front of the seat, pull the Harness
Straps through the shoulder area slots and seat pad.
vi) Using the included Belt Threading Tool, insert
the Harness Straps through the Slots selected in step
(ii) above in the seat pad and the seat shell,
respectively. (See Figure 32-3)
vii) From the rear of the Safety Seat, pull the Harness
Straps through the Slots until you have enough strap
to reach the Belt Adjuster Plate. (See Figure 33-1)
viii) Reassemble the Harness Straps to the Belt
Adjuster Plate. The left Harness Strap must be
reassembled to the Belt Adjuster Plate first followed
by the right Harness Strap (See Figure 33-2).
Check that both Harness Straps are completely
within the Belt Adjuster Plate loop as shown in
figure 33-3.
ix) Inspect the Harness Straps from the front and rear
to ensure that they are not twisted. Twisted straps
can prevent proper tightening of the Harness and
thus may not adequately restrain your child in a
sharp turn, sudden stop or crash.
x) Before using the Safety Seat, please pull on the
Harness Straps from the front to ensure that they are
securely reattached.
13) Adjustment of the Crotch Strap Length
The crotch strap length should be adjusted such that a
gap of
1/2"
to 1" is present between the ears of the
buckle, or the bottom of the EZ5 pad, and the top of
the baby's thigh, disregarding any clothing or diaper
(fig. 34-1). Your baby will grow very quickly so
always check that the buckle is the proper height
whenever placing your baby in the Safety Seat. The
crotch strap length is adjusted as follows:
a) Lift up on the crotch strap pad and you will see the
crotch strap anchor clip riding in a slot in the crotch
strap cavity in the car seat shell. Pull outward on the
metal clip, while feeding the crotch strap webbing
downward, until the crotch strap metal clip is
removed from the slot. DO NOT attempt to
completely remove the crotch strap from the Safety
Seat. Figure 35-1.
b) The length of the crotch strap is shortened by
wrapping additional strap material around the metal
clip. The length is increased by unwrapping material
from around the metal clip. Adjust the length of the
crotch strap to the desired length. Figure 35-2.
c) Reinsert the crotch strap metal clip into the slot in the
crotch strap cavity while pulling upward on the crotch
strap buckle. Check that the crotch strap metal clip is
completely seated all the way down in the slots before
using the Safety Seat. Figure 35-3.
32
Wrap strap around
anchor clip to shorten
Crotch strap anchor
clip
Fig. 32-1
Fig. 32-2
Fig. 32-3
Fig. 33-1
Fig. 34-1
Fig. 35-1
Fig. 35-2
Fig. 35-3
Fig. 33-2
Fig. 33-3
1/2
to 1 inch
above thigh
Belt Threading Tool
Anchor clip
38
39
37
In a crash, the safety seat provides no protection for
your child unless the Harness Straps are properly
installed according to these instructions. Make sure
that the harness straps are properly adjusted and
secured whenever using the Safety Seat, even when
using as a carrier.
Please follow these instructions carefully to properly
secure your child.
a) Check that the Harness Straps are installed in the
proper slots or adjusted to the proper height as
described in section 12, Adjustment of the Shoulder
Straps, preceding.
b) The clothing you dress your child in will affect the
proper use of the Safety Seat. Please dress your
child in clothing that will:
i) Allow the Harness Straps to securely latch
between your child's legs.
ii) Keep the shoulder straps properly located on
your child's shoulders.
c) Place the Safety Seat on a firm and level surface.
Move the carry handle to the non rocking position.
Loosen the Harness Straps by pulling on the straps
while pushing on the Harness Adjuster Button
located below the pad just in front of the buckle.
Unfasten the Harness Chest Clip. Unbuckle the
Harness Straps and drape the Harness Straps over
the Seat back or to the sides of the Safety Seat.
Please see figure 37-1.
d) Place your child in the Safety Seat so that the
child's bottom is against the back and bottom of the
seat. Please see figure 37-2.
e) Pull the harness straps down over your child.
Check that the harness straps are not twisted.
36
Failure to properly secure your child in the Safety Seat /
Carrier increases the risk of death or serious injury from
suffocation or falls, or in the event of a sharp turn, sudden
stop or crash.
14) Securing your Child in the Safety Seat / Carrier
f) For the EZ5 Harness:
i) Buckle the Harness Straps to the buckle between
your child's legs. Make sure you hear a click. Pull
on the Harness Straps to ensure that they are
securely buckled.
If the harness straps are not
securely buckled, the safety seat will provide no
protection for your child. DO NOT use the
safety seat, even as a carrier, if the harness does
not securely buckle. Please call Baby Trend at
(800) 328-7363 for assistance.
ii) From the front of the Safety Seat, pull outward on
the Harness Adjuster Strap to tighten the Harness
Straps. Make sure that both Harness Straps are snug
on your child's shoulders. A snug strap should not
allow any slack. It lies in a relatively straight line
without sagging. It does not press on the child's
flesh or push the child's body into an unnatural
position. Please see figure 38-1.
iii) Fasten the Harness Chest Clips together. Position
the Harness Chest Clip, by sliding the Clip either up
or down on the Harness Straps, so that it is level
with the child's armpits. Please see figure 38-2.
g) For the 5-Point Harness:
i) Put the two buckle tongues together, overlaying the
left buckle tongue onto the right buckle tongue, and
insert the two joined buckle tongues into the harness
buckle on the crotch strap. Make sure that you hear
the tongues click into the buckle and check that both
are firmly latched by pulling upward on the straps.
Please see figure 39-1 and 39-2.
If the harness
straps are not securely buckled, the safety seat
will provide no protection for your child. DO
NOT use the safety seat, even as a carrier, if the
harness does not securely buckle. Please call
Baby Trend at (800) 328-7363 for assistance.
ii) From the front of the Safety Seat, pull outward on
the Harness Adjuster Strap to tighten the Harness
Straps.
Make sure that both Harness Straps are snug
on your child's shoulders. A snug strap should not
allow any slack. It lies in a relatively straight line
without sagging. It does not press on the child's flesh
or push the child's body into an unnatural position.
Please see figure 38-1.
iii) Fasten the Harness Chest Clips together. Position
the Harness Chest Clip, by sliding the Clip either up
or down on the Harness Straps, so that it is level with
the child's armpits. Please see figure 38-2.
Correct
Incorrect
Fig. 37-1
Fig. 38-1
Fig. 38-2
Fig. 39-1
Fig. 39-2
Fig. 37-2
Straps flat and tight
one finger of space
Level with arm pits