BabyTrend 1871CT - SPUNKY TRAVEL SYSTEM User Manual
Page 7
26
27
24
25
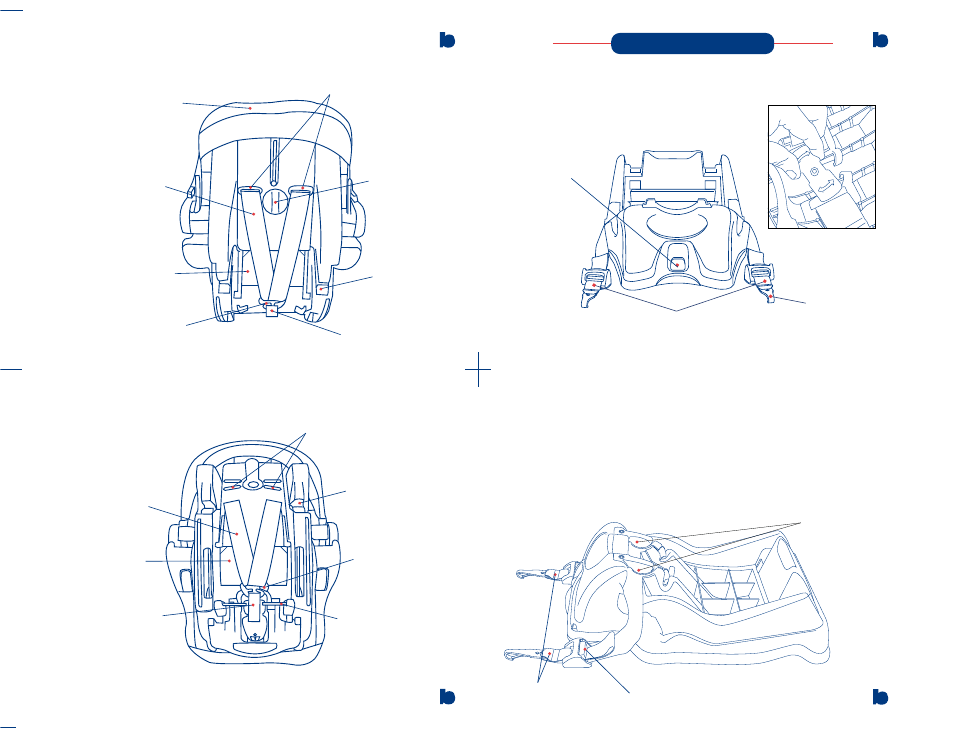
BASE
8) Features and Functions for Vehicle Installation of Base:
Foot Adjustment
Lock Button
Your Safety Seat base can be installed with
either the vehicle belt or with the included
LATCH attachment system.
To properly install the Safety Seat and
protect your child, you must carefully
follow the instructions that correspond with
the model you have purchased.
Vehicle Belt Path
(Under Hooks)
LATCH
Connectors
Rear View of Adjustable Back Model
Canopy
Adjustable Back Model
Adjuster Knob
Base/Stroller
Hook
Harness Belt
Owner's Manual
Holder
Harness
Adjuster Strap
Belt Adjuster
Plate
Harness Slots
LATCH
Attachment Hook
LATCH Connectors
LATCH Connector
Storage on underside
Webbing Release
Button
Rear View of Fixed Back Model
Harness Slots
Base/Stroller
Hook
Belt Adjuster
Plate
Base Lock
Rod
Harness Belt
Owner's Manual
Holder
Harness Adjuster
Strap
30
31
28
29
Failure to properly adjust the harness on your child
increases the risk of death or serious injury in the event of
a sharp turn, sudden stop or crash. Please follow the
instructions very closely to ensure that the harness is
properly adjusted to fit your child at all times. Your child
will grow very rapidly! Please check the fit of the harness
every time you use the Safety Seat.
9) Use of the Safety Seat with the Base:
a) Squeeze the Base Release handle, located
below the foot end of the Safety Seat, to
release the Safety Seat from the Base. Please
see figure 28-1.
b) To attach the Safety Seat to the Base, align the
Safety seat with the Base and push down until
the Safety Seat latches onto the Base. Check
that both sides of the Safety Seat are securely
attached to the base.
10) Operation of the Carry Handle
a) The Carry Handle has three positions: the
upright carry position, a mid-storage position,
and the non-rocking position.
b) Depress the two buttons located on the
handle just above the connection to the
Safety Seat shell to release the handle.
c) Slowly rotate the handle to the desired
position. The buttons should pop out and
the handle should automatically lock into
the new position.
d) Before lifting the Safety Seat, push on the
handle to check that both sides of the handle
have locked into place.
e)
Use the Mid Storage or non-rocking
position when the Safety seat is the vehicle.
11) Attaching the Canopy
a) Slip the canopy stays through the sleeves
on the canopy.
b) The canopy is attached by inserting the
ends of the canopy plastic stays into the
female fittings found on the inside of the
handle hub.
12) Adjustment of the Shoulder Straps.
a) Adjustable Back Safety Seat
i) The Adjustable Back Safety Seat includes a sliding
back component that will adjust the height of the
harness straps as the back is adjusted.
ii) To adjust the seat back height, turn the moving
back adjuster knob behind the seat clockwise to
increase the seat back height and counter clockwise
to decrease the seat back height. Each half turn will
raise or lower the slots
1/2
".
iii) The proper height of the harness straps is even
with or just below your child's shoulders.
iv) Remove the Safety Seat from the Base and rotate
the Carry Handle to the non rocking position. Place
your child in the Safety Seat such that your child's
bottom is all the way to the rear and bottom of the
seat. (See Fig. 32-1) Rotate the knob behind the
seat back to raise or lower the moving seat back and
harness straps. Knob must remain in vertical
position after adjustment. (Fig. 31-1) The Harness
Straps must be even with or just below the child's
shoulders. (Fig. 31-2) DO NOT use the Safety Seat
with the Harness adjusted above the child's
shoulders as the child will not be held securely in a
sharp turn, sudden stop, or crash.
Squeeze
Mid Storage in
vehicle position
Non Rocking in
vehicle position
Upright Carry
Rotate the Handle
Proper height is even
or just below shoulder
Fig. 28-1
Fig. 31-2
Fig. 31-1
Knob handle must
be vertical