User's guide, Setting up and adjusting the moog guitar – Moog Music Moog Guitar (User's Guide) User Manual
Page 6
User's Guide
_______________________________________________________
Change the Filter Toggle Switch to Articulated Moog Filter. The articulated filter now modulates the cutoff frequency of the
filter for each string based on the dynamics of that string; much like a hex envelope follower. The pedal sets the start
frequency of the articulation. In this mode, the Tone/Filter Knob controls the filter resonance. Play in any mode. The
articulated filter can also be used to provide a unique vocal-like quality to melodic phrasing.
The Moog Filter cutoff frequency can also be controlled by an external Control Voltage signal (0-5V). This signal can
come from an MP-201 Multi Pedal, a CP-251 Control Voltage Processor, Etherwave® Plus Theremin or any other equip-
ment capable of generating suitable control voltages.
A great application is to synchronize the Multi Pedal’s on board LFO (through MIDI Clock Sync) to a laptop or drum
machine rhythm track and then to use that LFO to modulate the filter cutoff frequency.
Strings
The Moog Guitar works best with Moog Guitar Strings because they have a high steel content and are properly insulated
from the bridge. This combination favors the unique electromagnetic interaction of the Moog pickups. Using ordinary
strings will work but sustain and muting will be weaker, noisier and less stable.
Moog strings are required for the proper operation of the Moog Guitar. You should always use Moog Strings, however in
an emergency, GHS “Infinity Steel” (best), GHS “Super Steels”, or D’Addario “ProSteels” strings would work, but not quite
as well as Moog Strings. You can use an ordinary string in an emergency if you have nothing else, but you will not be able
to play at full Vo power.
Players have their favorite strings, presumably because they sound the best on their existing instrument. The Moog
Guitar will sound the best with Moog Guitar Strings.
Note: When replacing your guitar strings, it is important to carefully snip off any curled ends of the strings prior
to pulling them through. After installing new strings, tighten the locking mechanism on the tuning pegs.
When changing strings, please be careful not to drop anything, (especially anything electrically conductive), into
the string access opening in the rear cavity cover. Such debris may damage the Moog electronics!
Setting up and Adjusting the Moog Guitar
Your Moog Guitar has been set up at our facility by an experienced luthier who understands how the new capabilities of
your instrument are affected by the guitar’s set up. We strongly suggest that you play your Moog Guitar for a while with
no alterations - even though you may be used to a different set-up on your other guitars. You may find that as you
experience your instrument the differences become more acceptable or even preferred.
Adjusting the pickups: The high end is closer to the strings to compensate for the smaller mass of string. The pickups
may be raised or lowered using the three screws under each pickup at the back of the guitar. The tripod of screws allows
adjustment of both height and orientation. Caution: These screws are nylon. Turning them against strong
resistance may damage the screw heads and the screw threads. The available range of pickup adjustment is about
¼” at the maximum. We strongly recommend you refrain from adjusting your pickups.
© 2009 Moog Music Inc
Specifications subject to change without notice
www.moogmusic.com
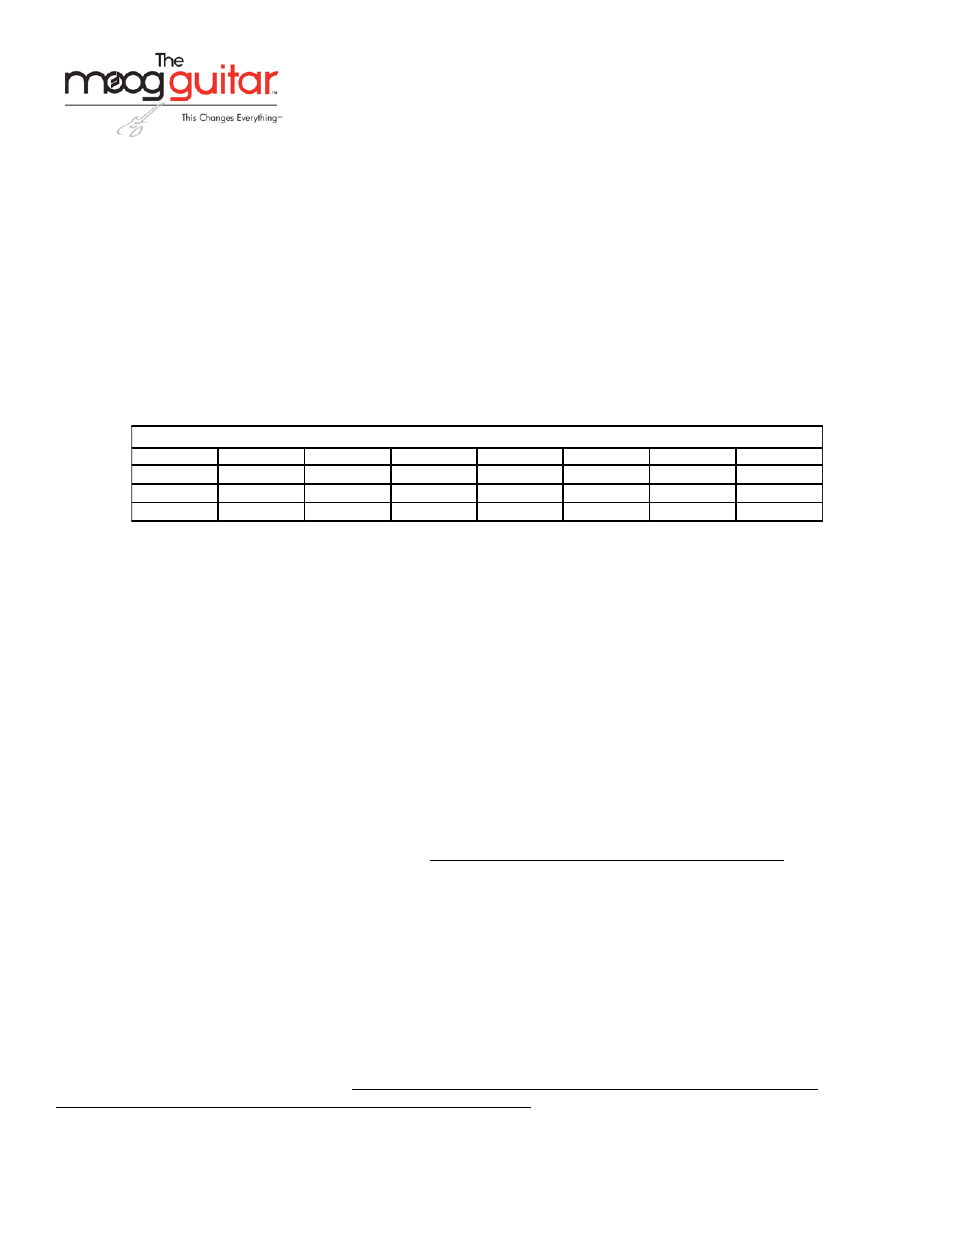
String Sets
Gauging
First-E
Second-B
Third-G
Fourth-D
Fifth-A
Sixth-E
Light
9-46
009
011
016
026
036
046
Medium
10-52
010
013
017
030
042
052
Heavy
11-52
011
014
018
030
044
052