Velleman IVSPROM1 User Manual
Page 13
IVSPROM1
09.11.2010
©Velleman nv
13
Note: There must be at least 8192 images of recorded data for playback to work properly. If not, the
device will stop playback. For example, if the IPS is set to 30, the recording time should be at least 273
seconds (8192 images / 30 IPS) for the playback to work properly.
Note: During playback, the image size of the recording (FRAME, FIELD or CIF) will be shown on the
screen.
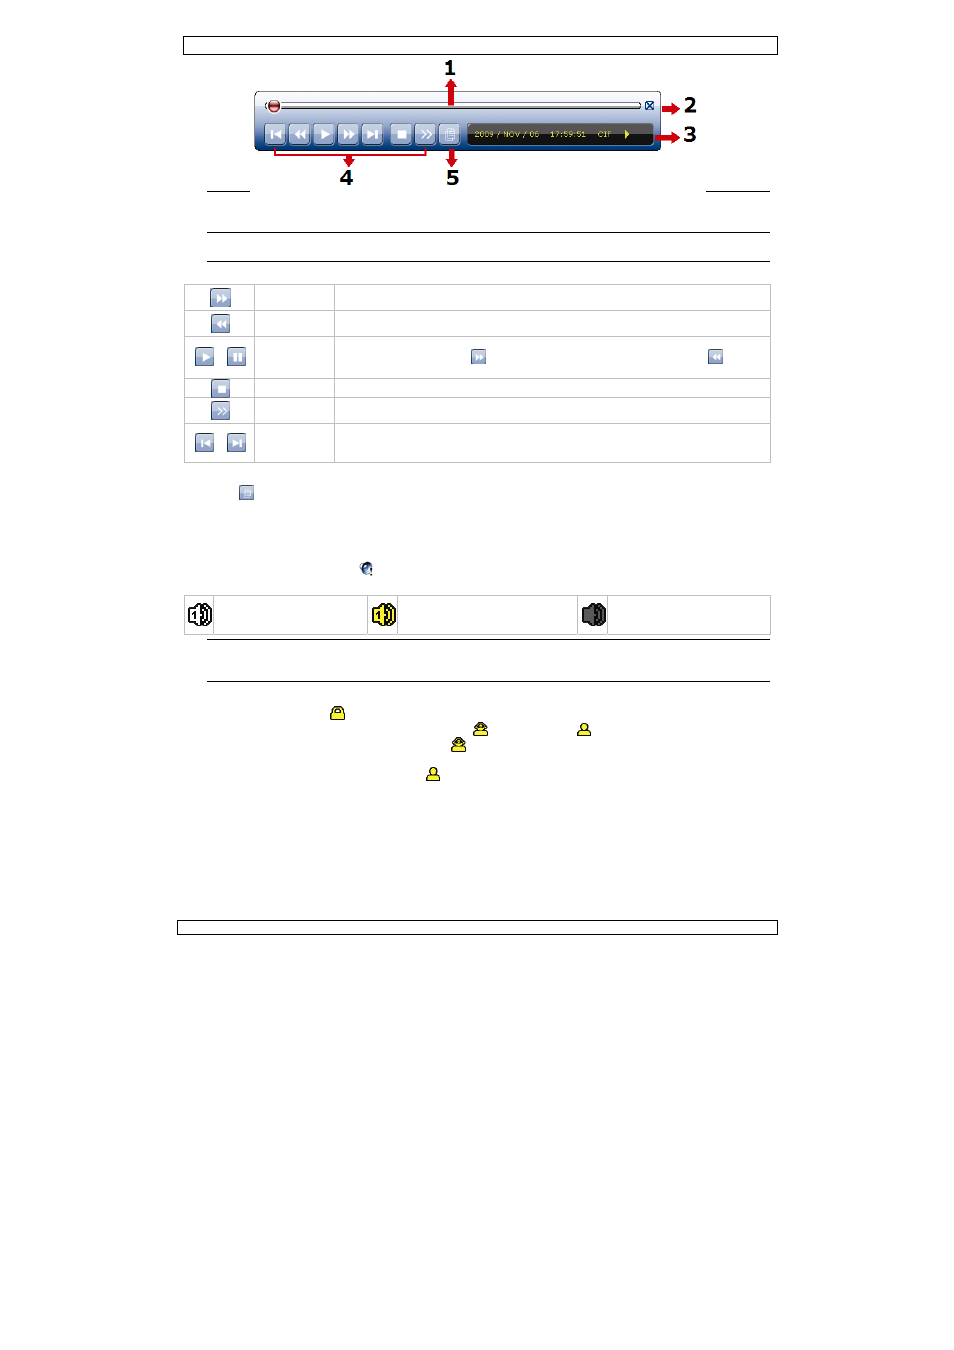
Playback control
Fast Forward
Increase the speed for fast forward. Click once to get 4X speed forward, click
twice to get 8X speed, etc. Maximum speed is 32X.
Fast Rewind Increase the speed for fast rewind. Click once to get 4X speed rewind, click twice
to get 8X speed, etc. Maximum speed is 32X.
/
Play / Pause
Click to play the latest recorded video clip immediately, click again to pause.
In the pause mode, click
once to get one frame forward, and click
to get
one frame rewind.
Stop
Click to stop the video playback.
Slow Playback
Click once to get 1/4X speed playback, and click twice to get 1/8X speed
playback.
/
Previous /
Next Hour
Click to jump to the next / previous time interval in an hour, for example, 11:00
~ 12:00 or 14:00 ~ 15:00, and start playing the earliest event video clip
recorded during this whole hour.
Event search
•
Click
to quickly search the recorded files by event lists: RECORD / MOTION / ALARM / TIME / HUMAN
DETECTION / IVS / STATISTIC, or select FULL to show all the event logs.
•
To quickly search the time you want, select “QUICK SEARCH”. For more details, refer to §5.4.1 in the full
user manual.
Audio playback
•
In the playback mode, click
on the quick menu bar as many times as needed to select live or playback
audio from audio channel 1~4.
Live audio from audio
channel 1~4 (indicated in
white).
Playback audio from audio
channel 1~4 (indicated in
yellow).
Audio channel unselected
Note: To make a video backup with audio, make sure the camera which supports the audio function is
connected to the video-in channel and audio-in channel. For example, the audio data from audio CH1 will
be recorded with the video data from video CH1.
8.4 User switch
•
In the key lock mode (
), move your USB mouse to display the password input keypad. There are two
user levels for accessing the DVR: Administrator (
) and Operator (
).
•
When the administrator password is entered,
will be shown on the status bar of the screen and all
operations are allowed. The default administrator password is 0000.
•
When the operator password is entered,
will be shown on the status bar of the screen, and the main
menu is NOT accessible. The operator user level needs to be set in the main menu “SYSTEM” Æ “TOOLS”.
•
To switch between these two user levels, click the current user level icon to switch to the key lock mode,
and move your mouse to show the password input keypad, and enter the password of the user level you
want.
8.5 Video output switch
•
Showing the video output simultaneously on a CRT monitor (connected to MONITOR) and LCD monitor
(connected to VGA) is not supported.
•
The default video output setting is “AUTO”, meaning the DVR will automatically detect the video output
source. When VGA and MONITOR are both connected, the default monitor output is VGA.