Operation, Maintenance and service – Bosch GKS 190 Professional User Manual
Page 17
English | 17
Bosch Power Tools
1 619 P09 868 | (4.11.11)
Operation
Operating Modes
f
Before any work on the machine itself, pull the mains
plug.
Adjusting the Cutting Depth (see figure C)
f
Adjust the cutting depth to the thickness of the work-
piece. Less than a full tooth of the blade teeth should be
visible below the workpiece.
Loosen the clamping lever 24. For a smaller cutting depth,
pull the saw away from the base plate 12; for a larger cutting
depth, push the saw toward the base plate 12. Adjust the de-
sired cutting depth at the cutting-depth scale. Tighten the
clamping lever 24 again.
If the cutting depth cannot be fully adjusted after loosening
clamping lever 24, pull clamping lever 24 away from the saw
and swivel it downward. Release the clamping lever 24 again.
Repeat this procedure until the requested cutting depth can
be adjusted.
If the cutting depth cannot be sufficiently locked after tighten-
ing clamping lever 24, pull clamping lever 24 away from the
saw and swivel it upward. Release the clamping lever 24
again. Repeat this procedure until the cutting depth is locked.
Adjusting the Cutting Angle
Loosen the wing bolts 6 and 26. Tilt the saw sidewards. Ad-
just the desired measure on the scale 5. Tighten the wing
bolts 6 and 26 again.
Note: For bevel cuts, the cutting depth is smaller than the set-
ting indicated on the cutting-depth scale 25.
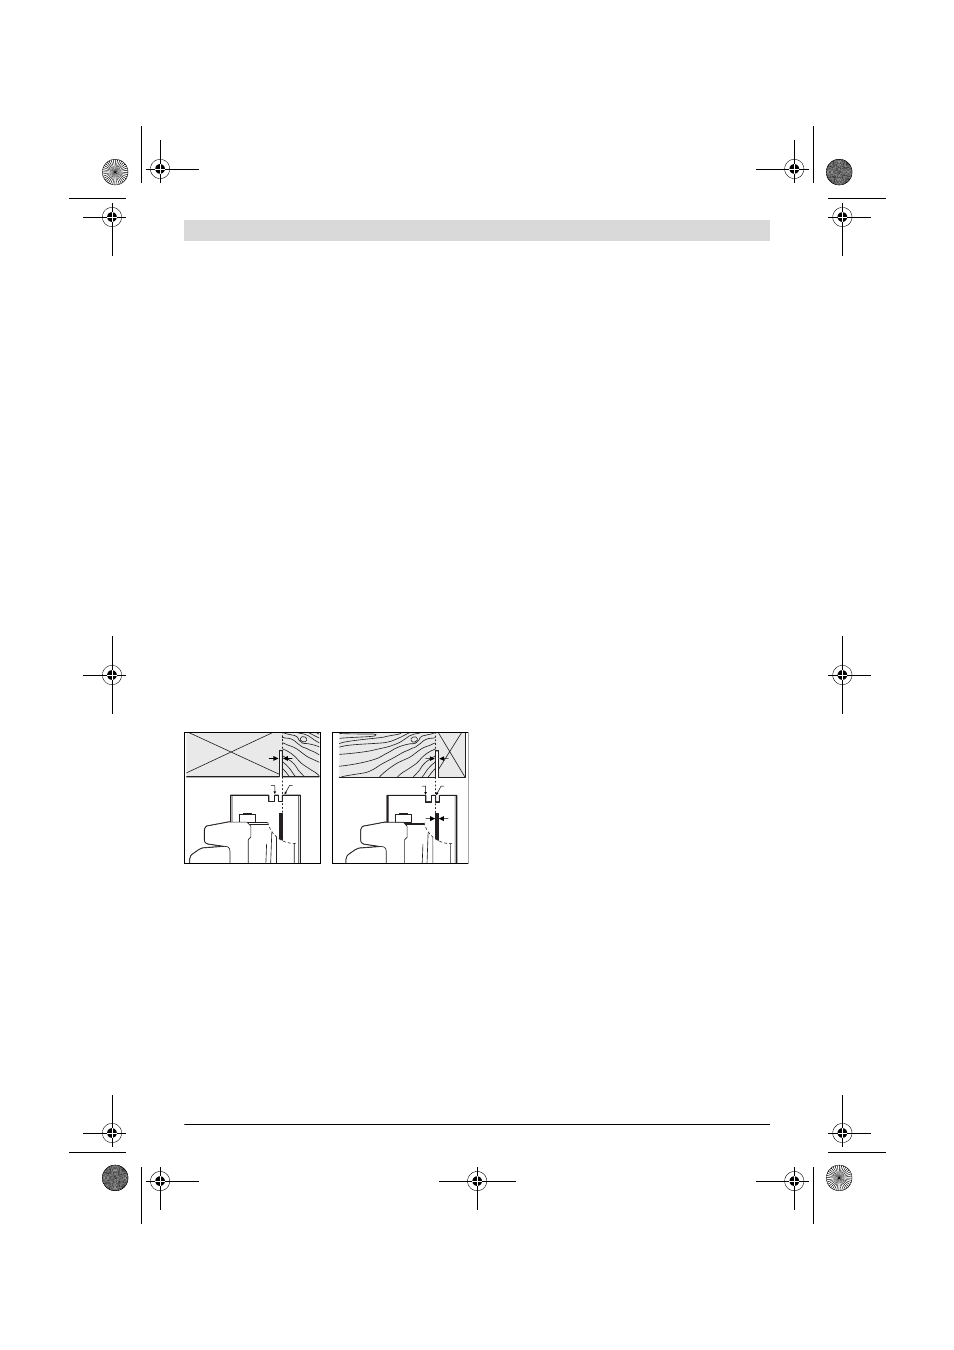
Cutting Marks
The 0° cutting mark (9) indicates the position of the saw
blade for right-angled cuts. The 45° cutting mark (8) indi-
cates the position of the saw blade for 45° cuts.
For precise cuts, position the circular saw against the work-
piece as shown in the figure. It is best to carry out a trial cut.
Starting Operation
f
Observe correct mains voltage! The voltage of the pow-
er source must agree with the voltage specified on the
nameplate of the machine. Power tools marked with
230 V can also be operated with 220 V.
Switching On and Off
To start the machine, first push the lock-off button for the
On/Off switch 2 and then press the On/Off switch 1 and keep
it pressed.
To switch off the machine, release the On/Off switch 1.
Note: For safety reasons, the On/Off switch 1 cannot be
locked; it must remain pressed during the entire operation.
Working Advice
Protect saw blades against impact and shock.
Guide the machine evenly and with light feed in the cutting di-
rection. Excessive feed significantly reduces the service life of
the saw blade and can cause damage to the power tool.
Sawing performance and cutting quality depend essentially
on the condition and the tooth form of the saw blade. There-
fore, use only sharp saw blades that are suited for the material
to be worked.
Sawing Wood
The correct selection of the saw blade depends on the type
and quality of the wood and whether lengthway or crossway
cuts are required.
When cutting spruce lengthways, long spiral chips are
formed.
Beech and oak dusts are especially detrimental to health.
Therefore, work only with dust extraction.
Sawing with Parallel Guide (see figure D)
The parallel guide 10 enables exact cuts along a workpiece
edge and cutting strips of the same dimension.
Loosen wing bolt 7 and slide the scale of the parallel guide 10
through the guide in the base plate 12. Adjust the desired cut-
ting width as the scale setting at the respective cutting mark 9
or 8; see Section “Cutting Marks”. Tighten wing bolt 7 again.
Sawing with Auxiliary Guide (see figure E)
For sawing large workpieces or straight edges, a board or
strip can clamped to the workpiece as an auxiliary guide; the
base plate of the circular saw can be guided alongside the aux-
iliary guide.
Maintenance and Service
Maintenance and Cleaning
f
Before any work on the machine itself, pull the mains
plug.
f
For safe and proper working, always keep the machine
and ventilation slots clean.
The retracting blade guard must always be able to move freely
and retract automatically. Therefore, always keep the area
around the retracting blade guard clean. Remove dust and
chips by blowing out with compressed air or with a brush.
Saw blades that are not coated can be protected against cor-
rosion with a thin coat of acid-free oil. Before use, the oil must
be removed again, otherwise the wood will become soiled.
Resin and glue residue on the saw blade produces poor cuts.
Therefore, clean the saw blade immediately after use.
If the replacement of the supply cord is necessary, this has to
be done by Bosch or an authorized Bosch service agent in or-
der to avoid a safety hazard.
0
45
0
45
OBJ_BUCH-813-003.book Page 17 Friday, November 4, 2011 7:23 AM