Incorrect, Correct, Level – Activeforever Invisia Collection Serena Seat Brazilian Walnut Wall Mount Shower Seat User Manual
Page 2
Page 2 of 4
WOO
D STUD
SPA
CING
16"
(40.
6cm)
(a)
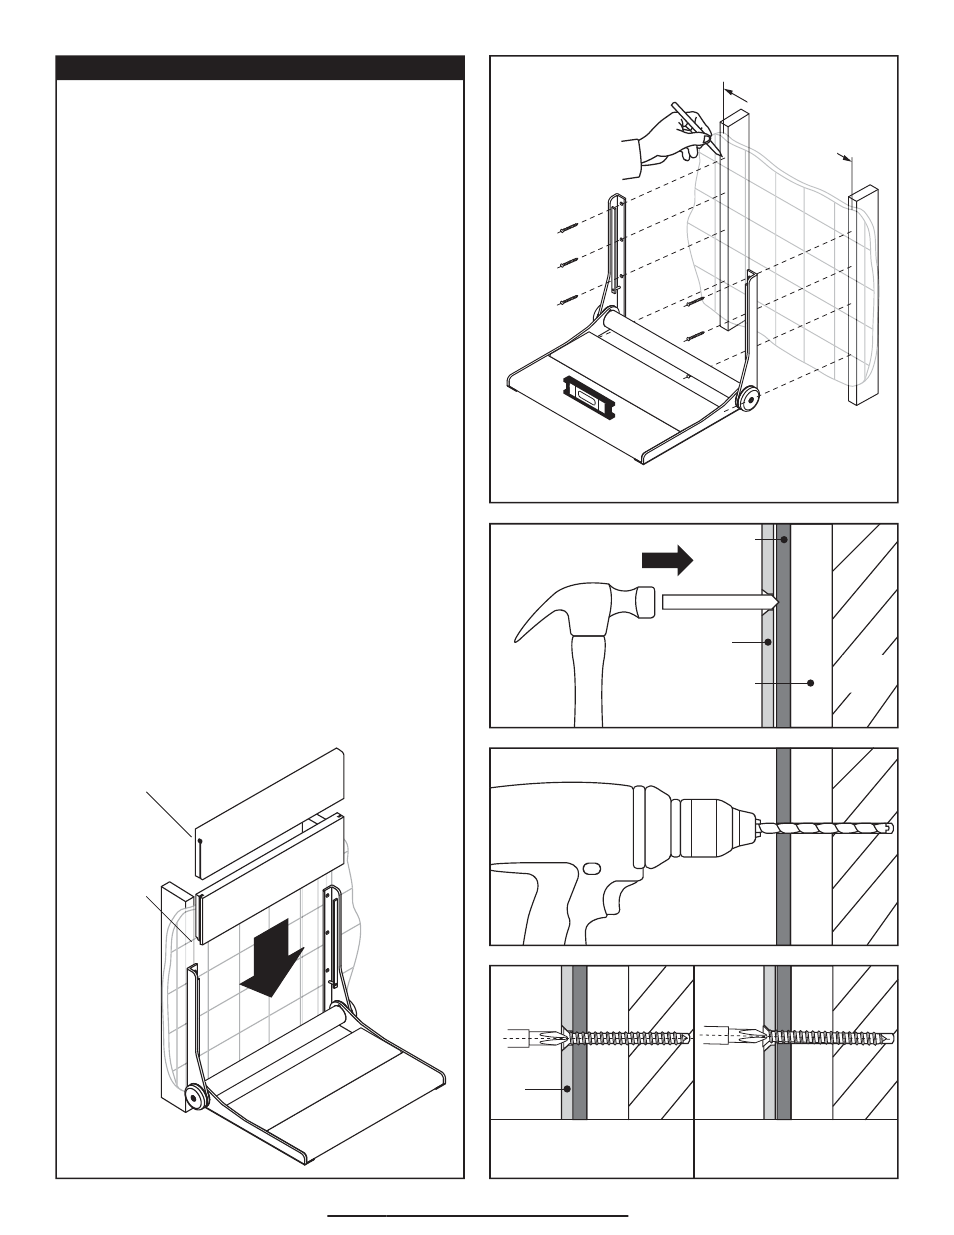
Figure 1.
Level
(b)
Figure 4.
INCORRECT!
Flat head installed ON AN
ANGLE in countersunk hole
CORRECT!
Flat head installed STRAIGHT
in countersunk hole
Wall
Bracket
INSTALLATION INSTRUCTIONS
Place a blanket down in the area that you will be installing the
SerenaSeat™ to protect the shower or bathtub surfaces from
parts that may fall during installation.
A1. Identify the horizontal and vertical location of the
SerenaSeat™. Specifically, identify the location of the top hole
on one side of the wall bracket as shown in of
Figure 1 (a).
A2. Notch the tile accurately with a center punch as shown in
Figure 2. NOTE: A light tap is all that is required for punch to
make notch.
A3. Drill hole for appropriate fastener as shown in Figure 3.
Clear away debris from hole that could interfere with the seat
sitting flush with the wall.
A4. Secure wall bracket using appropriate fasteners. Ensure
the screw goes in as straight as possbile so the flat head of
the screw is within the countersunk area as shown in
Figure
4. If it protrudes out, it may interfere with the sliding removal
of the backrest panels.
A5. Once attached, use level as shown in Figure 1 (b) to
ensure seat is straight. Identify the location of the top hole on
the opposite wall bracket.
IMPORTANT: Ensure distance
between the wall brackets allows for easy sliding of the back
rest panels (do not cause brackets to bend inwards).
Repeat steps A2 thru A4 first for the top hole on the opposite
wall bracket and ensure it is level. Repeat steps A2 thru A4
the remaining holes.
NOTE: Perform a final tighten and inspection of all fasteners.
Test the installation by pushing down / sitting on the seat.
A6. Once all screws are installed, the backrest panels can be
slid onto the wall bracket as shown below. Ensure the
orientation of each seat panel is correct (i.e. label on back of
panel should face wall).
Your SerenaSeat™ is now installed.
STOPPER
AT TOP
NOTCH
FACING
FLOOR
BACKREST
TOP
BACKREST
BOT
TOM
Figure 2.
Figure 3.
WOOD
STUD
TILE
Cement
Board
Wall
Bracket
“LIGHT TAP”
www.ActiveForever.com