Activeforever Invisia Collection Serena Seat Brazilian Walnut Wall Mount Shower Seat User Manual
Serenaseat, Min 1.5
Page 1 of 4
www.ActiveForever.com
SerenaSeat
™
Installation Instructions: WS-18-WD
SERENA SEAT
THANK YOU...
Thank you for purchasing the SerenaSeat™. We are confident that
you will find the unique design and durable construction of this
product to be of great assistance in your daily routine.
To fully enjoy your SerenaSeat™, please take a few moments to read
these instructions. You should store these instructions in a safe place
for future reference.
SAFETY CONSIDERATIONS
CAUTION: It is your responsibility to see that your SerenaSeat™ is
properly assembled, installed, and cared for. Failure to follow
instructions in this manual could result in serious injury. Some
surfaces can be slippery when wet - use this product with caution.
SERENASEAT™ INSTALLATION / MAINTENANCE
The SerenaSeat™ should only be installed in areas where the
mounting surface is structurally sound. Strengthening modifications
may be required (see page 3 for details). Should not be installed in
fiberglass / acrylic shower enclosures with insufficient stiffness and
strength. Should not be installed into metal studs. If you are not
equipped to undertake the outlined work we recommend that you have
your SerenaSeat™ installed by a qualified contractor. Seat should
only be used for sitting upon - not to be used for other purposes. Do
not install seat in locations where seated user and seat are close to
direct steam or hot water emissions. Suggested maximum user
weight 450lbs/205kg, however this rating is conditional upon suitable
fasteners and supporting surface. One person maximum capacity.
WOOD CONTACT SENSITIVITY - some people may experience a
skin rash or other reaction due to contact with certain types of wood.
If unsure, test first.
WOOD PANEL WARNING
In order to retain the natural beauty of the Brazilian Walnut (IPE),
HealthCraft has made a conscious decision to not treat the wood
panels with any chemicals (stains or sealers). We hope this effort will
reduce the environmental impact caused by these chemicals.
As a result of not using chemicals on the wood, a light brown or red
discoloration may be noticed in water exposed to the wood. This is
due to an excess of pigments (natural oils) in the wood reacting with
minerals present in certain types of water (well water, hard water,
etc.). This discoloration should fade over time.
If you choose to prevent this from occurring, please contact us for
recommendations on sealers that are suitable for this application. If
unsure, test wood in local water prior to installation.
WARRANTY
All HealthCraft™ Products are covered by a one year limited warranty
with the exception of hand grips which are subject to normal wear.
Buyer hereby indemnifies, agrees to hold harmless and defend
HealthCraft™ Products Inc. from and against any and all liabilities,
claims, (founded and unfounded), losses, damages, costs and
expenses (including without limitation consequential damages and
reasonable professional fees) resulting from buyers specification,
application, or improper use of goods described hereon; buyers
omission or neglect.
HealthCraft™ Products Inc. does not assume any liability for damage
resulting from services performed by others or faulty installation,
misuse or misapplication of goods sold by HealthCraft™ Products
Inc.
HealthCraft™ Products Inc. shall not be liable for prospective profits
or special, indirect, or consequential damages, or for the cost of any
corrective work done without HealthCraft™ Products Inc. prior
approval. HealthCraft™ Products Inc. total liability hereunder shall in
no event exceed the purchase price of the goods specified hereon.
TOOLS REQUIRED
• Level
• Personal Protective Eyewear • Center Punch
• Hammer
• Carbide tip drill suitable for tile
• Stud Finder
• Protective blanket
CLEANING AND MAINTENANCE
The back panels of the SerenaSeat™ are removable to allow
for cleaning of the wall behind the seat. Clean seat with water,
and then wipe dry using a soft cloth. Do not use abrasive
cleaning products.
TIPS FOR DRILLING INTO TILE
• Use carbide tipped masonary drill on ceramic, or consider
a diamond tip drill for porcelain tile.
• If possible, drill a smaller pilot hole first.
• Be careful to prevent the drill from moving when you first
start it rotating - use duct tape or a wood guide on the
surface of the tile to hold the drill from walking sideways.
• A variable speed drill on slow is best to start the hole. Do
not apply too much pressure when drilling. Do not use a
hammer drill.
MOUNTING LOCATION
We strongly recommend that you give some thought as to the
optimal location of your SerenaSeat™ before installation. The
following suggestions are offered for your consideration,
however, it is recommended to consider advice from the
appropriate healthcare professional for locating of any support
product. Also, consider the following when determining the
optimal mounting location:
1. Move mounting location to match structure behind the wall.
2. Avoid electrical / plumbing behind the wall.
3. Wheere possible, drill through tile - not through grout.
The holes on the SerenaSeat™ were designed to contact wood
studs spaced at 16" centers. If the position of the wood studs
places the seat in an undesireable location, we recommend
strengthening modifications to be done (see Page 3 for
recommendations). When determining the seat height,
consider the height of the user and their capabilities (
NOTE:
ADA guideline specifies seat height of 17-19" above the
finished floor).
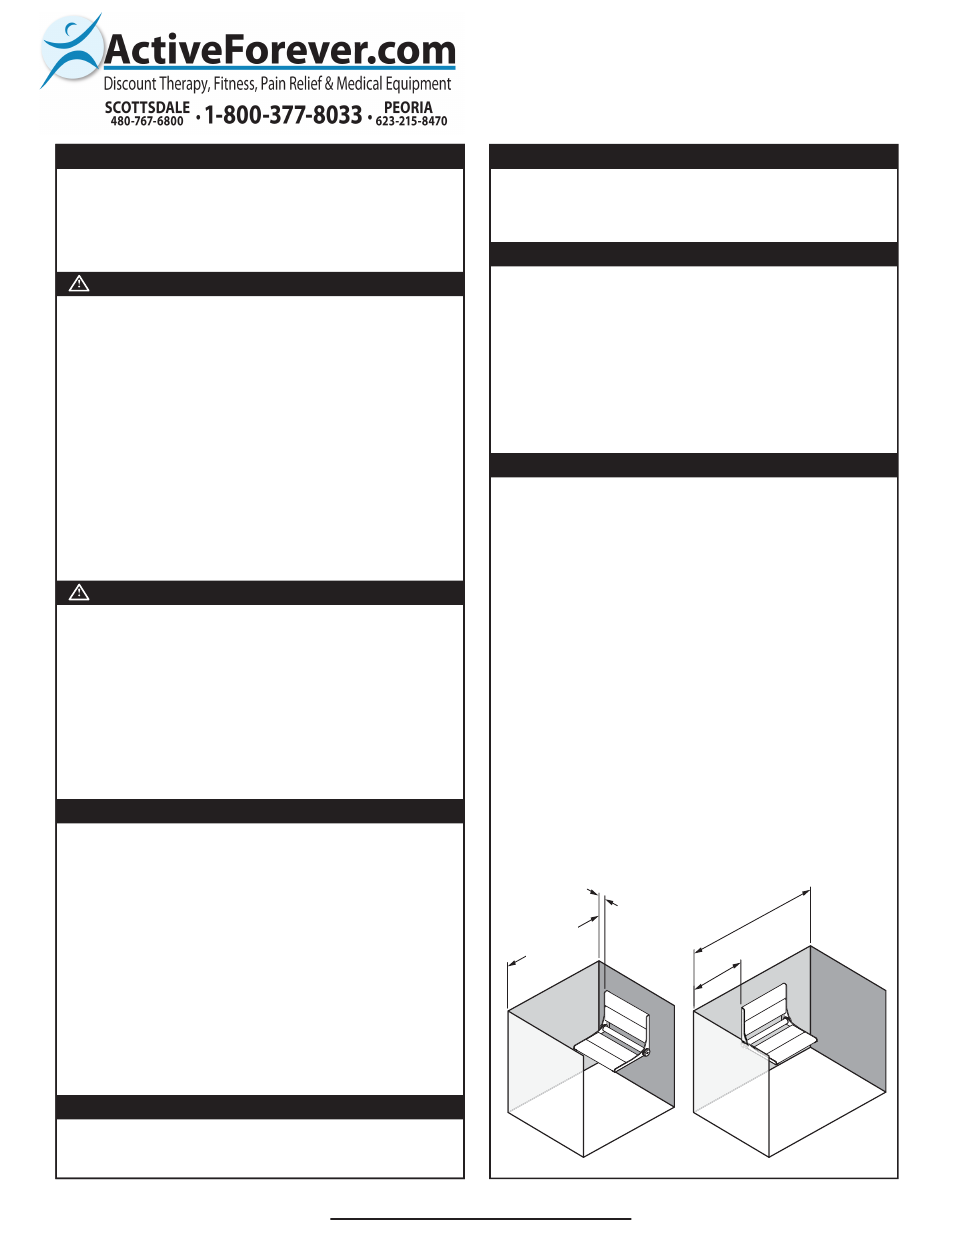
RECOMMENDED INSTALLATION LOCATIONS:
BACK WALL (a) - If side wall is less than 36", seat should be
mounted on back wall.
SIDE WALL (b) - If side wall is greater than 36", seat can be
mounted on side wall (to reduce reaching for shower controls
located on FAUCET WALL).
SIDE
BACK
MIN 1.5"
AD
A guidel
ine
specifies
clearan
ce
betwe
en se
at ed
ge
and
side wall
.
FAUCET
Less
than 36"
SIDE
BACK
Greater than 36"
Less
than 24"
FAUCET
)
b
(
)
a
(