Instructions for use, Getting started, Operating controller – Activeforever Teeter Hang Ups Vibration Cushion User Manual
Page 2: Maintenance
Instructions for Use
The Vibration Cushion with Far Infrared Neck Arch Support was designed for use
with Inversion Tables. Please read all instructions prior to use.
GETTING STARTED
1. Pull apart the Velcro on all of the straps on the Vibration Cushion.
2. Place the Vibration Cushion on top of the inversion table bed. Make sure
the electrical cords are located on the left as you stand facing the unit and
that they are free from the underside of the Vibration Cushion.
1. Pull apart the Velcro on all of the straps on the Vibration Cushion.
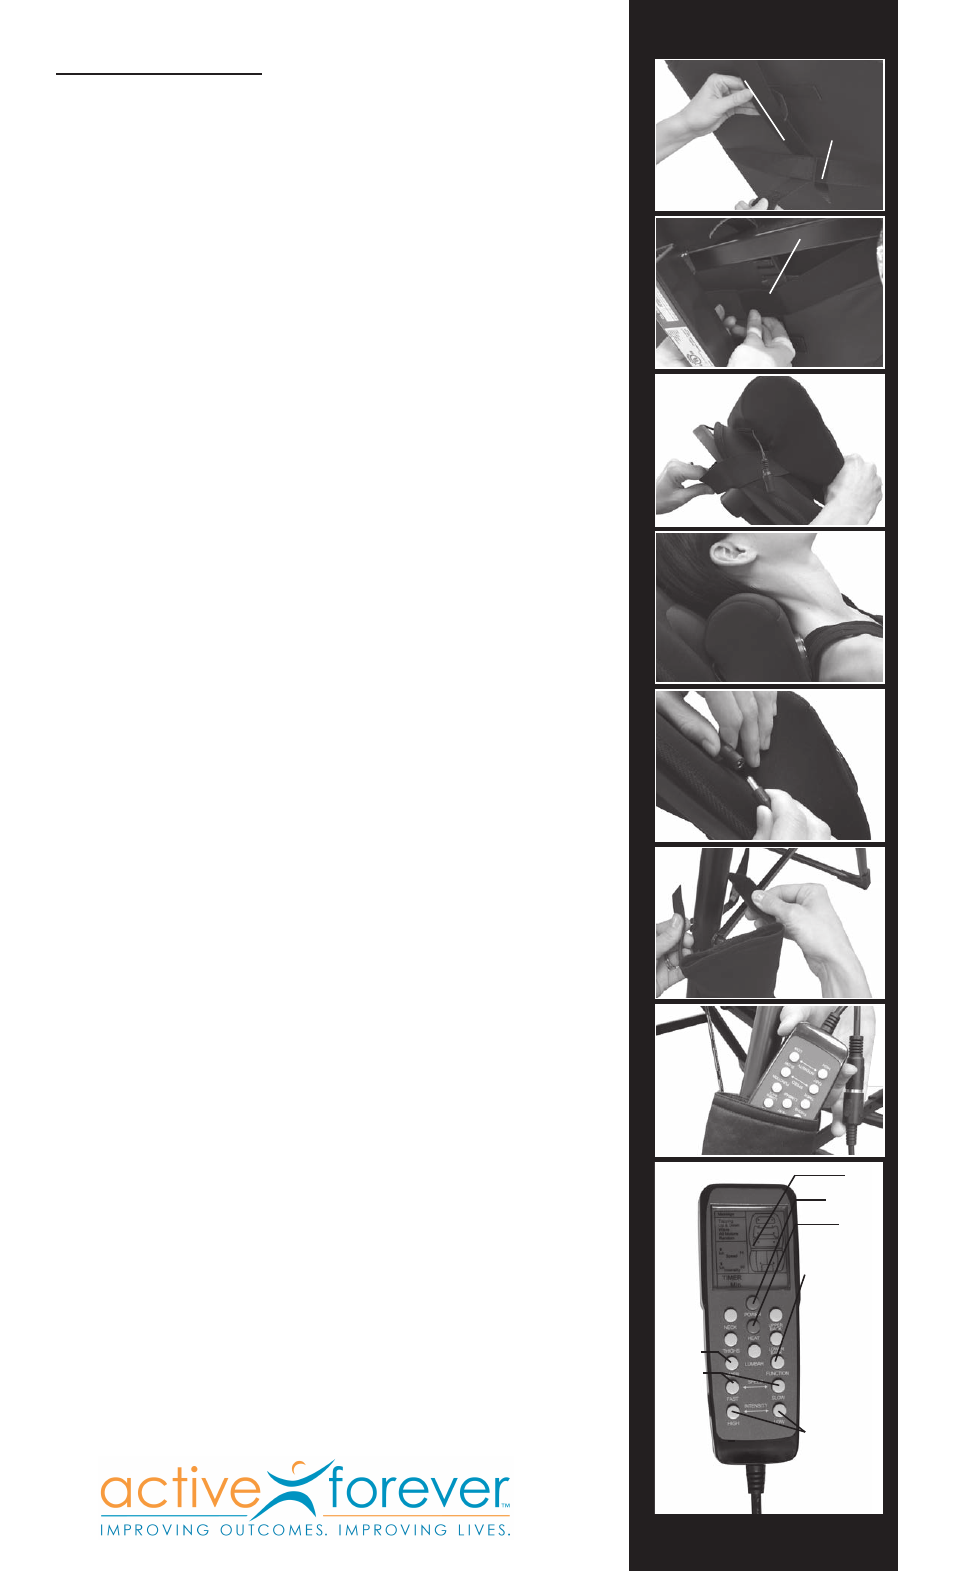
3. CAUTION: Keep your face and eyes away from the elastic straps when
stretching them for installation. Pull the top strap over the table bed and
between the upper bed supports and the table bed. Insert one of the two
center straps through the loop in the top strap and secure it to the other
center strap using the Velcro strips. (Fig. 1)
4. Pull the two lower straps around the table bed and between the lower bed
supports and the table bed. Fasten the Velcro strips together. (Fig. 2)
5. Position the Neck Arch Support so that the larger rounded edge is facing
the top of the table bed. With the Neck Arch Support on top of the Vibration
Cushion, stretch the elastic strap around the top of the table bed to secure
it to the table. (Fig. 3) The strap and arch support position can be adjusted
at the time of use. The larger rounded edge of the Neck Arch Support
should be positioned so the larger rounded edge supports the natural curve
of your neck, and your head should rest on the cushion, not the Neck Arch
Support. (Fig. 4)
6. Connect the Neck Arch Support cord to the input jack at the top of the Vibration
Cushion. (Fig. 5)
7. Attach the Controller Pouch to the A-frame of the inversion table by
securing a Velcro strap around the rear leg above and below the spreader
arm (Fig. 6)
8. Run the electrical cord from the Vibration Cushion through the secured
Velcro straps of the Controller Pouch – this will help keep the cord out of
the way during operation of the inversion table. Plug the adapter into a 120
volt AC outlet and plug the receptacle end into the input jack, located along
the side of the cushion.
9. Connect the Controller cord to the Controller and place the Controller in the
pouch. (Fig. 7) Secure the cord to the rear leg of the A-frame using the
Velcro strap provided.
FOLLOW ALL INSTRUCTIONS REGARDING THE
PROPER USE OF THE INVERSION TABLE.
OPERATING CONTROLLER
(Fig. 8)
HEAT: Press the “heat” button to turn the infrared lights on and off.
VIBRATION:
1. Press the “power” button on the Controller to start the vibrating motors.
2. Press the “function” button to select vibration modes: tapping, up & down,
wave, all motors, and random.
3. The vibration area can be selected by pressing the buttons “neck”, “upper
back”, “lower back”, “lumbar” and “thighs”.
4. Press the “timer” button to select the amount of vibration time.
5. Press the “fast” or “slow” buttons to adjust the speed of the vibration motors.
6. Press the “high” or “low” buttons to adjust the desired intensity.
MAINTENANCE
TO CLEAN: Be sure to unplug the Vibration Cushion and allow it to cool prior to
cleaning. Using a soft, slightly damp sponge, wipe only the surface. DO NOT allow the
Vibration Cushion to contact or become immersed in water or any other liquid. NEVER
clean the Vibration Cushion with brushes or abrasive cleaners, flammable fuels, glass/
furniture polish or paint thinner.
TO STORE: Place the Vibration Cushion in its original box or in a cool, dry place - use
caution when storing so as not to damage the internal components. Do not wrap the
power cord around the unit or attempt to hang the Vibration Cushion by the Controller
cord. Take care to avoid contact with sharp or pointed objects that might puncture the
fabric surface.
DO NOT attempt to repair the Vibration Cushion - there are no user serviceable parts.
Contact Customer Relations for service.
1-YEAR LIMITED WARRANTY: This appliance is warranted against defects in materials and
workmanship for one year from the date of purchase. Any problems arising from misuse, attempts
at repair, dropping or extreme wear are not covered by this warranty. Refer to the warranty card for
additional information about Warranty Service.
USA and Canada
• STL International • 9902 162
nd
St. Ct. E. • Puyallup, WA 98375
Phone: 800-847-0143 Fax: 800-847-0188
International
• Inversion International, Ltd. • PO Box AP 59245 • New Providence Island, Bahamas
© Copyright 2010 STL. International Law Prohibits Any Copying. LS-3000 1210-5
©2010 STL International, all rights reserved.
Fig. 1
Fig. 2
Fig. 3
Fig. 4
Fig. 5
Fig. 6
Fig. 7
TOP STRAP
CENTER
STRAP
BOTTOM STRAP
LCD
POWER
HEAT
POSITIONS
TIMER
FUNCTIONS
SPEED
INTENSITY
A symbol on the LCD
screen will flash as its
control key is activated.
*
*
Fig. 8
*