Candy CG 644 T User Manual
Page 9
IT
CAPITOLO 5
MESSA IN OPERA
INSTALLAZIONE
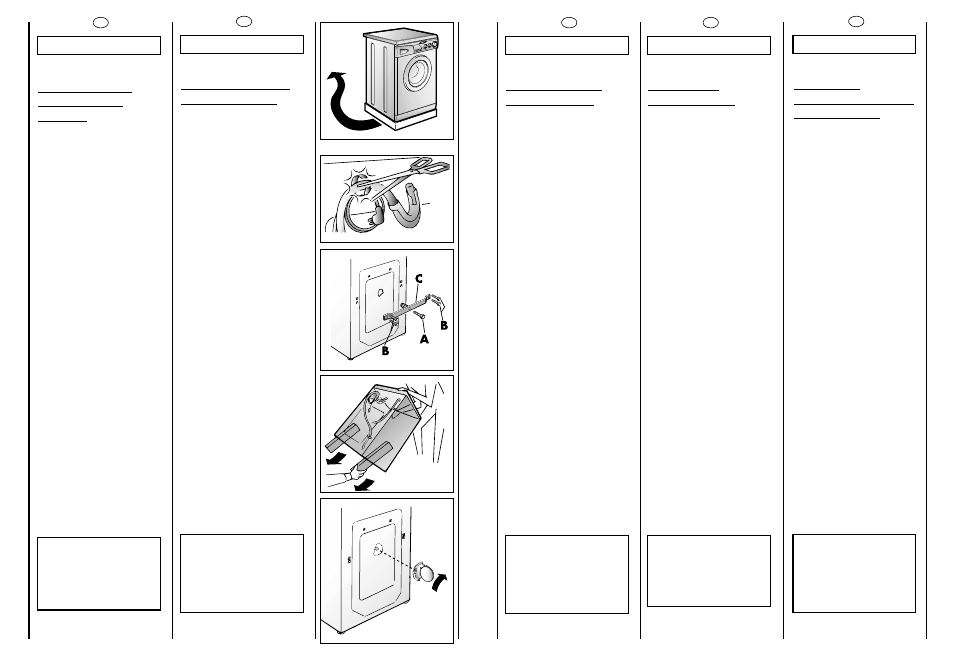
Porti la macchina vicino al
luogo di utilizzo senza il
basamento dell’imballo.
Tagli le fascette fermatubo
Svitare la vite centrale (A);
svitare le 4 viti laterali (B) e
rimuovere la traversa (C).
Inclinare la macchina in
avanti e sfilare i sacchetti in
plastica che contengono i
due blocchetti in polistirolo
posti sui 2 lati tirando verso il
basso.
Richiudere il foro utilizzando
il tappo contenuto nella
busta istruzioni.
ATTENZIONE:
NON LASCI ALLA
PORTATA DI BAMBINI
GLI ELEMENTI
DELL’IMBALLAGGIO IN
QUANTO POTENZIALI
FONTI DI PERICOLO.
16
17
FR
CHAPITRE 5
MISE EN PLACE
INSTALLATION
Placer la machine sur le lieu
d’utilisation sans le socle
d’emballage.
Couper les colliers
serre-tubes
Dévisser la vis centrale (A);
dévisser les 4 vis latérales (B)
et enlever l’axe (C).
Incliner la machine en avant
et enlever les sachets en
plastique qui contennent les
2 arrêts en polystyrène qui
se trouvent sur les 2 côtés en
tirant vers le bas.
Refermer le trou en utilisant
le bouchon qui se trouvè
dans le sachet “instructions”.
ATTENTION:
NE PAS LAISSER À LA
PORTÉE DES ENFANTS
DES ELEMENTS
D’EMBALLAGE QUI
PEUVENT CAUSER DES
RISQUES.
EN
CHAPTER 5
SETTING UP
INSTALLATION
Move the machine near its
permanent position without
the packaging base.
Cut tube-holding straps.
Unscrew the central screw
(A); unscrew the 4 lateral
screws (B) and remove the
cross piece (C).
Lean the machine forward
and remove the plastic
bags containing the two
polystyrene blocks at the
sides, pulling downwards.
Press the plug (to be found
in the envelope with the
instructions) into the hole.
WARNING:
DO NOT LEAVE THE
PACKAGING IN THE
REACH OF CHILDREN AS
IT IS A POTENTIAL
SOURCE OF DANGER.
ES
CAPÍTULO 5
PUESTA EN
FUNCIONAMIENTO
INSTALACIÓN
Ponga la máquina cerca
del lugar de uso sin la base
del embalaje.
Corte las cintas del tubo.
Desenroscar el tornillo
central (A); desenroscar los
4 tornillos laterales (B) y
extraer el travesaño (C).
Inclinar la máquina hacia
delante y sacar los sacos de
plástico que contienen los
dos protectores de plástico
puestos sobre 2 lados,
tirando hacia abajo.
Tapar un agujero utilizando
el tapón que contiene la
bolsa con las instrucciones.
ATENCIÓN:
NO DEJE AL ALCANCE
DE LOS NIÑOS LOS
ELEMENTOS DE
EMBALAJE YA QUE
PUEDEN SER
PELIGROSOS.
SL
P
PO
OG
GLLA
AV
VJJE
E 5
5
NAMESTITEV IN
PRIKLJUÖITEV
STROJA
Stroj brez podstavka
postavite v bliïino mesta,
kjer bo stalno prikljuöen.
Prereïite objemko, s katero
je prevezana odtoöna cev.
Najprej odvijte osrednij vijak
“A
A”, nato odvijte 4 stranske
vijake “B
B” in odstranite
preöno letev (C).
Stroj nagnite naprej in
potegnite navzdol 2
plastiöni vreöki napolnjeni s
stiroporom. Vreöki sta
nameäöeni na boönih
straneh stroja.
Zaprite odprtino na zadnji
steni stroja s pokrovökom, ki
je priloïen v vreöki s
priborom.
O
OP
PO
OZZO
OR
RIILLO
O::
D
DE
ELLO
OV
V E
EM
MB
BA
ALLA
AÏÏE
E N
NE
E
S
SM
ME
ETTE
E P
PU
UД
ДЦ
ЦA
ATTII N
NA
A
D
DO
OS
SE
EG
GU
U O
OTTR
RO
OK
K,, K
KE
ER
R
JJE
E LLA
AH
HK
KO
O ZZA
AN
NJJE
E
N
NE
EV
VA
AR
RN
NA
A..