RIDGID KJ-3100 User Manual
Page 11
KJ-2200/KJ-3100 Water Jetting Machines
9
pressure water, chemical burns, infections, carbon
monoxide and other causes, and prevent jetter
damage.
1. Check work area for:
• Adequate lighting.
• Flammable liquids, vapors or dust that may ignite.
If present, do not work in area until sources have
been identified and corrected. The jetter is not ex-
plosion proof and can cause sparks.
• Clear, level, stable dry place for machine and opera-
tor. If needed, remove the water from the work area.
Wood or other coverings may need to be put down.
• Jetter location that is in a well ventilated outdoor
area. Do not place the jetter indoors, even with
doors and windows open. Jetter can be located
remotely from the point of use.
• Suitable water supply.
• Clear path to transport the jetter to the set up lo-
cation.
2. Inspect the drain to be cleaned. If possible, deter-
mine the access point(s) to the drain, the size(s) and
length(s) of the drain, distance to tanks or mainlines,
the nature of the blockage, presence of drain clean-
ing chemicals or other chemicals, etc. If chemicals
are present in the drain, it is important to under-
stand the specific safety measures required to work
around those chemicals. Contact the chemical man-
ufacturer for required information.
If needed, remove fixture (water closet, etc.) to allow
access to the drain. Do not feed the hose through a
fixture. This could damage the hose and the fixture.
3. Determine the correct equipment for the application.
See the Specifications section for information on these
jetters. Drain cleaners and jetters for other applica-
tions can be found by consulting the RIDGID Catalog,
on line at www.RIDGID.com or www.RIDGID.eu .
4. Make sure all equipment has been properly inspected.
5. Evaluate the work area and determine if any barri-
ers are needed to keep bystanders away. Bystand-
ers can distract the operator. If working near traffic,
erect cones or other barriers to alert drivers.
6. If needed, place protective covers in the work area.
The drain cleaning process can be messy.
7. Take the jetter to the well-ventilated outdoor work area
along the clear path. If the machine needs to be lifted,
use proper lifting techniques. Use care moving equip-
ment up and down stairs, and be aware of possible slip
hazards. Wear appropriate footwear to help prevent
slips.
Water Supply
Confirm that there is sufficient water flow for jetter. Run a
hose from the water source to the jetter. Use the largest di-
ameter, shortest length hose possible. A
3
/
4
” / 19 mm I.D.
hose is the minimum recommended size. An appropriate
backflow prevention device should be used to comply
with all local codes and ordinances. Turn the water on at
the source and measure the time it takes to fill a clean five
gallon / 18,9 liter bucket. See the following table for maxi-
mum bucket fill times for each jetter.
Jetter
Rating
GPM / liter
Maximum 5 Gallon / 18,9 liter
Bucket Fill Time
KJ-2200
2.4 / 9
125 seconds
KJ-3100
5.5 / 20
55 seconds
Insufficient water flow will prevent the jetter from reaching
the pressure rating and could damage the pump. Inspect the
water in the bucket for dirt and debris. Dirt and debris in the
water supply can cause excess pump wear, clog the jetter fil-
ters nozzles and reduce performance. Do not use water from
ponds, lakes or other sources that may be contaminated.
In cases of insufficient water flow, possible solutions in-
clude using fittings to allow multiple supply hoses to be
connected to the jetter or the use of a tank.
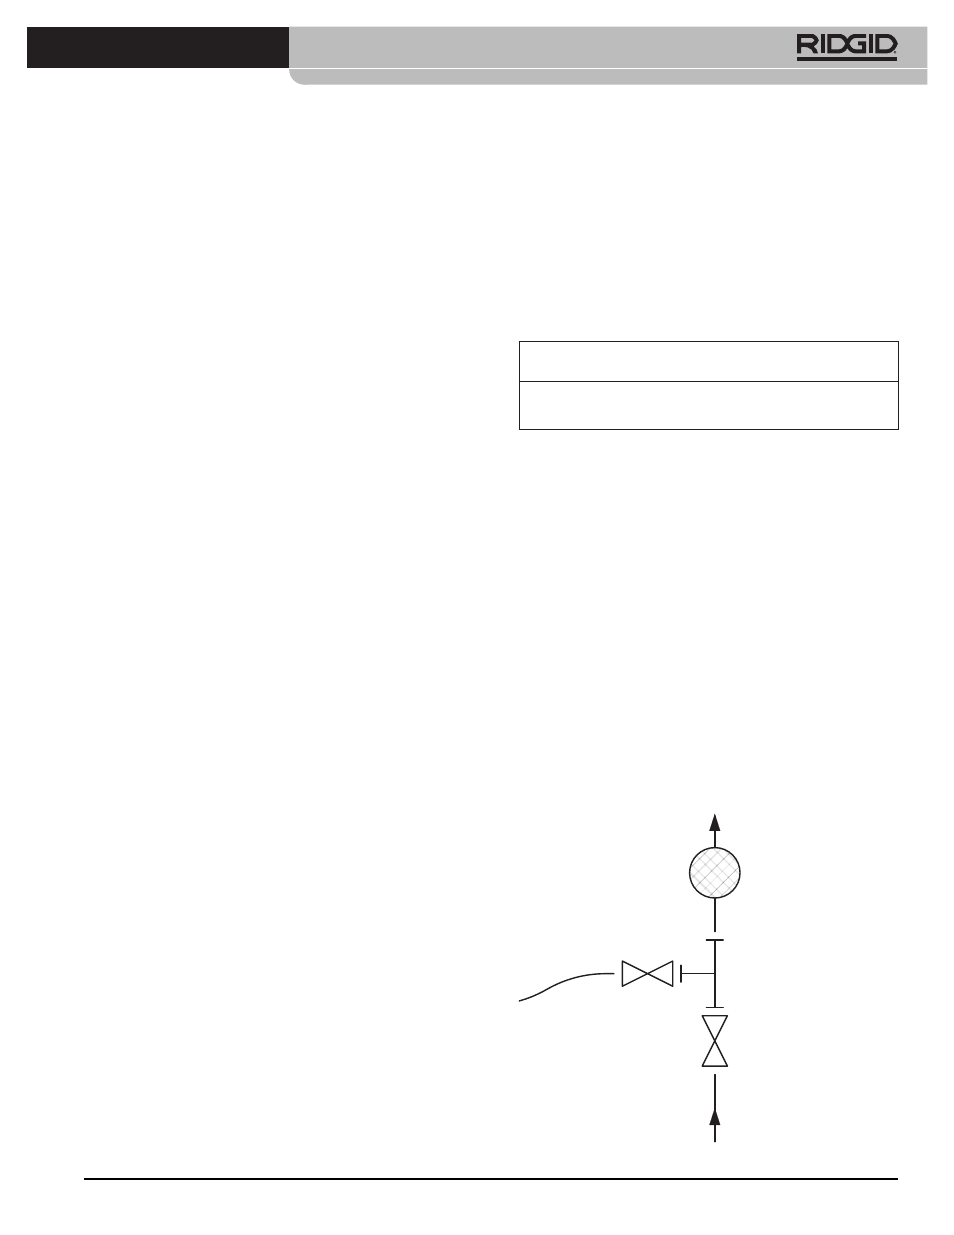
If a tank is used, plumb a tee with full port valves to the
jetter water inlet as shown in Figure 9. Connect a
3
/
4
” /
19 mm hose no longer than 6 feet / 1,8 m to the valve
on the outlet of the tee, and connect the water supply
to the run of the tee. Either place the hose end in the
tank or connect to the tank outlet. The entire length
of the tank hose should be no more than 5” / 12,7 cm
above the jetter water inlet, or the jetter will not draw
water from the tank.
Figure 9 – Water Supply Connections When Using A Tank
Water In To Jetter
Inlet Filter
Tee
Full Port Valve
Hose To Tank
Water Supply In