Optional (installing optional laminate kit), True food service equipment, inc, Installation / operation instructions – True Manufacturing Company TCGR-50 User Manual
Page 15
............ www.truemfg.com ............
True Food Service Equipment, Inc.
13
13
INSTALLATION / OPERATION INSTRUCTIONS
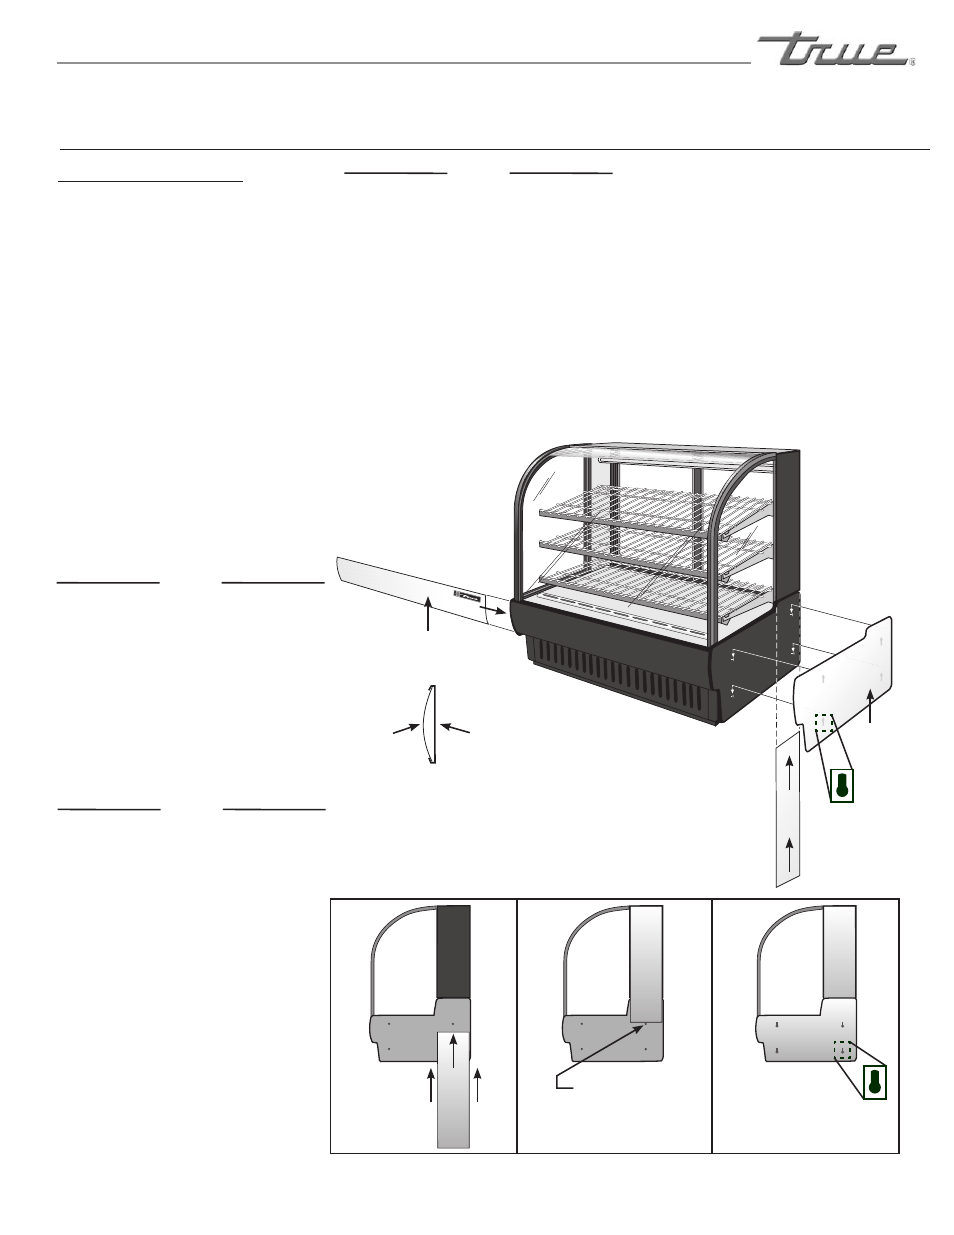
OPTIONAL (INSTALLING OPTIONAL LAMINATE KIT)
Laminate Kit Components
2 Laminate Top End Pieces
Dimensions: width = 10-3/4”
height = 33”.
2 Bottom End Pieces (1) one left side
(1) one right side (Laminate
glued to black plastic panel with
4 key-hole slots)
1 Laminate Front Piece
Dimensions: width will vary but
the height is 7-5/8”
NOTE:
Please use care when installing the
laminate. Laminate can chip, crack,
or break.
NOTE:
Refer to figure 1 for placement of
laminate panels.
STEP 1
To install the front laminate panel:
Installing front laminate piece.
Make sure the bottom end pieces are
off in order to install the top front
laminate piece. Slide laminate into
top and bottom tracks on the front
of the cabinet. Make sure laminate
is even on both left and right end of
the cabinet. See figure 1 & 2.
STEP 2
Install the upper end laminate panel
one on each side. (This applies to
both sides)
Install top end pieces. Make sure
the bottom end pieces are off in
order to install the top side laminate
piece. Both side laminate pieces are
the same size to they each can be
used for left or right of the cabinet.
Slide laminate up into black plastic
tracks on the top side piece of each
cabinet. See figure 1, 2, & 3.
NOTE:
After installing the bottom end pieces
the top end laminate will stay in place.
STEP 3
Installing bottom end pieces (laminate
is pre-glued to black plastic panel).
Line up the for keyhole slots in each
bottom end piece to the 4 screws on
the side of the cabinet. Slip the 4 large
keyholes from the bottom end piece
over the 4 screws. Then push down to
fasten the bottom end piece onto the
cabinet. See figure 1 & 3.
NOTE:
The bottom left and right pieces are
not the same. The taller part of the
bottom end piece goes to the rear of
the cabinet. As shown in figure 3.
STEP 1
STEP 3
STEP 2
Figure 1
Figure 2 (Step 1 & 2)
Side view of laminate
sliding into place for
front piece and top end
piece.
Laminate top
end piece will
slide up into
plastic tracks.
Laminate top
end piece will
rest on screw.
Laminate bottom
end piece will lock
into four screws through
keyholes on backside of
bottom end piece.
Tracks to hold
laminate.
Laminate
Figure 3