Warning – TOA Electronics CST38MH User Manual
Page 4
NOTE: DIAGRAMS & ILLUSTRATIONS ARE NOT TO SCALE.
4
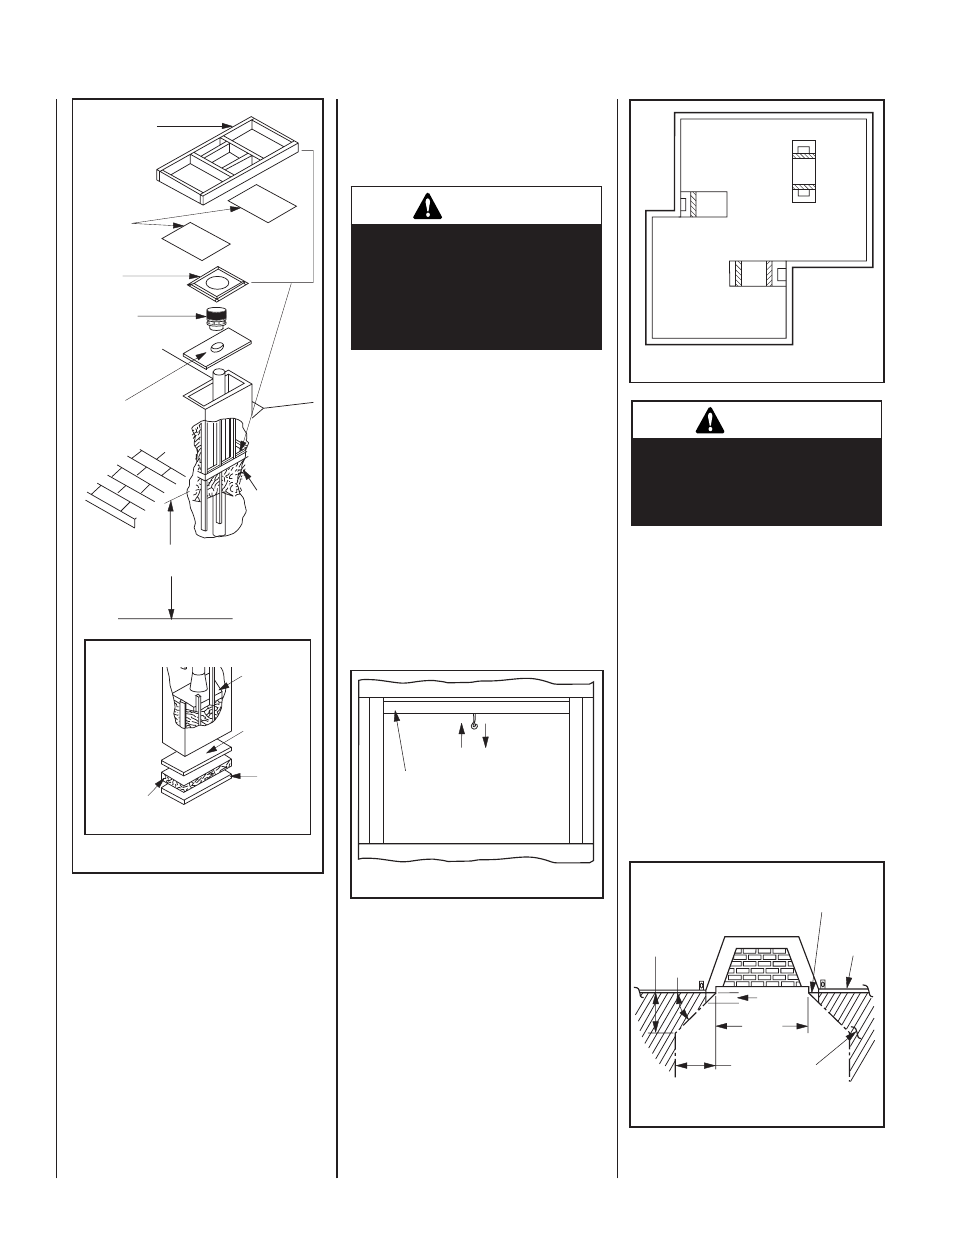
Figure 2
assembly ouTlIne
before you start
Check your inventory list to be sure you have
all the necessary parts supplied in good us-
able condition. Check also for any concealed
damage.
Check the operation of the damper. The damper
is controlled through the use of a control lever
located within the firebox opening at the top
center just behind the firebox lintel (Figure 3).
The control lever snaps into place at the extreme
range of motion, up and back in the closed
position. When pulled forward and down, the
damper is open.
Figure 3
locaTIon of fIrePlace
Carefully select the proper location for heat
circulation, aesthetics, chimney obstructions
and clearance to side wall(s). With proper pre-
planning, a slight adjustment of a few inches
can save considerable time and expense later
during construction and assembly.
Figure 4
Carefully consider the position of the fireplace
opening with respect to the location of adjacent
or nearby stairwells, bath or kitchen exhaust
fans and/or return air registers for forced air
furnaces/air conditioners that could cause a
smoking fireplace condition if the house is
tightly insulated.
When locating the fireplace, consideration must
be given to combustibles and final finishing. For
an example of this, see Figure 5 and confine
the final location of combustible finish materials
to the "Safe Zone".
DO NOT permanently place furniture or other
items such as decorative pillows within 60" of
the fireplace front face.
Figure 5 - Clearances
Wall
Covering
Black Portion Of Frame
Not To Be Covered With
Combustible Materials
Safe
Zone
30
°
11-3/8”
18”
Door
Opening
1”
Insulate Joists
Same As Ceiling
Draft Stops
Firestop
CTDT
Termination
Note: Non-
Combustible
Chase
Flashing
Must Be
Used To
Cover
Chase
Opening
Optional
Insulation
In Outside
Walls Of
Chase
8'
Level
Ground Level
damper
closed
damper
open
lintel
warnInG
do not obstruct the collar open-
ings around the base of the chim-
ney at the top of the fireplace.
do not insulate the chase cavity
with blown or fill type insulation
materials.
chimney enclosure
Construct a box-like framed structure to enclose
the fireplace and chimney within the confines
of the manufactured home, not necessarily
above the roof line.
As with all chimney installations, avoid overhead
obstructions such as trees, power lines, etc.
The chimney/fireplace enclosure should be
constructed and insulated just like any outside
wall. In a cold climate, we recommend the base
of the chimney/fireplace enclosure should also
be insulated between the solid continuous floor
beneath the fireplace and the chase bottom.
Insulation in a cold climate installation is not
required for safety.
warnInG
This fireplace and chimney
system is not approved for use
in a bedroom or any room used
for sleeping.
Insulate Joists
Same As Ceiling
Draft Stops
Firestop
CTDT
Termination
Note: Non-
Combustible
Chase
Flashing
Must Be
Used To
Cover
Chase
Opening
Solid
Fireplace
Continuous
Surface
Base
Insulation
(Thermal Barrier)
Note: Local codes may not require firestopping
at the ceiling levels for outside chimney enclo-
sure installations. However, it is recommended
for safety and the reduction of heat loss.
base requirements
Front Face
Model Shown