Orion STARSHOOT G3 User Manual
Page 10
18
19
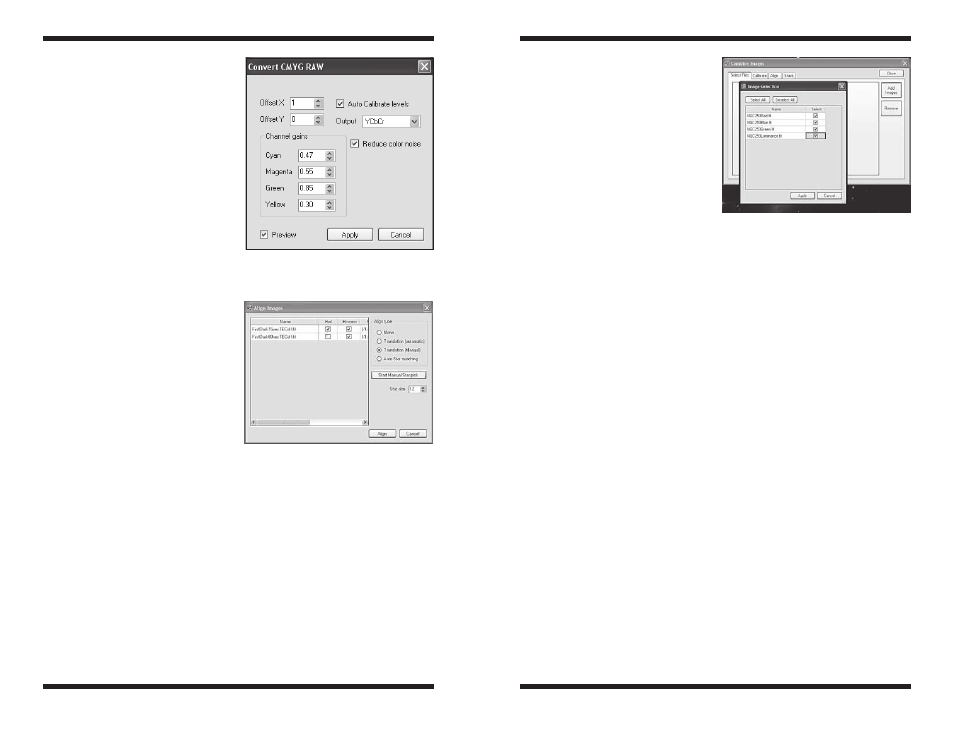
Convert to Color (For the StarShoot
G3 Color only)
1. With your calibrated images still
open, goto the
Process menu
and select
Color, then CMYG
Raw conversion. We recommend
using the default values (Figure
18), but you may adjust them to
your liking.
2. Click apply to complete the color
conversion.
Align
1. With your images still open, goto
the
Process menu and select
Align. The Align Images window
will appear.
2. Select
Auto Star matching and
click
Align. The images should
automatically align. If they do not
appear to align correctly when
they are combined later, you can
manually align the images by
selecting
Translation (Manual)
and select a star in each image to
align to by clicking
Start Manual
Star Pick (Figure 19).
Combine
1. With your images still open, goto
the
Process menu and select
Combine. The Combine Images
window will appear (Figure 16).
2. Since you have already calibrated and aligned your images, proceed to the
Stack tab. Remember that if you are using the StarShoot G3 Monochrome,
you can perform all of these tasks in each of the tabs of the
Combine
Images window.
3. Select
Add Images, then Select All, then Apply (Figure 20).
4. Proceed to the
Stack tab. Keep the default settings. We recommend Sigma
Reject which is effective at removing unwanted leftover hot pixels, satellite
trails, or other unwanted artifacts from your image.
5. Click
Combine, and your resultant image will appear. If the image did
not appear to combine correctly, go back to the
Align tab and try to use
a different alignment method.
Normally the
Auto Star matching
is the easiest method.
Getting a Color Image with the
G3 Monochrome
The G3 Monochrome requires captur-
ing images through a series of filters,
such as Luminance, Red, Green and
Blue filters to obtain a color image,
or with specialized narrowband filters.
The image processing program ulti-
mately wants to have image data for
Red, Green and Blue.
Camera Studio allows you to export 16
bit TIFF files or the raw FIT files to your favorite post image processing program
such as Photoshop. Save and export each of your color channel images from the
Monochrome G3. If you used LRGB filters, export each of the LRGB images to a
program like Photoshop. Before exporting, align and combine each of the LRGB
images individually, then align the LRGB together, but do not combine them yet.
Add the RGB images to a new RGB layer in Photoshop or similar program that
uses layers. Assign your red image (which will still look monochrome) to the red
channel, green to the green channel, and blue to the blue channel. The image
should then appear in color. then add the L (luminance) layer and select “color”
in the layer mode. This can also be performed in freeware programs like Paint.
Net. Import the luminance layer and select “color” in the layer mode. The image
detail will come from your luminance image, and all color detail will come from
your RGB images. There are several different ways to process the color this way,
especially if you use narrowband filters. This give you complete control over the
color balance in your image.
Donald Waid of “Waid Observatory” provides an excellent step-by-step video
tutorial of LRGB processing in Photoshop (or similar program that uses layers).
Visit
www.waid-observatory.com/article-LRGB.html.
5.1 Save and Export
Always save your work in the native .FIT format which will preserve all of the
image data you worked on. .FIT is a common file format for CCD imaging, and
is understood by many other image editing programs, including plugins that are
available for Adobe Photoshop.
You may choose to edit your image further. Camera Studio has several other
image enhancement features, such as sharpening, low pass filters, Gaussian
blur filters as well as color balance adjustments to enhance your image. Explore
these features in the
Process menu. But always save your original FIT file.
Choose
Save As in the File menu to save different versions of your edited work.
Figure 20. Select the open images to
align.
Figure 19. Manual Star Pick can be used
if you have difficulty aligning your images
with the automatic methods.
Figure 18. For G3 Color users: Convert
CMYG Raw is the best way to convert raw
images to color.