Dvd+rewritable – RCA RTD317W User Manual
Page 2
The Info Menu
The Info Menu
Additional Information
Print in China
811-317W91W010
Additional Information
Additional Information
Limited Warranty
Limited Warranty
The Setup Menu
The Setup Menu
Jpeg Files
The Info Menu
Radio
AUDIO IN/AUX IN/OPTICAL IN
Note: Many discs only have one title.
Note: Time display function may not
be available on all discs.
Notes:
• The time taken for the contents of the
disc to be displayed varies according to
the size and number of jpeg files on the
disc. If nothing is displayed after a few
minutes, the file sizes may be too large.
Reduce the files’ resolution and write
another disc.
• Before inserting a disc, make sure it is
compatible with the unit.
Title/chapter (DVD)/track (audio CD)
To directly access a title, chapter (DVD) or a track
(audio CD), press INFO, press OK.
Select the Title(TT), Track(TRK) or Chapter(CH)
icon and enter a number directly with the numeric
buttons. Press OK again to confirm.
Subtitles (DVD)
Subtitles are turned off by default. Turn on subtitles
as follows:
1. While the disc is playing, press INFO twice, then
select the Subtitles icon using the left/right
arrow buttons.
2. Select a language using the up/down arrow
buttons.
3. To turn subtitles off, select the off option or
press SUBTITLE on the remote.
When you change the language of the subtitles
using the Info menu, it only applies to the disc
currently being played. When you eject the disc
and switch off the unit, the subtitles will default
to the subtitle language you selected in the
Languages menu.
This function may not be available on all discs.
Time display
To access the Time Display, press INFO on the
remote. Press the up/down buttons repeatedly to
display:
DVD: Chapter elapsed time, Chapter remaining
time, Title elapsed time and Title remaining time.
Audio CD: Track elapsed time, track remaining time,
disc elapsed time, disc remaining time.
To directly access a location on the disc which does
not correspond to the start of a title or chapter,
press INFO once and press OK, highlight the Time
Display icon using the arrow buttons, then enter
a time with the number buttons (hh:mm:ss) and
press OK.
Audio (DVD)
Some discs have several audio tracks used for
different languages or different audio formats.
To change the language or audio format during
playback:
1. Press the INFO button twice.
2. Use the left/right arrow buttons to select the
Audio icon, or press the AUDIO button on the
remote control.
3. Choose a language or an audio format with the
up/down arrow buttons.
This option is only available if the disc offers dialog
languages or audio formats. When you change
the dialog language using the Info menu, it only
changes the dialog language of the disc being
played. When you eject the disc or switch off
the unit, the language will revert to the one you
selected in the language Setup menu.
Camera angle (DVD)
Some discs offer different camera angles for
specific scenes.
1. To change the camera angle, press the ANGLE
button on the remote or press the INFO button
twice and select the Camera angle icon with the
left/right buttons.
2. Choose the angle with the up/down arrow
buttons.
If the disc was recorded using a single camera
angle, this function is not available.
Play mode (all discs except jpeg)
1. While the disc is playing, press the INFO button
twice for CD and three times for DVD.
2. Select the Play Mode icon using the left/ right
arrow buttons.
3. Use the up/down arrow buttons to select an
option.
• DVD play modes: standard, program, A-B
repeat, title repeat, chapter repeat. Program
play mode is only available if a program list
has been created (see below). Repeat mode is
only available with discs that display elapsed
time and remaining time. To repeat a sequence
between points A and B, choose the A-B repeat
option, and then follow the instructions for
entering the two points.
• Audio CD play modes: standard, introscan,
random, program, repeat A-B, repeat disc,
repeat track.
4. To stop repeat playback, select the Play Mode
icon and use the up/down arrow buttons to
choose the Standard option.
Creating a Program List for Program
Play Mode (Audio CDs and DVD discs)
To use program play mode, you must first create
a program list.
1. To create a program list, press the INFO button
twice for CD and three times for DVD. Highlight
the Play Mode option and press the up arrow to
select the Program option.
2. Press OK. The Program screen is displayed.
3. The first spot in the list is highlighted. Use the
number buttons on the remote to enter a track
number. As for DVD discs: T stands for Title while
C stands for Chapter. As for Audio CDs: T stands
for Track.
4. Use the arrow buttons to move to the next spot
in the list. Enter the next track number.
5. Continue entering tracks until you have
completed your list.
6. Highlight the Play option at the bottom of
the screen and press OK or press PLAY to start
playback. The program list will play in the order
you programmed it.
Introscan (CD)
This option plays the first ten seconds of each track
on a CD.
1. Press the INFO button twice, then select the Play
mode icon with the left/right arrow buttons.
2. Press the up/down arrow buttons to select the
INTRO option and press OK to start IntroScan.
3. Press STOP to stop Introscan, and press PLAY to
resume normal playback.
Bookmark (DVD and audio CD)
1. Press INFO twice for CD and three times for DVD.
Select the Bookmark icon with the left/right
buttons, and press OK. A menu is displayed with
five bookmarks.
2. The first bookmark space is highlighted. Press
OK to set the bookmark. The bookmark is saved
and is indicated by the number 1. You can set up
to five bookmarks on a disc.
3. To start playback from a bookmark, press the
PLAY button on the remote.
4. To delete a bookmark, highlight it and press
CLEAR.
To stop program play, press STOP or select Standard
from the Play Mode option in the INFO display.
If you want to cancel the list, repeat Steps 1 and 2
to select CLEAR and press OK.
Sleep
1. Press INFO twice for CD and three times for
DVD.
Select Sleep icon with the left/right arrow
buttons.
2. Select one of the available options using the Ok
button : Off, 30, 60, 90 or 120 minutes.
The unit has a built-in tuner that allows for FM
radio function. The AM loop antenna allows for AM
radio function.
Manual tuning
1. Connect the FM antenna and the AM loop
antenna at the back of the unit.
2. Press TUNER.
3. Tune a station by pressing TUNER+/-repeatedly
until the desired station is found. Alternatively,
you can press and hold the same buttons down
for about one second to activate the automatic
search function. In this mode the unit will
automatically tune frequencies until it finds a
station.
4. Repeat step 3 to tune to another radio station.
5. Press TUNER to toggle between FM and AM.
Storing radio stations
The unit can store up to 30 radio stations in its
memory. You can enter every single radio station
yourself or the unit can store all available radio
stations automatically in ascending order.
Automatic preset programming
1. Press TUNER to enter the Tuner mode.
2. Press and hold TUNER for two seconds to start
automatic preset programming.
3. Radio frequencies will be browsed and radio
stations stored automatically. When all the
available radio stations are stored or all 30
memory locations are full, the auto preset
programming function will stop.
Manual preset
1. Tune to a radio station (see “Manual tuning” for
details).
2. Press MEMORY. While the Program Preset
number is still flashing, input your desired
preset number using the numeric buttons, then
press MEMORY to store it.
Retrieving preset stations
1. Press TUNER to enter the Tuner mode.
2. Press CH +/- to search up or down for the preset
stations or directly press the numeric buttons.
TV, VCR or Set Top Box can be connected to AUX
IN / OPTICAL IN input jacks at the back of the unit
or AUDIO IN at the front panel so that sound from
the auxiliary component comes into the unit and
out through the speakers.
Connecting auxiliary components
Refer to “Getting sound from external sources
such as TV” for details on connecting the auxiliary
components to the unit.
Selecting AUDIO IN/AUX IN/OPTICAL IN
mode
Press either SOURCE on the main unit or AUDIO/
AUX/OPTICAL on the remote control to select
AUDIO IN, AUX IN or OPTICAL IN mode.
Sound output in AUX IN mode (or AUDIO
IN/OPTICAL IN mode)
• You may change the surround setting by
pressing SURROUND to select between 5.1
CHANNEL and Stereo modes.
• If the AUX IN (or AUDIO IN/OPTICAL IN) audio
signal is mono, you may not receive audio on
all speakers.
6. During the slide show you can use the left/right
button to rotate the picture, the up arrow but-
ton to rotate the image vertically, the down
arrow button to rotate the image horizontally.
Use the ZOOM button to magnify the picture.
Use the CH- button to go back to the previous
picture or the CH+ button to go to the next one,
and the STOP button to interrupt the slide show
and display the disc’s contents.
7. When the unit has played all the files, the music
or slide show stops and the disc’s contents are
displayed again.
8. Press STOP to end playback.
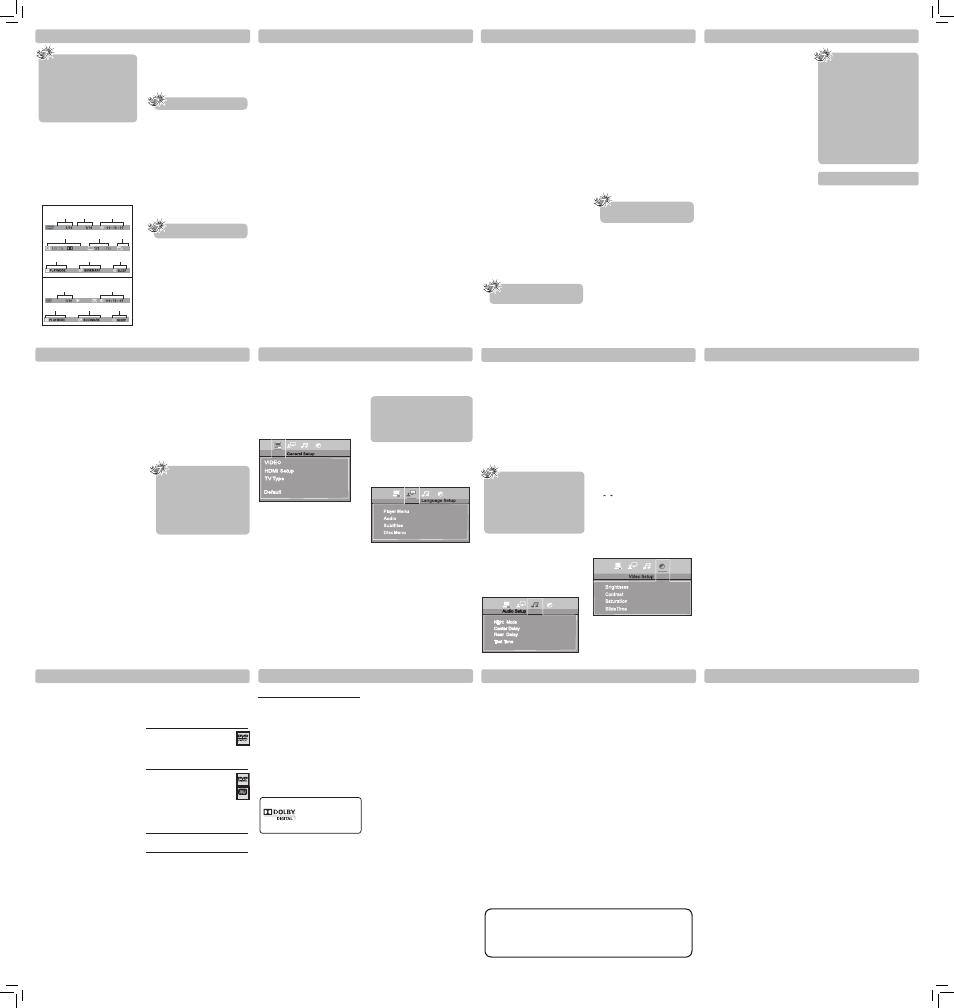
There are four options in the main setup menu:
General Setup, Language Setup, Audio Setup and
Video Setup.
Press SeTUP to bring up the main menu. Select
one of the menu icons across the top of the screen
using the left/right arrow buttons. The menu’s
options are displayed on the left side of the
screen. Press the right arrow button to move to the
option’s choices on the right. Press SeTUP if you
want to exit setup.
GENERAL SETUP
Video
Progressive Function provides high quality
pictures with less flickering. Turn on Progressive
Scan if you used the Component Video jacks of the
unit to connect a TV or monitor compatible with a
progressive scan signal.
Select P-Scan YPbPr and press OK to activate
Progressive Scan.
HDMI Setup
This lets you select the resolution of the player’s
output according to the connected TV.
• Supported HD JPEG mode: 480p, 720p, 1080i
and 1080p.
TV Type
Depending on the format of the DVD disc, you can
choose the picture format (aspect ratio) best suited
to the format of your TV screen:
• 4:3 PS: reproduces a 4:3 picture without
distortion.
• 4:3 LB: gives best reproduction of pictures recorded
in this format (i.e. with horizontal bands at the top
and bottom of the screen) or in 16:9.
• 16:9 (widescreen): reproduces 16:9 format films
in full on a 16x9 screen.
Default
This option allows you to return the unit’s settings
to the original factory settings. Any changes you
have made to the unit’s settings will be reverted
back to the original settings.
Subtitles
Select the subtitle language using up/down arrow
buttons and press OK.
To change the language of the subtitles during
playback, press INFO twice for DVD and use the
left/right arrow buttons to highlight the Subtitle
icon. Press the up/down arrow buttons or the
SUBTITLE button on the remote to select a subtitle
language.
Disc Menu
To change the language of the disc menus, select
the language using the up/down arrow buttons
and press OK.
The language you select will only be displayed if
the disc is programmed with that language.
AUDIO SETUP
You can adapt your unit to other equipment and
access specific functions with the Audio Setup
menu.
1. Select the Audio Setup icon in the main menu
using the left/right arrow buttons.
2. Select an option using the up/down arrow but-
tons. Press the right arrow to move to the op-
tion’s choices.
Night Mode
You can use this function to control the different
sound levels via dynamic compression. It improves the
quality of the sound track at a low volume, and quiets
the loudest sounds. You can choose between Quiet,
Moderate or Off.
Center Delay / Rear Delay
Basic settings have been preset for the speakers included
with your unit. However, to suit the acoustic conditions
in your listening room and to make the sound more
effective, you may need to delay the signal coming from
some of the speakers. Channel delay compensates for
centre or surround speakers that are closer to the listening
position than the front speakers.
1. Highlight the Center Delay/Rear Delay option using
the up/down arrow buttons.
2. Press the right button to move to the default
distance.
3. Press the up/down buttons to adjust the distance.
Test Tone
This function is used to test and adjust the volume level
(gain) for each individual speaker channel.
Use / to select the speaker channel you wish to
test and adjust. You’ll hear a test tone come from the
speaker you select. Use the VOL button to adjust the
level to your desired setting.
Press OK button to exit this function.
ViDeo SeTup
1. Select the Video icon in the main menu using the
left/right arrow buttons.
2. Select a menu option using the up/down arrow
buttons and press OK.
Slide Time
The Slide Time option lets you select the amount
of time a picture is displayed in a slide show. The
choices are 5 seconds, 10 seconds, or 15 seconds.
Troubleshooting
The unit does not switch on.
• Make sure it is plugged in.
• Press the ON•OFF button on the remote control
or the ON/STANDBY button on the front of the
unit.
The device switches off spontaneously.
• The device switches off automatically when it is
in STOP mode for more than 30 minutes without
any user intervention. Switch it on again.
• It might be impossible to read the disc.
• Insert the disc with the printed side facing up.
• Check that the disc can actually be played by
this device.
• Check that the disc’s regional code matches the
unit’s regional code. This unit’s regional code is
1.
• Clean the disc.
There is no picture.
• Check you have switched on the TV set.
• Check the connections.
• Select the AV input assigned to the unit on the
TV.
• Replace the HDMI cable with a better one. Bad
HDMI cable can cause data lost.
• Press HDMI key on remote handset several times
to toggle among different HD OUTPUT.
The picture is of poor quality (with snow or
lines).
• Check the connections.
There is no sound or the sound is of poor
quality.
• Check the connections.
• Make sure the speakers are connected.
• Make sure the MUTE function is not on.
No surround sound.
• Check the speaker configuration in the Setup
menu (See Positioning speaker or Audio Setup).
I can’t find my file in the jpeg listing.
• Make sure the file name is valid.
The remote control does not work or works
only intermittently.
• Check that batteries are inserted or change
them.
• Aim the remote control at the unit. The infrared
beam must not be blocked or interrupted.
• Check that the remote control is configured
to control the device you are trying to operate
with it.
The subtitles do not appear.
• Check that the DVD disc provides subtitles.
• Refer to the section on how to display sub-
titles.
The disc menu language is not the correct one.
• The disc menu language has not been set up.
• The language of your choice is not available
on the disc .
Precautions
Use
• If your unit has been stored in a cool place for any
length of time, during a journey for example, wait
for about 2 hours before using it.
• The openings located on the top and
bottom are for ventilation and must not be
obstructed.
• During thunderstorms, we recommend that
you isolate the unit from the electrical supply
so that it is not damaged by electrical or
electromagnetic surges.
• This unit is designed for continuous use.
Switching off the unit to standby mode does
not disconnect it from the mains supply. To
completely isolate the equipment, remove the
plug from the mains jack as some components
remain connected to the electrical supply.
• If you notice any burning or smoke, disconnect
the unit immediately to avoid any risk of
electrocution.
• Do not attempt to look inside the unit through
the disk tray opening or any other opening.
You may be electrocuted or exposed to laser
radiation.
• This unit is for domestic use only and must not
be used for industrial purposes.
• Total or partial copying of recordings protected
by copyright legislation, without the explicit
permission of the holder of the rights,
contravenes current legislation. Copying
or downloading music files for sale or any
other business purpose constitutes or could
constitute a violation of copyright law.
Cleaning
• Use a soft, dry, clean cloth. Regularly dust the
vents at the back or sides.
• Using solvents, abrasive or alcohol-based
products risks damaging the unit.
• If an object or liquid enters inside the unit,
unplug it immediately and have it checked by
an authorized servicer or service center.
Handling and caring for discs
• Handle your discs with care. Hold the disc with
your fingers at the edges or through the hole.
• Insert the disc with the label facing up (for a
single-sided disc).
• Place the disc properly into the tray in the
allotted holder.
• Use a soft cloth to clean discs if necessary,
always wiping from the centre to the edge.
• Always put discs back in their cases after use
and store in a vertical position.
• Do not close the tray with two discs in it or with
a disc not sitting correctly in the holder.
• Do not play cracked, chipped or warped discs
nor try to repair them with adhesive tape or
glue.
• Do not write on a disc.
• Do not move the unit when a disc is being
played.
• Do not scratch discs or store them in places
exposed to direct sunlight, high humidity or
high temperatures.
• Do not use aerosol cleaners, benzene, anti-static
liquids or any other solvent for cleaning discs.
When cleaning, wipe gently with a soft damp
(water only) cloth from the centre to the edge,
avoiding circular motions, which could cause
scratches and interference during playback.
DVD-Video
Digital video discs - 12 cm, single or
double sided, single or dual layer. DVDs
are high density optical discs on which
high quality picture and audio are
recorded by means of digital signals.
DVD-R, DVD-RW, DVD+R, DVD+RW
Most DVD-R and DVD+R (one recording
only), DVD-RW and DVD+RW discs
(rewritable), depending on the DVD
writer and discs used. Recordings using
DVD-R and DVD-RW discs must be made
in Video DVD mode. Recordings using
DVD+RW discs must be made in accordance with
the specifications for DVD+RW discs with a 4.7 GB
capacity.
Audio CDs
Audio CDs (12 cm).
CD-R, CD-RW
Most CD-R (one recording only) and
CD-RW discs (rewritable).
CD-Rs written during a multisession recording can be
played, provided that the session has ended before
the disc is played (depending on the write software).
Compatible Formats
In order to ensure playback, discs must conform
with DVD or CD standards. This unit may not play
some recordings or files due to differences in
recording formats, software used and disc types.
However, depending on the condition of the CD-
writer, computer and the disc used, you may find
that not all discs will play. When playing a CD-R disc,
it is normal for the unit to take up to 60 seconds to
recognize the disc before starting to play.
If the disc is not recognized after a period of 120
seconds, remove the disc, and insert it again.
• Do not use its full capacity.
• CD-Rs should be preferably used instead of CD-
RWs (rewritable CDs) as, in certain cases, CD-RW
playback may be faulty.
• Use reliable, good-quality CD write software.
• Close all other applications on the computer to
ensure reliable CD-R disc recording.
Jpeg files
CD-R and CD-RW with jpeg files. Certain jpeg files,
in cluding progressive jpeg files, cannot be read by
this unit.
When composing your title, use 10 characters or less,
no spaces, and avoid the use of special characters
including (. , / , \ , = , +).
The total number of files and folders on the disc
should be less than 650.
Make sure that files have the “.jpg” extension. Files
without the “.jpg” extension will not be able to be
read by the unit --- even thought the files are shown
as jpeg images on your computer.
Sound Enhancement Systems
This receiver is equipped with several built-in
sound enhancement systems.
Manufactured under license
from Dolby Laboratories.
”Dolby”, “Pro Logic“, and
the double-D symbol
are trademarks of Dolby
Laboratories.
Technical Specifications:
Amplifier Section:
RMS Output Power: Dolby Digital Mode with 10%
Total Harmonic Distortion
Rear Channels: 32 Watts/channel (1kH, 4Ω)
Front and Center Channel: 32 Watts per channel
(1kHz, 4Ω )
Subwoofer Channel: 40 Watts (100Hz, 3Ω)
Total RMS Output Power, Dolby Digital mode: 200
Watts
Muting Attenuation: 70 dB
Frequency Response:
200Hz – 20KHz/3dB, 1KHz ref.
Subwoofer Frequency Response:
20Hz – 200Hz /-3dB, 100Hz ref.
Signal to Noise Ratio: 70 dB (Dolby Digital)
AM Tuner Section:
Frequency Response: 2kHz +/-3dB, 400Hz ref.
Usable Sensitivity: 3000uV/m @ S/N 20dB
Signal to Noise: 38dB
IF Rejection: 35dB
FM Tuner Section:
Frequency Response: 15kHz +/-3dB, 1kHz ref.
Quieting: 24dB
Signal to Noise: 62dB(stereo) / 65dB(mono)
IF Rejection: 70dB
Dimensions (H x W x D mm) :
Unit: 66 x 430 x 240
Front Speakers: 214 x 78 x 69
Center Speaker: 290.5 x 78 x 69
Rear Speakers: 214 x 78 x 69
Subwoofer: 312.5 x 155 x 273.5
AVC MULTIMEDIA ("AVC") makes the following limited warranty. These limited warranties extend to the
original consumer purchaser and is limited to non-commercial user of the product.
One Year Parts & Labor Warranty
AVC products purchased in the United States are warranted to be free from defects in materials or
workmanship for a period of one year from the date of their original retail purchase. If the unit fails to
conform to this warranty, we will service the product using new or refurbished parts and products, at
AVC's sole discretion.
During a period of one year from the effective warranty date, AVC will provide, when needed, service
labor to repair a manufacturing defect at its designated Service Center. To obtain warranty service in the
United States, you must first call our Customer Support Center at 1-800-506-5746 or 1-877-252-6873,
during the hours listed in the box below. The deternination of service will be made by AVC customer
support.
PLEASE DO NOT RETURN YOUR UNIT TO AVC WITHOUT PRIOR AUTHORIZATION. New or
remanufactured replacements for defective parts or products will be used for repairs by AVC at its
designated Service Center for one year from the defective warranty date. Such replacement parts or
products are warranted for an additional one year from the date of repair or replacement. The Customer
will be required to ship the unit to the Service Center indicated at the time Customer Support is
contacted to make the necessary repairs. The customer is responsible for all transportation charges to
the service facility.
Packaging and Shipping Instruction
When you send the product to the AVC service facility you must use the original carton box and packing
material or an equivalent as designated by AVC.
Your Responsibility
(1) You must retain your bill of sale to provide proof of purchase.
(2) These warranties are effective only if the product is purchased and operated in the U.S.A. or Canada.
(3) Warranties extend only to defects in material or workmanship, and do not extend to any product or
parts which have been lost or discarded, or damage to product or parts caused by misuse, accident,
improper operation or maintenance, or use in violation of instructions provided with the product,
or to product which has been altered or modified without authorization of AVC, or to products or
parts thereof which have had the serial number removed or changed.
Out of Warranty
Dolby Pro Logic
The Pro Logic mode uses the built-in circuit to steer
the Left, Center, Right and Mono Surround channel
audio signals and uses all five speakers to play both
stereo and Dolby Pro Logic program source, such
as TV and VCR.
You can use this mode with any stereo program
source (such as VCR/TV) to enjoy multi-channel
sound experience.
Dolby Digital
The Dolby Digital mode lets you enjoy full digital
surround from software processed in the Dolby
Digital format. Dolby Digital provides better
sound quality and a more powerful presence
than conventional Dolby Surround. This unit is
equipped with Dolby Digital 5.1-channel so that
you can enjoy enhanced full digital surround
sound. The new system provides stereo separation
of the rear speakers (Rear-Right, Rear-Left). Adding
the subwoofer channel to the 5 channels for bass
sounds (counted as 0.1 channel) results in 5.1
channels (or 6 Channels) that bring you the most
sophisticated Dolby Digital sound enjoyment.
DVD+Rewritable
IMPORTANT!
Once Progressive Scan has been activated, an
image will only be visible on a progressive scan
TV or monitor. If you choose this option and you
don’t have a progressive scan TV or monitor,
you may get a picture with incorrect color or
no color.
Notes:
• If the selected language is not available
on a disc, the disc’s language will be used
instead.
• If the language chosen is available, it is
automatically selected when you display
the subtitles or press SUBTITLE on the
remote control. Otherwise, the subtitle
language indicated on the disc is selected.
Note: This function is not available
AUX IN /OPTICAL IN / AUDIO IN /
TUNeR mode.
Note: This function is only available
with discs whose elapsed time or remaining
time appears in the Info menu.
Tips:
• When the FM station broadcasts Stereo
sound is found, ST is displayed.
• When you manually tune into a weak FM
station, press AUDIO on remote control to
switch from Stereo to Mono mode. This
will reduce the background noise.
• If there is any interference, change the
antenna’s position until ideal sound
reception is obtained. TV and other
electronic devices could be the cause
of interference, so try to position the
antenna away from them.
• A weak signal can affect the “Automatic
preset programming” function’s efficiency.
Adjust the antenna for better reception
and a more efficient search.
Playing jpeg files
Jpeg files are image files. Make sure that they have
a resolution of less than 2 megapixels.
1. Open the disc tray.
2. Place the disc with the printed side facing up
and close the disc tray.
The folders on the disc will be listed in numerical
order on the left side of the screen. When you
highlight a folder, then press OK button. The list
of songs or pictures in the folder are listed in
numerical order on the right side of the screen.
3. Select a folder using the up/down arrow buttons
on the remote, then press the left arrow button
to move to the music/picture icons at the
bottom of the screen. Use the left/right arrow
buttons to select either music or picture mode.
4. Press the up arrow button to move to the file
list on the right side of the screen. Use the up/
down arrow buttons to select a file. Press OK or
PLAY to start playback.
5. The unit starts the slide show with the jpeg file
you have selected, then displays all the jpeg
files in the same folder, then all the jpeg files in
the subfolders located in the same folder. You
can set the amount of time a picture remians
on the screen in the General Setup menu.
LANGUAGE SETUP
With this menu, you can set the language for unit
menus, dialog, subtitles and the disc menus.
If you chose “English” during initial set-up, any
menus generated by the disc are in English, and
so is the language of the dialogs (if this language
is available on the disc).
1. Select the Language Setup icon in the main
menu using the left/right arrow buttons.
2. Select one of the options using the up/down
arrow buttons.
3. Press the right arrow button to move to the
language choices.
4. Use the up/down arrow buttons to highlight
the language of your choice and press OK.
Player Menu
Select the language of player menus and press
OK.
Audio
Select the dialog language using up/down arrow
buttons and press OK.
To change the Audio language during playback,
press INFO twice for DVD and use the left/right
arrow buttons to highlight the Audio icon.
Press the up/down arrow buttons or AUDIO on the
remote control to select audio language.
In the event your product requires repair after the limited warranty period has expired, please contact
our Customer Support Center at 1-800-506-5746, 1-877-252-6873 or
www.RCAav.com
Hours: Monday-Thursday: 9am-7pm, Friday: 9am-5pm, Saturday: 9am-NOON Eastern time.
Important:
You are responsible for any transportation, shipping or insurance relative to the return of the product to
our Product Returns Center.
All warranties implied by state law, including the implied warranties of merchantability and fitness for a particular
purpose, are expressly limited to the duration of the limited warranties set forth above. With the
exception of any warranties implied by state law as hereby limited, the foregoing warranty is exclusive
and in lieu of all other warranties, guarantees, agreements and similar obligations of manufacturer
or seller with respect to the repair or replacement of any parts. In no event shall AVC be liable for
consequential or incidental damages.
No person, agent, distributor, dealer or company is authorized to change, modify or extend the terms
of these warranties in any manner whatsoever. The time within action must be commenced to enforce
any obligation of AVC arising under the warranty or under any statute, or law of the United States or any
state thereof, is hereby limited to one year from the date of purchase. This limitation does not apply to
implied warranties arising under state law.
This warranty gives you specific legal rights and you may also have other rights, which may vary from
state to state. Some states do not allow limitation on how long an implied warranty lasts, when an action
may be brought, or the exclusion or limitation of incidental or consequential damages, so the above
provisions may not apply to you.
For more information on other products and services, please contact our web site at
www.RCAav.com
Important: Also keep your “Bill of Sale” as proof of purchase.
Model no. ................................................................................ Product name ...........................................................................
Type of set ............................................................................................................................................................................................
Serial no. .................................................................................. Invoice no. ................................................................................
Date purchased ..................................................................... Dealer name ..............................................................................
FOR SERVICE AND REPAIR, PLEASE VISIT www. RCAav.com
Specifications and external appearance are subject to change without notice.
Notes:
• When you press STOP, the unit stores the point
where playback was interrupted. If you press
PLAY again, playback resumes from this point.
To stop playback completely or to start again
from the beginning, press STOP twice. If the
unit is left in STOP mode for more than 5
minutes without any user interaction, a screen
saver is activated. At the end of 30 minutes
without any user interaction, the unit switches
off automatically.
•
INVALID KEY will be displayed if the function
you select is not available.
DVD Info Display
CD Info Display
TT
CH
5.1CH
OFF
Title
Track
Chapter
Time display
Time display
Audio language
Subtitles
Camera angle
Play mode
Play mode
Bookmark
Bookmark
Sleep timer
Sleep timer
TRK
- 12 -
- 16 -
- 20 -
- 21 -
- 22 -
- 17 -
- 18 -
- 19 -
- 13 -
- 14 -
- 15 -
The Info Menu
1. Press INFO on the remote while a disc is playing
to display the info menu. The first banner shows
title, chapter, and time display information.
2. Press INFO again for audio language, subtitles,
and camera angle.
3. Press INFO a third time for play mode, bookmark
and sleep timer.
4. Use the right/left arrow buttons on the remote
to select an icon.
5. Use the up/down buttons to scroll through the
options.