Installation, Door installation (packaged separately), Log installation – Regency U41 GAS INSERT U41-LP3 User Manual
Page 12
12
Regency U41-3 ULTIMATE Gas Fireplace Insert
DOOR INSTALLATION
(Packaged Separately)
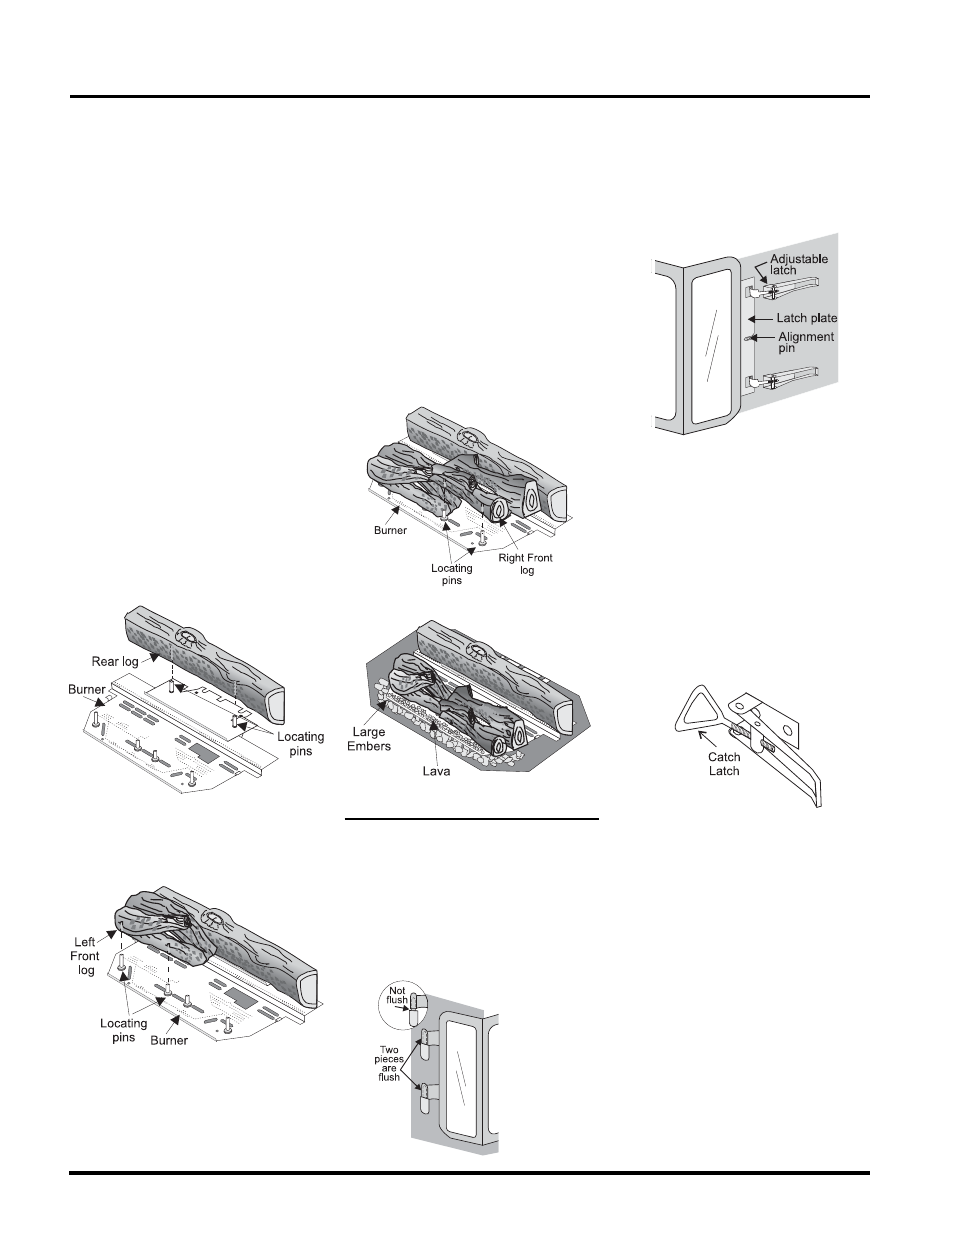
1) Open the two side doors.
2) Slide the door onto the two hinge pins mak-
ing sure the two pieces are fl ush together.
See diagram 1.
Diagram 1
Diagram 3
Diagram 2
Diagram 4
Diagram 2
Diagram 1
Diagram 3
LOG INSTALLATION
Note: Do not force logs down.
INSTALLATION
3) Place the left front log, carefully sliding it
down onto the left pins of the front burner.
See diagram 2.
4) Place the right front log, carefully sliding it
down onto the right pins of the front burner.
See diagram 3.
5) Distribute the embers along the front burner
but do not cover the burner ports and around
the logs. Place the large embers on the fl oor
of the fi rebox. Place the lava on the burner
tray in front of the left and right front logs.
See diagram 4.
WARNING: Dangerous operating condi-
tions may occur if these logs are not po-
sitioned in their approved locations. Read
the instructions below carefully and refer
to the diagrams. If logs are broken do not
use the unit until they are replaced. Broken
logs can interfere with the pilot and burner
operation.
The gas log kit contains the following:
a) Front Right Log - Part # 902-245
b) Front Left Log - Part # 902-244
c) Rear log - Part # 902-246
d) Embers - Part # 902-151 (2 bags)
e)
Lava - Part # 902-154 (1 bag)
(Part # 653-930 for the set of three logs)
1) Remove the logs from the box and carefully
unwrap them. The logs are fragile, handle
with care - DO NOT FORCE into position.
2) Place the rear log, carefully sliding it down
onto the pins, with the fl at side of the log
facing the back of the unit. See diagram
1.
3) Close the door. The latch plate must be
centered around the alignment pin. See
diagram 2. If the latch plate interferes with
the corner of the stove you may want to
angle the plate slightly so the door closes
more easily.
4) The latches should already be at the proper
setting. If they are too hard or too easy to
close, you may want to adjust them by
turning the latch. See diagram 3.
5) Remove the blue plastic protective coat-
ing.
6) Test the seal around the door by placing
a piece of paper between the unit and the
door, close the door and try to pull the paper
out. If it slips out easily, then the door is not
properly sealed. Turn the adjustable catch
to tighten or loosen the latch. See diagram
3.
Note: The door latch may require adjust-
ment as the door gasket material
compresses after a few fi res and after
glass replacement. Turn the latch to
tighten or loosen the latch.