Finishing – Napoleon Fireplaces NZ-26WI User Manual
Page 12
W415-0585 / B / 11.28.06
12
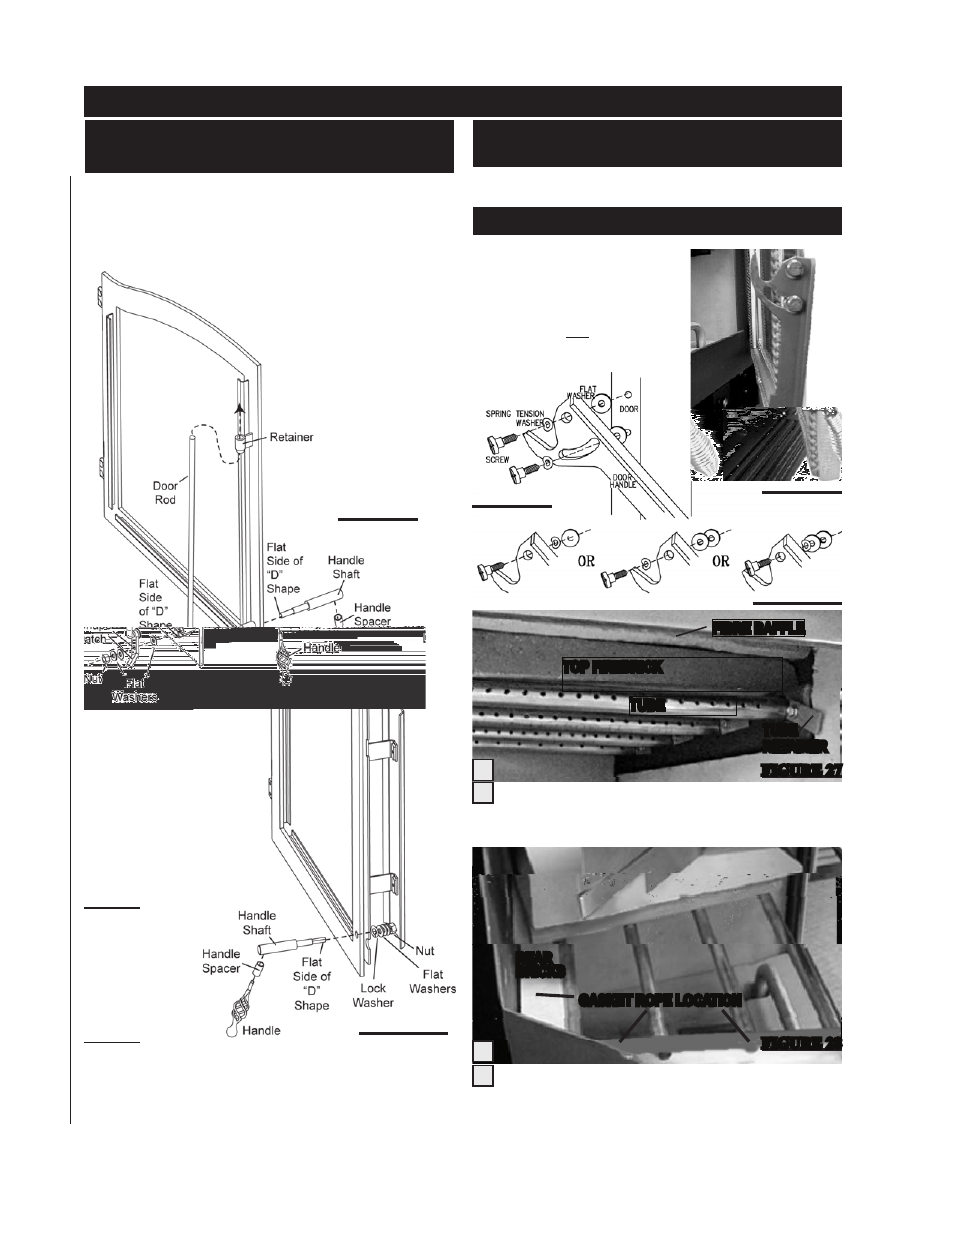
Right Door Handle (operating)
1. Insert the door rod through the round hole of the latch
ensuring the flat edge of the “D” shaped hole points towards
the hinges.
2. Slide the end of the door rod through the bushing at the
top of the door as shown.
3. Insert the handle shaft
through the door and the
latch.
4. Secure with 3 flat wash-
ers and a nut.
5. Feed the handle through
the handle spacer and into
the handle shaft.
Attach the handle as shown so that
when the door is closed, the handle
will be centred in the slot located
on the fireplace front. To achieve
this you may have to experiment
(on the upper and lower screws)
with one of the variations shown.
Tighten securely.
figure 23
FINIShING
Nz-26 ATTAChING ThE hANDLE
Place gasket rope along the upper ledge of the air
chamber and on the top of the rear bricks. The top and
bottom flame spreaders come taped together. This tape
will burn away in the initial firing of the unit. On subsequent
brick removals, the bottom flame spreader must be taped to
the top spreader to ease top brick and baffle removal and to
avoid damaging the fibre baffles.
1
1
2
gAsket rope locAtioN
reAr
bricks
unscrew and remove the front tube retainer. Note that the
first tube retainer also holds the side brick in place. Slide
the tube either to the left or right and remove. Remove
the two middle tubes in the same fashion.
The fireplace is shipped with the firebricks in place. Top fire-
bricks, fibre baffles and gasket rope are not installed.
TOP FIREBRICk AND BAFFLE
INSTALLATION:
fibre bAffle
tube
top firebrick
tube
retAiNer
figure 24
figures 25
figure 27
figure 28
Nz-26WI INSTALLING DOOR
hARDWARE
1
2
figure 26
Left Door Handle (fixed)
1. Insert the handle shaft
through the door.
2. Secure with a lock
washer, 3 flat washers and
a nut.
3. Feed the handle
through the handle spacer
and
into the handle shaft.
Note #1: You
may need to
move washers
ro the oterh side
of the latch to
obtain sufficient
door seal.
Note #2: The
final angle of the
left door handle should mirror the right door handle in the
closed position. Tighten the nut to secure the left handle at
the desired angle.
figure 26b