Adjustments, Maintenance – Napoleon Fireplaces TORCH GT8N User Manual
Page 12
12
W415-0619 / A /08.09.07
Closing the air shutter will cause a more yellow fl ame, but can
lead to carboning. Opening the air shutter will cause a more
blue fl ame, but can cause fl ame lifting from the burner ports.
The fl ame may not appear yellow immediately; allow 15 to 30
minutes for the fi nal fl ame colour to be established.
NOTE: It is important that the venturi sits down tight on
the orifi ce. The burner is adjustable up/down to ensure
this.
ADJUSTMENTS
GAS PRESSURE ADJUSTMENT
VENTURI ADJUSTMENT
TURN OFF THE GAS AND ELECTRICAL POWER BEFORE
SERVICING THE FIREPLACE.
CAUTION: Label all wires prior to disconnection when
servicing controls. Wiring errors can cause improper and
dangerous operation. Verify proper operation after servicing.
This fi replace and its venting system should be inspected
before use and at least annually by a qualifi ed service
person. The fi replace area must be kept clear and free of
combustible materials, gasoline or other fl ammable vapours
and liquids. The fl ow of combustion and ventilation air must
not be obstructed.
1. Keep the control compartment, burner, and air shutter
opening clean by vacuuming or brushing, at least once a
year.
2. Check to see that the main burner ignites when the
switch for the burner is turned on. A 5 second light-up
period is satisfactory. If ignition takes longer, consult your
Napoleon® dealer / distributor.
3. Check that the gasketing on the sides, top and bottom of
the door is not broken or missing. Replace if necessary.
MAINTENANCE
FIGURE 24
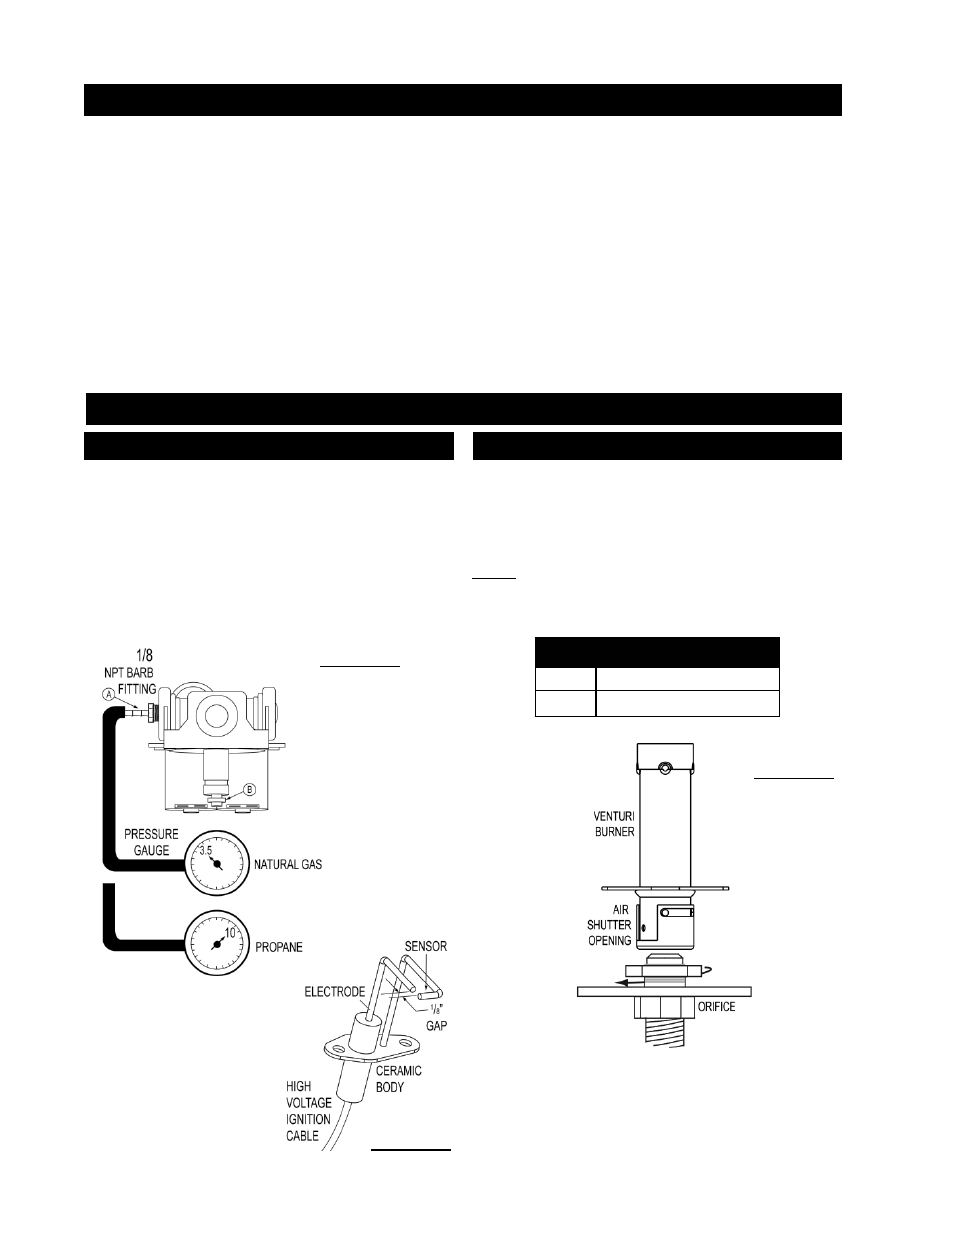
AIR SHUTTER OPENINGS
LP
5/16” DIA (x2)
NG
3/16” DIA (x1)
Outlet pressure can be adjusted if not measuring 3.5” W.C.
(NG) or 10.0” W.C. (LP).
1. Pressure can be checked by removing cap (A) using
a 3/16 allen key and replacing it with a 1/8 NPT barb fi tting.
2. Place pressure gauge tube over the fi tting.
3. Pressure can be adjusted by removing cap (B) using a
fl at screwdriver, and adjusting the nylon plug with the same
screw driver.
Turning the plug in (clockwise) will increase the pressure.
FIGURE 23
FIGURE 22