Peavey MESSENGER M100 User Manual
Page 11
11
the color red.
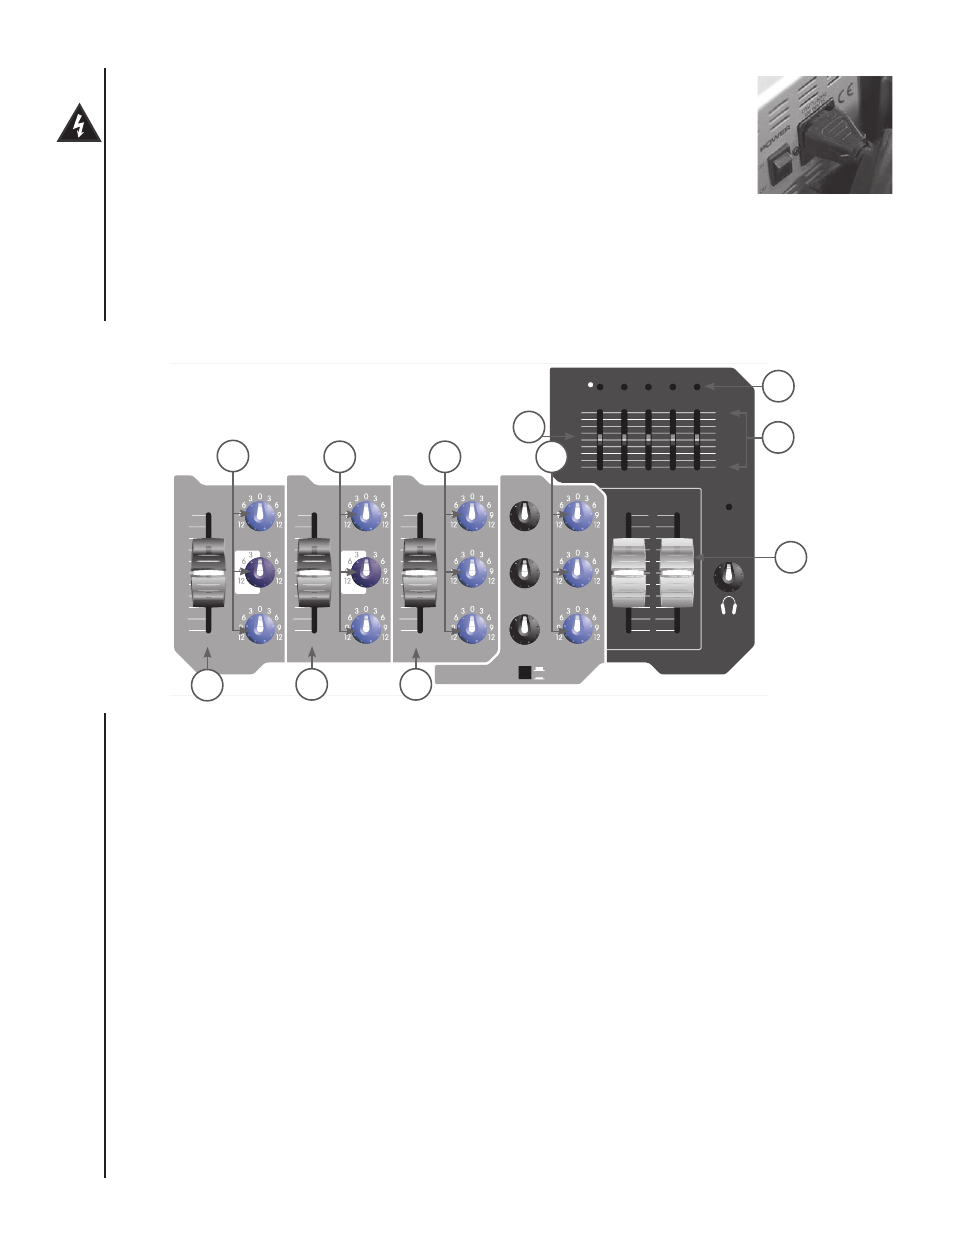
Setting Controls and Turning Unit On (1)
Set MASTER LEVEL controls to the “5” position and all other controls to “0” (all graphic EQ sliders should be
on “0”). Turn on power by placing the OFF/ON switch, located adjacent to the IEC cord receptacle, in the ON
position.
Adjusting Gain and Volume Controls (Faders) (2)
With the master level at “5,” adjust the channel LEVEL controls for desired volume from the speakers. If the
desired volume is reached with the channel LEVEL at a low setting (1-3), lower the MASTER LEVEL controls. If
the channel LEVEL needs to be set at 9-10 for desired volume, raise the MASTER LEVEL controls. The L and R
MASTER LEVEL controls adjust the left and right speakers.
Adjusting Tone Controls (3)
Adjust the channel LOW, MID and HIGH controls as necessary to achieve the desired sound. However,
use moderation in setting channel tone controls. The Mid EQ is a unique tone control designed to provide
a wide variation of mid-range frequencies. Turning the knob to the left (counterclockwise) adds warmth
and smoothness to the voice, while rotating the control to the right (clockwise) enhances vocal intelligibility.
Extreme settings of these controls can adversely affect sound quality. Large amounts of boost (+) on these
controls can also increase the chance of feedback on microphone inputs.
Using the Graphic Equalizer (4)
Unlike the LOW and HIGH controls on each channel, the five-band graphic equalizer adjusts the tonal balance
of all the signals going through the powered mixer. This gives the user greater flexibility in adjusting the sound,
OUTPUTS
9
8
7
6
5
4
3
2
1
0
10
HIGH
LOW
MID MORPH
HIGH
LOW
HIGH
LOW
MID
HIGH
LOW
MID
MUSIC
CHANNEL MASTER
VOICE
1
INPUTS
2
3
4/5
LEVEL
LEVEL
LEVEL
LEVEL
LEFT
RIGHT
MASTER LEVEL
+12
+12
+6
+6
0
0
-6
-6
-12
-12
LOW
LOW
MID
MID HIGH
MID
HIGH
5 BAND EQUALIZER
FLS
®
FEEDBACK LOCATING SYSTEM
U.S. PATENT # 5,737,428
POWER
+HI
-LO
MID MORPH
+HI
-LO
REVERSE
NORMAL
MUSIC TRACK SELECT
0
1
2
3
4 5 6
7
8
9
10
0
1
2
3
4 5 6
7
8
9
10
0
1
2
3
4 5 6
7
8
9
10
-15
+15
-15
+15
-15
+15
-15
+15
-15
+15
-15
+15
-15
+15
-15
+15
-15
+15
-15
+15
10
9
88
7
6
5
4
3
2
1
0
10
9
88
7
6
5
4
3
2
1
0
10
9
88
7
6
5
4
3
2
1
0
FLS
1
2
2
2
3
3
3
3
4
5
1
Connecting Power
Before connecting power, make sure that the power switch is in the OFF position.
Connect the IEC power cord to the receptacle on the back panel of the unit, and then to
a suitable electrical outlet. If an extension cord is used, be sure that it is a three-wire cord
with ground pin intact to preserve the safety ground.
NOTE: FOR U.K. ONLY
If the colors of the wires in the mains lead of this unit do not correspond to the colored markings identifying the
terminals in your plug, proceed as follows: (1) The wire that is colored green and yellow must be connected to
the terminal that is marked by the letter E, the earth symbol; colored green; or colored green and yellow. (2)
The wire that is colored blue must be connected to the terminal that is marked with the letter N or the color
black. (3) The wire that is colored brown must be connected to the terminal that is marked with the letter L or