Control reference guide – Panasonic DMR-EZ28 User Manual
Page 6
6
RQT9046
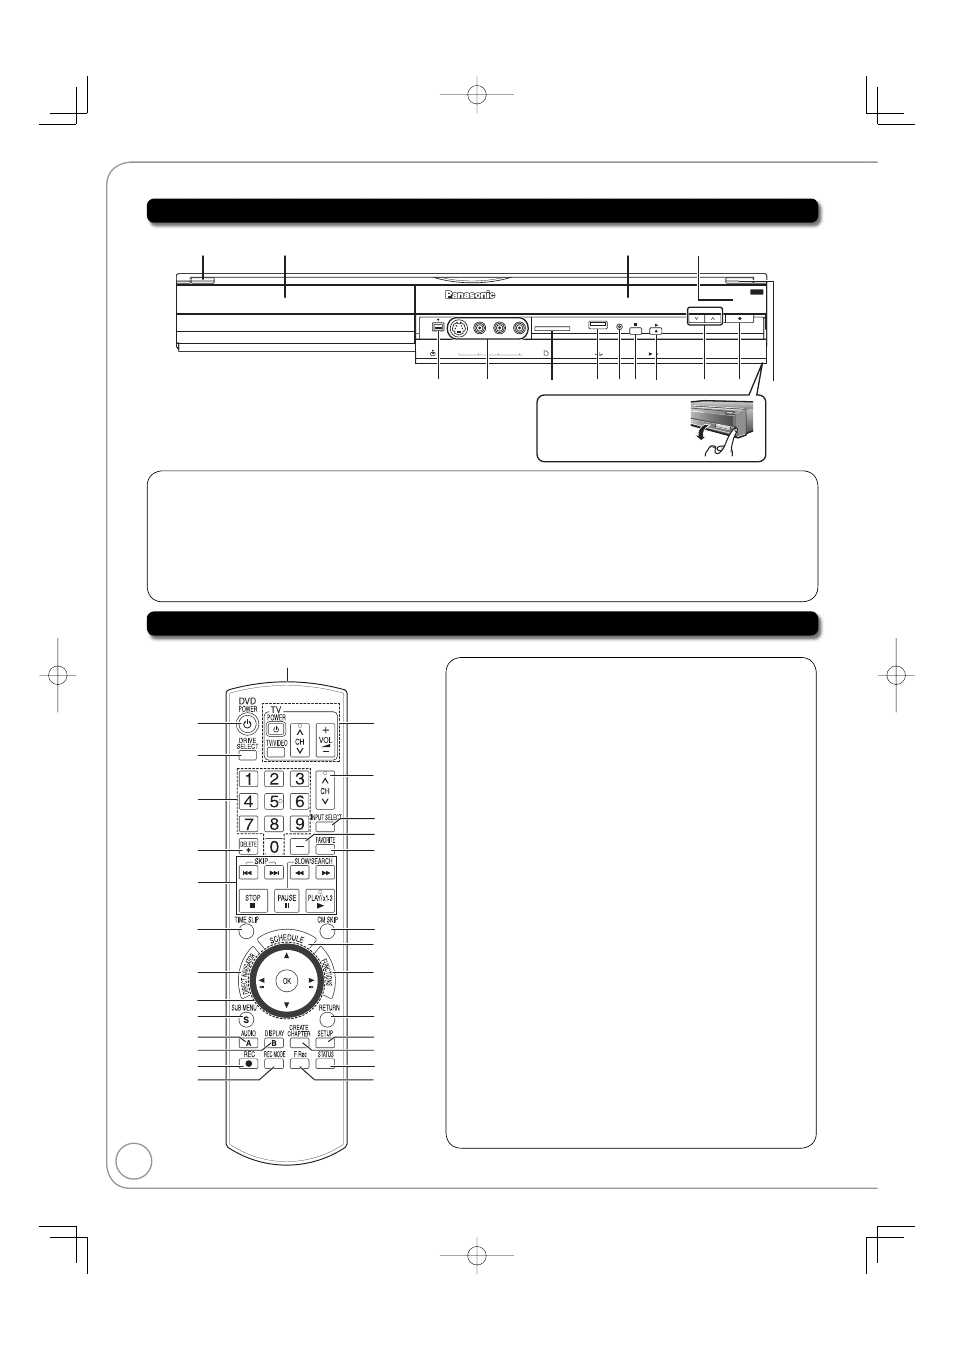
Main Unit
Opening the front panel
Pull down
USB
CH
REC
/ 1.3
RESET
SD CARD
IN2
DV IN
S VIDEO
VIDEO
L/MONO-AUDIO-R
2
4
5 67 8
9 bk
The unit’s display
Remote control
signal sensor
1
Disc tray
3
bl
1
POWER on/off button (POWER ^/I) ......... (
➔ 12)
Press to switch the unit from on to standby mode or vice versa.
In the standby mode, the unit is still consuming a small amount
of power.
2
DV IN terminal
(for a digital video Camcorder) ................. (
➔ 25)
3
IN2 input terminals (IN2) .......................... (
➔ 24)
4
SD Card slot ............................................... (
➔ 7)
•
5
USB
port
..................................................... (
➔ 7)
6
Reset
button
............................................. (
➔ 70)
7
Stop
button
............................................... (
➔ 16)
8
Play/x1.3
button
........................................ (
➔ 16)
9
Channel Select button .............................. (
➔ 15)
bk
Recording
button
...................................... (
➔ 17)
bl
Disc tray open/close button ........................ (
➔ 7)
Remote Control
1
4
5
7
6
3
9
bp
bq
bt
ck
cl
cm
8
bo
br
bs
bk
bl
bm
bn
cp
cq
cn
co
cr
2
1
Turn the unit on or off .............................................. (
➔ 12)
2
Select the drive (DVD, SD or USB) ......... (
➔ 19, 28 to 30)
3
Select channels and recording numbers etc./
Enter numbers ........................................................ (
➔ 15)
4
Delete
5
Basic operations for recording and play
6
Skip the specified time ............................................ (
➔ 27)
7
Direct Navigator ................................................ (
➔ 26, 36)
8
Selection/OK, Frame-by-frame ......................... (
➔ 12, 27)
9
Show sub menu ................................................ (
➔ 26, 36)
bk
Select audio ...................................................... (
➔ 22, 27)
[A] for Recordings screen ....................................... (
➔ 19)
bl
Show on-screen menu ............................................ (
➔ 42)
[B] for Album View screen....................................... (
➔ 30)
bm
Start recording ........................................................ (
➔ 17)
bn
Change recording mode ......................................... (
➔ 17)
bo
Transmission window
bp
TV and Set Top Box operations .............................. (
➔ 56)
bq
Channel select ........................................................ (
➔ 15)
br
Input select (TV, IN1, IN2, DV) ................................ (
➔ 24)
bs
Sub channel access for digital broadcasts ............. (
➔ 15)
bt
Favorite ................................................................... (
➔ 15)
ck
Skip 1 minute forward ............................................. (
➔ 27)
cl
Show scheduled recording list ................................ (
➔ 18)
cm
Show FUNCTIONS window ................................... (
➔ 33)
cn
Return to previous screen
co
Show setup menu ................................................... (
➔ 46)
cp
Create chapters ...................................................... (
➔ 27)
cq
Show status messages..................................... (
➔ 31, 32)
cr
Start Flexible Recording ......................................... (
➔ 22)
Control Reference Guide