67 subwoofer connections, Amplifier panel, Subwoofer – Phase Technology Cinemicro One User Manual
Page 4: Subwoofer left front center speaker right front, Amplifier setup and bass management, Subwoofer amplifier panel
6
7
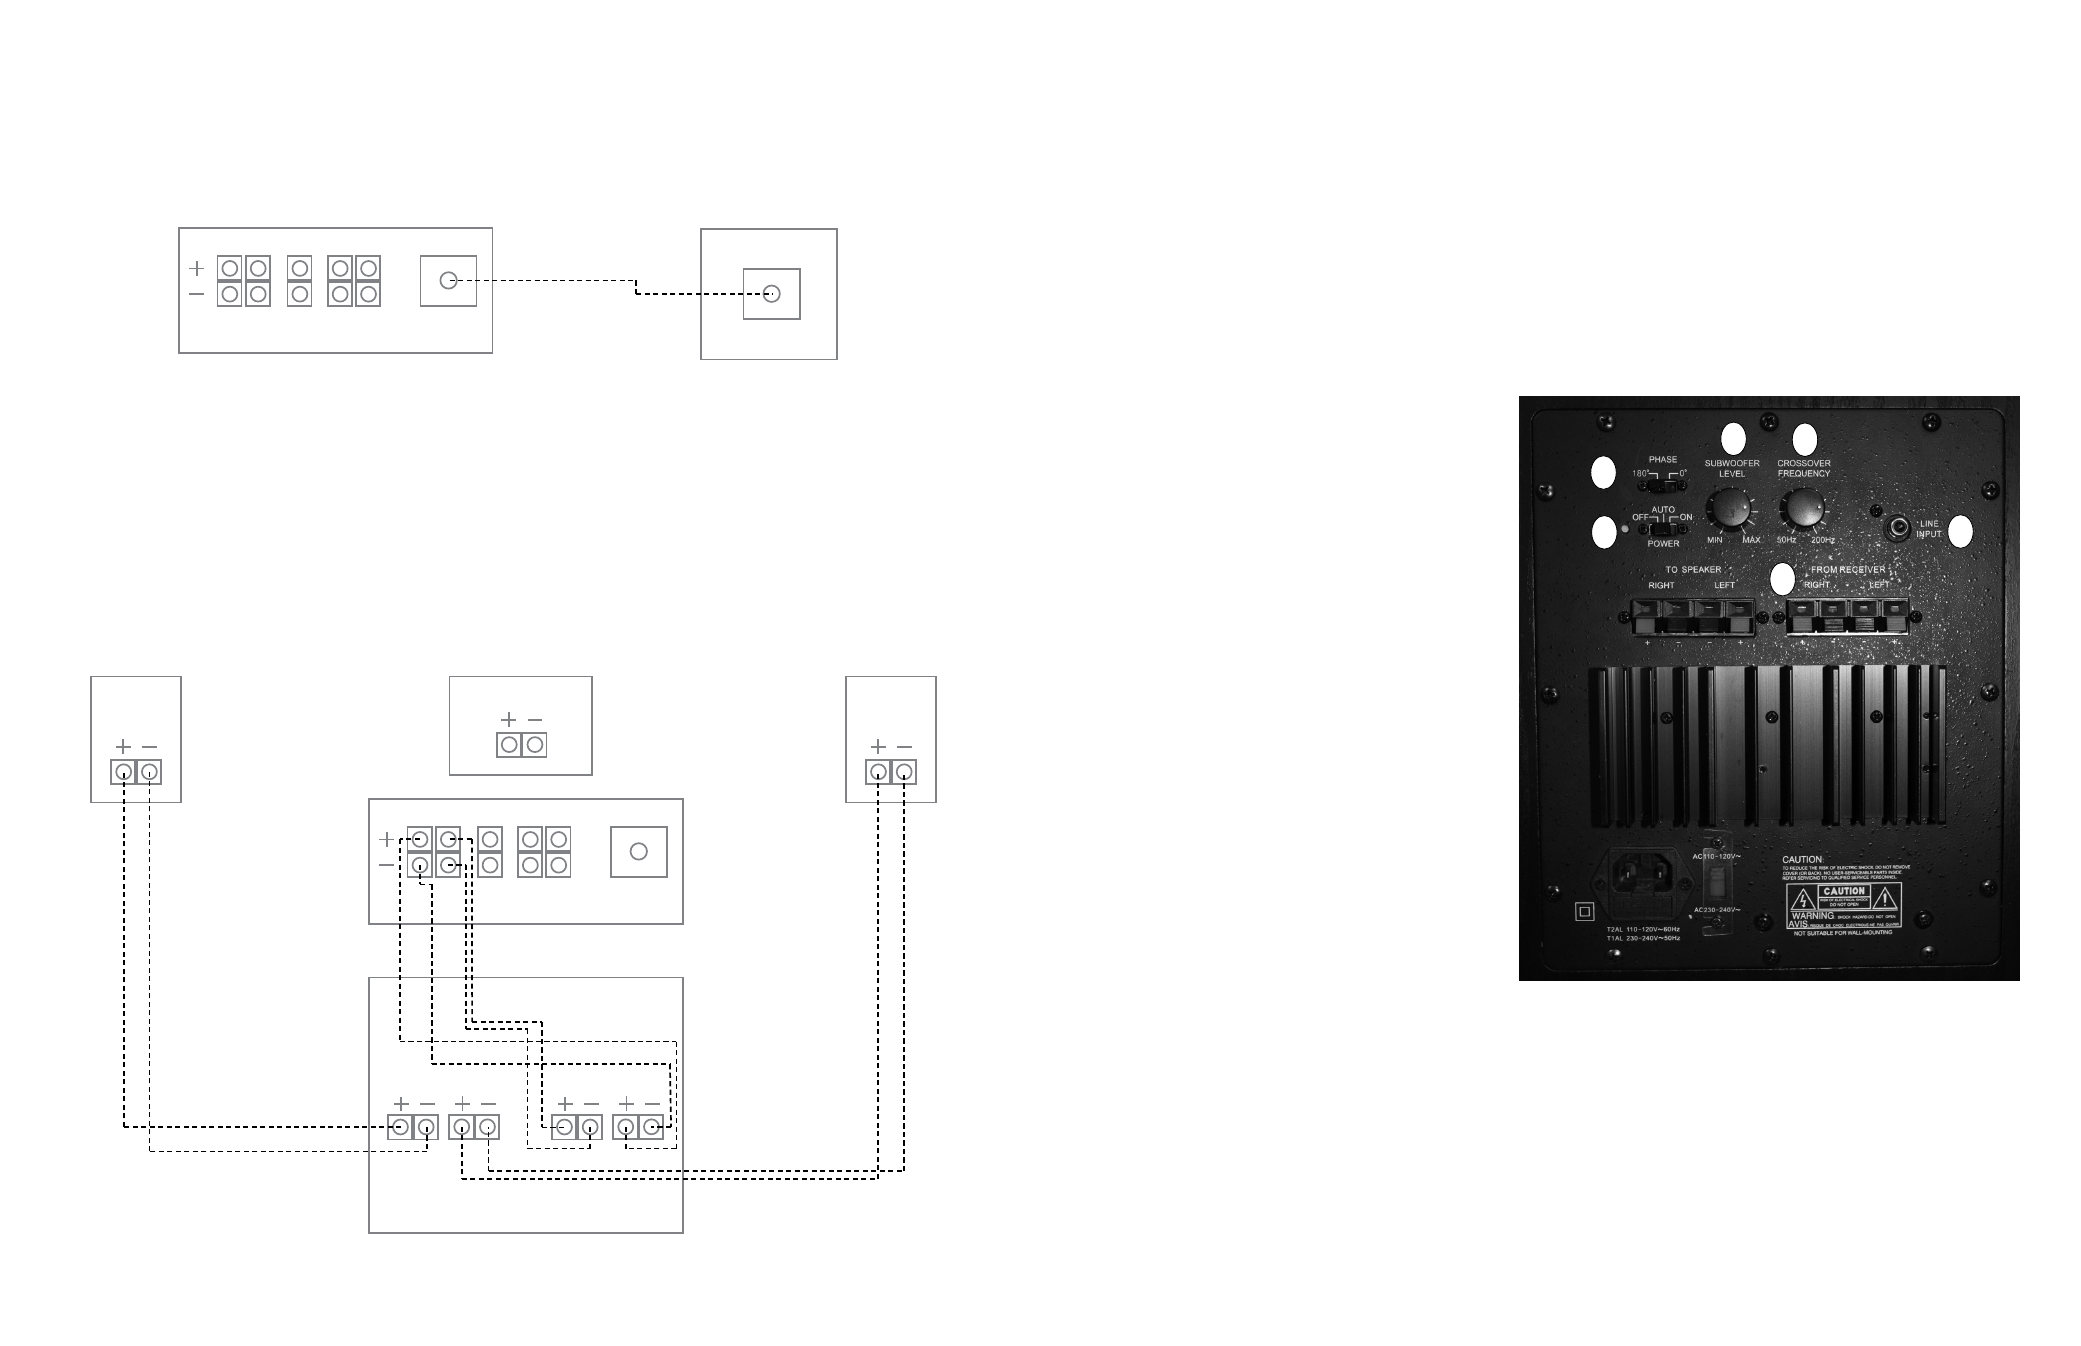
SUBWOOFER CONNECTIONS
Option 1: Low Level Setup This is the recommended method for those amplifiers and receivers that are equipped
with a “Subwoofer Out” or “Pre-Amp Out” connection. Virtually all audio/video receivers have this connection clearly
marked on the rear panel. Run a dedicated interconnect cable with RCA connectors from the subwoofer output jack
to the line input on the subwoofer. In this setup, you will be using the internal crossover on your processor.
Amplifier Panel
Left
Front
Left
Surr.
Center
Channel
Right
Front
Right
Surr.
SUB OUT
Subwoofer
Line Input
Option 2: High Level Input Setup If your amplifier or receiver does not have a dedicated subwoofer output, it will
be necessary to connect your new subwoofer directly to the speaker output terminals on the back of the unit. In this
scenario, you will be running high quality speaker wires from the left and right front outputs of your amplifier to the
high level inputs on the subwoofer. You will then need a second set of wires to carry the signal from the subwoofer
back to the main speakers.
Amplifier Panel
Left
Front
Left
Surr.
Center
Channel
Right
Front
Right
Surr.
SUB OUT
Subwoofer
Left
Front
Center Speaker
Right
Front
Left Input
Right Input
Left
Right
To Speaker
From Receiver
AMPLIFIER SETUP AND BASS MANAGEMENT
Many home theater receivers/processors have a feature that controls how the bass is processed and delivered
to the subwoofer. It also adjusts the amount of bass that is sent to your satellite speakers. Look carefully in your
amplifier or receiver’s instruction manual for details on how to adjust for the speaker size (sometimes called “Speaker
Setup”) for your system.
When using a Dolby Digital or DTS-capable receiver/processor with the subwoofer connected to the subwoofer out
on your amplifier turn the “LOW-PASS FREQUENCY” control to the highest setting (200 Hz) on the back of your
subwoofer. Set the subwoofer crossover setting in the speaker setup section of the amplifier setup menu to 150 HZ
(or the next highest setting) and set the Satellites and Center channels to “small”.
If you are NOT using the receiver’s internal processor for subwoofer control then turn the “CROSSOVER FREQUENCY”
control on the subwoofer to the 3 o’clock (150 Hz) setting.
SUBWOOFER AMPLIFIER PANEL
1. Power ON/Auto/OFF: This switch, when left
in the “Auto” position, automatically activates the
subwoofer when an audio signal is detected and
shuts the subwoofer off after approximately ten
(10) minutes of silence.
2. Subwoofer Level Control: Adjusts the volume
of bass energy allowing you to customize overall
tonal balance to your individual room acoustics
and personal taste.
3.
Crossover
Frequency
Control:
This
adjustment varies the point at which the
subwoofer takes over the task of creating low
bass frequencies from the rest of the audio
signal permitting additional fine tuning of the total
system. A little experimentation with this control
will allow you to match the performance of the
subwoofer to the rest of your speakers resulting
in extraordinary, accurate, deep bass response.
This control should be turned to its highest
setting when the sub is connected through the
Subwoofer out on your receiver.
4. Phase Control: This adjustment matches the
phase - the in and out movement of speaker
cones - to that of your main speakers. Adjust this
control by listening to music with bass content.
The setting is correct when the bass sounds the
fullest.
5. High Level Input and Output: Used for direct
speaker connections from the left and right front
speaker outputs when a low-level subwoofer
output is not available.
6. Low Level Input: Used from pre-out or
Subwoofer-out.
1
2
3
6
4
5