Phase Technology Cinemicro One User Manual
Page 3
5
4
SUBWOOFER PLACEMENT
Subwoofer placement is less critical, because the frequencies they reproduce are omni directional. This means the
human ear doesn’t perceive these low frequencies as coming from a specific direction, enabling placement of a
subwoofer virtually anywhere in the listening room.
It’s best, however, to keep a subwoofer within the sound field of the other speakers. The closer the subwoofer is
to a wall, the louder and more intense its bass output will be: this effect is even stronger when the sub is placed in
or near a room’s corner. If using two subwoofers, start by placing them next to the front left and right speakers, in
both front corners or one in the corner and one 1/3 of the way along the front wall from the corner. Each room is
different. Experiment with these options or try other locations until you get the best results. If you must choose a
less-than-ideal position, the output level of Phase Technology powered subwoofers is adjustable to compensate for
your listening environment.
SPEAKER CONNECTIONS
The following instructions apply whether you are using a separate amplifier or Home Theater receiver. For simplicity
we will use the term “amplifier” throughout this manual to mean both. With system power off and your amplifier
unplugged, please follow these steps:
Special Note: Observe Speaker Polarity Carefully!
Every cable, speaker and amplifier is clearly marked to show their positive (+) and negative (-) terminals. Amps and
speakers may use some combination of these symbols and/or colors to indicate positive (usually red) and negative
(usually black or white) connections. One strand of your cable will also be ridged and/or marked with a colored line
or other indicator on the positive side. For proper polarity and, thus, ideal system performance, always connect the
positive side of the cable to the positive terminals on your speakers and amplifier and the negative side of the cable
to the negative terminals.
Front Speakers: The pair of front speaker connections (left and right) on your amplifier will be labeled “Front” or
“Main.” Connect the speaker cables for your left and right front speakers using these terminals and then connect
the cables to the front satellites. Observe positive and negative polarities.
Center Speaker: The center speaker connections on your amplifier will be labeled “Center” or “Center Channel.”
Connect the speaker cables for your center channel speaker using these terminals and then connect the cables to
the center speaker. Observe positive and negative polarities.
Surround Speakers: The pair of surround connections (left and right) on your amplifier will be labeled “Surround.”
Connect the speaker cables for your left and right surround speakers using these terminals and then connect the
cables to surround satellite speakers. Observe positive and negative polarities.
Rear Speakers (optional purchase): The pair of rear connections (left and right) on your amplifier will be labeled
“Rear.” Connect the speaker cables for your left and right rear speakers using these terminals and then connect the
cables to the rear satellite speakers. Observe positive and negative polarities.
6.1-7.2 and Additional Subwoofers: Individual CineMicro
One
satellite speakers and subwoofers are offered
separately. One or two extra satellites can expand your 5.1 system into a 6.1 or 7.1 system. Adding an extra subwoofer
will expand your system to a 5.2, 6.2, or 7.2 system. Ask your Phase Technology dealer for details.
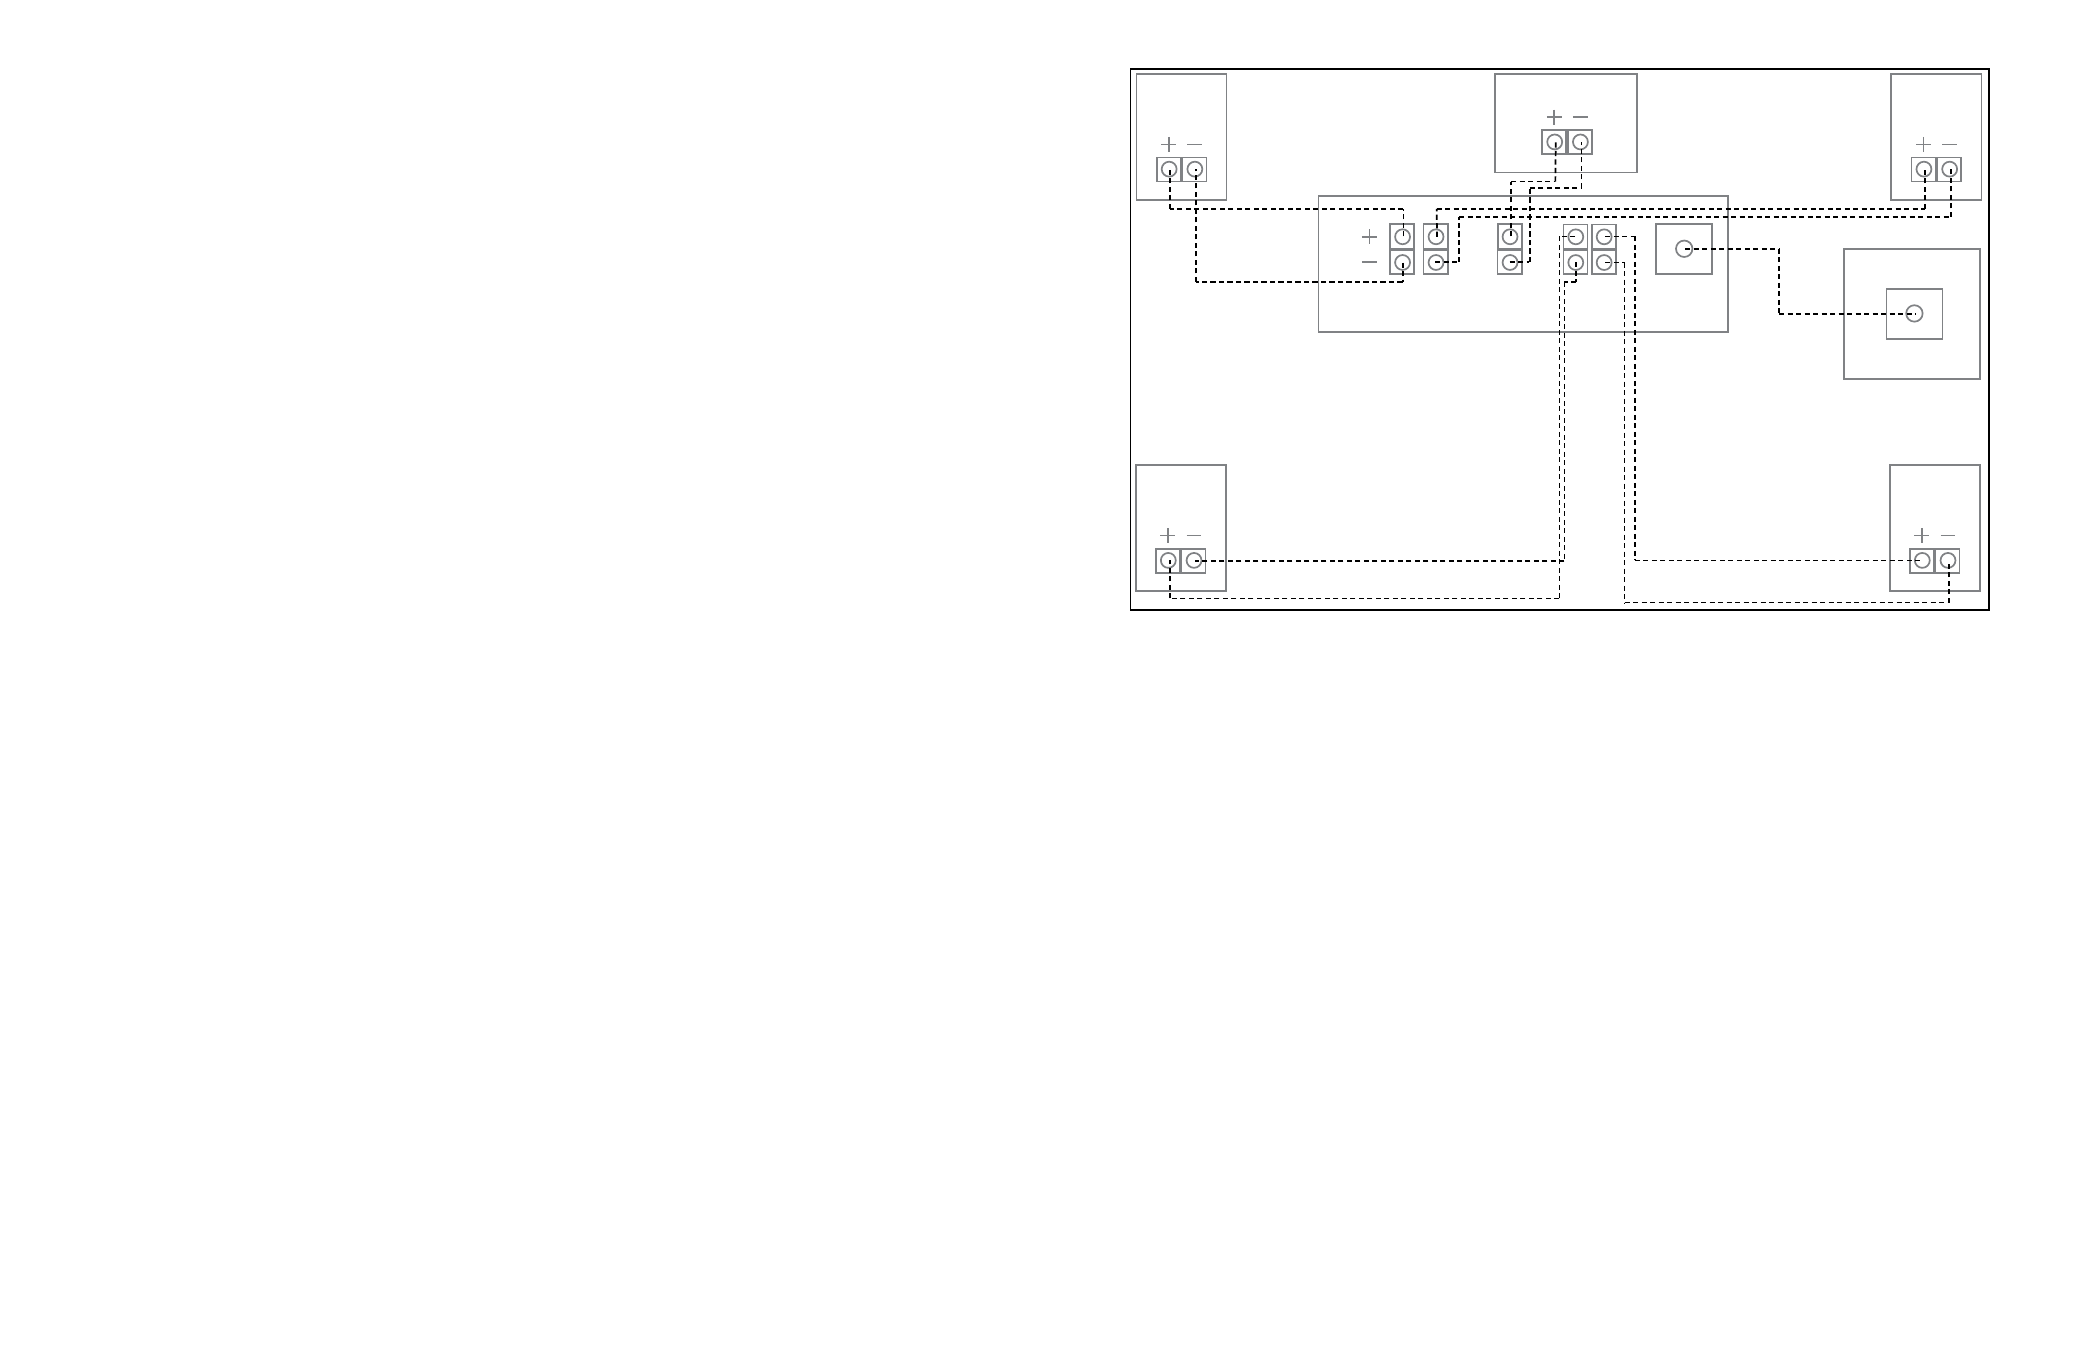
Please refer to the diagram on the following page for speaker connections.
Amplifier Panel
Left
Front
Left
Surr.
Center
Channel
Right
Front
Right
Surr.
SUB OUT
Subwoofer
Left
Front
Center Speaker
Right
Front
Right
Surround
Left
Surround
Line Input
MOUNTING THE CINEMICRO
ONE
ON A WALL
The four satellites and center channel include keyhole-style inserts for on-wall mounting. Use an 8 mm screw in a
drywall anchor capable of holding 2-3 times the weight of the speaker in the location you wish to mount the speaker.
Leave the screw head about 1/4” out of the anchor, then slide the keyhole insert over the screw.
Additionally, the four satellite and one center channel speakers feature M5 (5 mm) threaded inserts mounted on the
rear or bottom of the speakers for use with standard wall mounting brackets (available from third party vendors).
TABLE TOP OR SHELF PLACEMENT
Included with your CineMicro speakers are self adhesive bumpers that can be used on the bottoms of the speakers
to protect the finish when placing it on a shelf or table top. Simply peel off four of the bumpers from the backing
paper and apply the four bumpers to the bottoms of each of the satellite speakers. To keep the center channel
speaker from rocking and to level the speaker, two angled plastic feet are included that can be attached to the
bottom of the speaker cabinet. Use to two supplied screws to attach the feet to the left and right threaded inserts
in the bottom of the cabinet. Two extra bumpers are also included to apply to the bottom of the speaker to protect
the finish of the cabinet.