Dab fm radio 1, Hørselssikkerhet, Høresikkerhed – Philips DAB FM radio AE5900 User Manual
Page 4: English controls/power supply, Power supply general information, Basic operation dab radio, Dab radio, Safety & maintenance (see 7 ), Dab radio fm radio, Register your product and get support at
Meet Philips at the Internet
http://www.philips.com
English
Printed in China
PDCC-ZC-0735
W
AE5900
Environmental information
All unnecessary packaging material has been omitted.The packaging can be easily separated
into three materials: cardboard, polystyrene and plastic.
Your set consists of materials which can be recycled if disassembled by a
specialized company. Please observe the local regulations regarding the
disposal of packaging, dead batteries and old equipment.
Disposal of your old product
Your product is designed and manufactured with high quality materials
and components, which can be recycled and reused.
When this crossed-out wheeled bin symbol is attached to a product it
means the product is covered by the European Directive 2002/96/EC.
Please inform yourself about the local separate collection system for electrical
and electronic products.
Please act according to your local rules and do not dispose of your old products
with your normal household waste.The correct disposal of your old product will
help prevent potential negative consequences for the environment and human
health.
Bokmål
Dansk
Miljø-informasjon
All unødvendig embalasje material er unngått. Embalasjen kan lett bli delt opp
i tre materialer: papp, polystyren og plastikk.
Din enhet består av materialer som kan gjenvinnes hvis den er framontert
av en spesialisert bedrift.Vær snill og overhold de lokale regler angående
kasting av embalasje, tomme batterier og gammelt utstyr.
Avhending av ditt gamle produkt
Ditt produkt er laget og produsert av materialer og komponenter i høy
kvalitet som kan bli gjenvunnet og kan bli brukt igjen.
Hvis symolet med et krysset fat på hjul er festet på produktet, betyr det
at produktet samsvarer Europeisk direktiv 2002/96/EC.
Vær snill og informer deg om det lokale systemet separat innsamling av
elektriske eller elektroniske produkter.
Vær snill og følg de lokale regler og kast ikke gamle produkter sammen med ditt
husholdnings avfall. Riktig avhending av ditt gamle produkt hjelper å unngå
potensielle negative innvirkninger på miljøet og menneskenes helse.
Miljøoplysninger
Al unødvendig emballage er udeladt. Emballagen kan nemt sorteres i tre materialetyper:
karton, polystyren og plastik.
Produktet består af materialer, der kan genbruges, hvis det skilles af et
specialfirma. Hold venligst øje med de lokale regulativer omkring
bortskaffelse af emballage, brugte batterier og udtjent el-udstyr.
Bortskaffelse af udtjente produkter
Dit produkt er konstrueret og fremstillet af materialer og komponenter
af høj kvalitet, der kan genbruges.
Når et produkt er mærket med dette overstregede affaldsbøttesymbol
betyder det, at produktet er omfattet af EU-direktiv 2002/96/EC.
Undersøg reglerne for dit lokale indsamlingssystem for elektriske og elektroniske
produkter.
Overhold gældende regler, og bortskaf ikke dine gamle produkter sammen med
dit almindelige husholdningsaffald. Korrekt bortskaffelse af udtjente produkter
er med til at forhindre negativ påvirkning af miljø og helbred.
Notes
Hearing Safety
Listen at a moderate volume.
•
Using headphones at a high volume can impair your hearing. This product can produce sounds in
decibel ranges that may cause hearing loss for a normal person, even for exposure less than a
minute. The higher decibel ranges are offered for those that may have already experienced some
hearing loss.
•
Sound can be deceiving. Over time your hearing "comfort level" adapts to higher volumes of
sound. So after prolonged listening, what sounds "normal" can actually be loud and harmful to
your hearing. To guard against this, set your volume to a safe level before your hearing adapts and
leave it there.
To establish a safe volume level:
•
Set your volume control at a low setting.
•
Slowly increase the sound until you can hear it comfortably and clearly, without distortion.
Listen for reasonable periods of time:
•
Prolonged exposure to sound, even at normally "safe" levels, can also cause hearing loss.
•
Be sure to use your equipment reasonably and take appropriate breaks.
Be sure to observe the following guidelines when using your headphones.
•
Listen at reasonable volumes for reasonable periods of time.
•
Be careful not to adjust the volume as your hearing adapts.
•
Do not turn up the volume so high that you can't hear what's around you.
•
You should use caution or temporarily discontinue use in potentially hazardous situations.
•
Do not use headphones while operating a motorized vehicle, cycling, skateboarding, etc.; it may
create a traffic hazard and is illegal in many areas.
English
Controls/Power Supply
Congratulations on your purchase and
welcome to Philips!
To fully benifit from the support that
Philips offers, register your product at
www.philips.com/welcome
.
Supplied Accessories
– 1 x AC/DC certified switching adapter
(PHILIPS, Model No.: GFP181DA-0916-1,
Input: 100-240V~ 50/60Hz, 0.35A,
Output: 9V, 1.6A)
– Audio cable
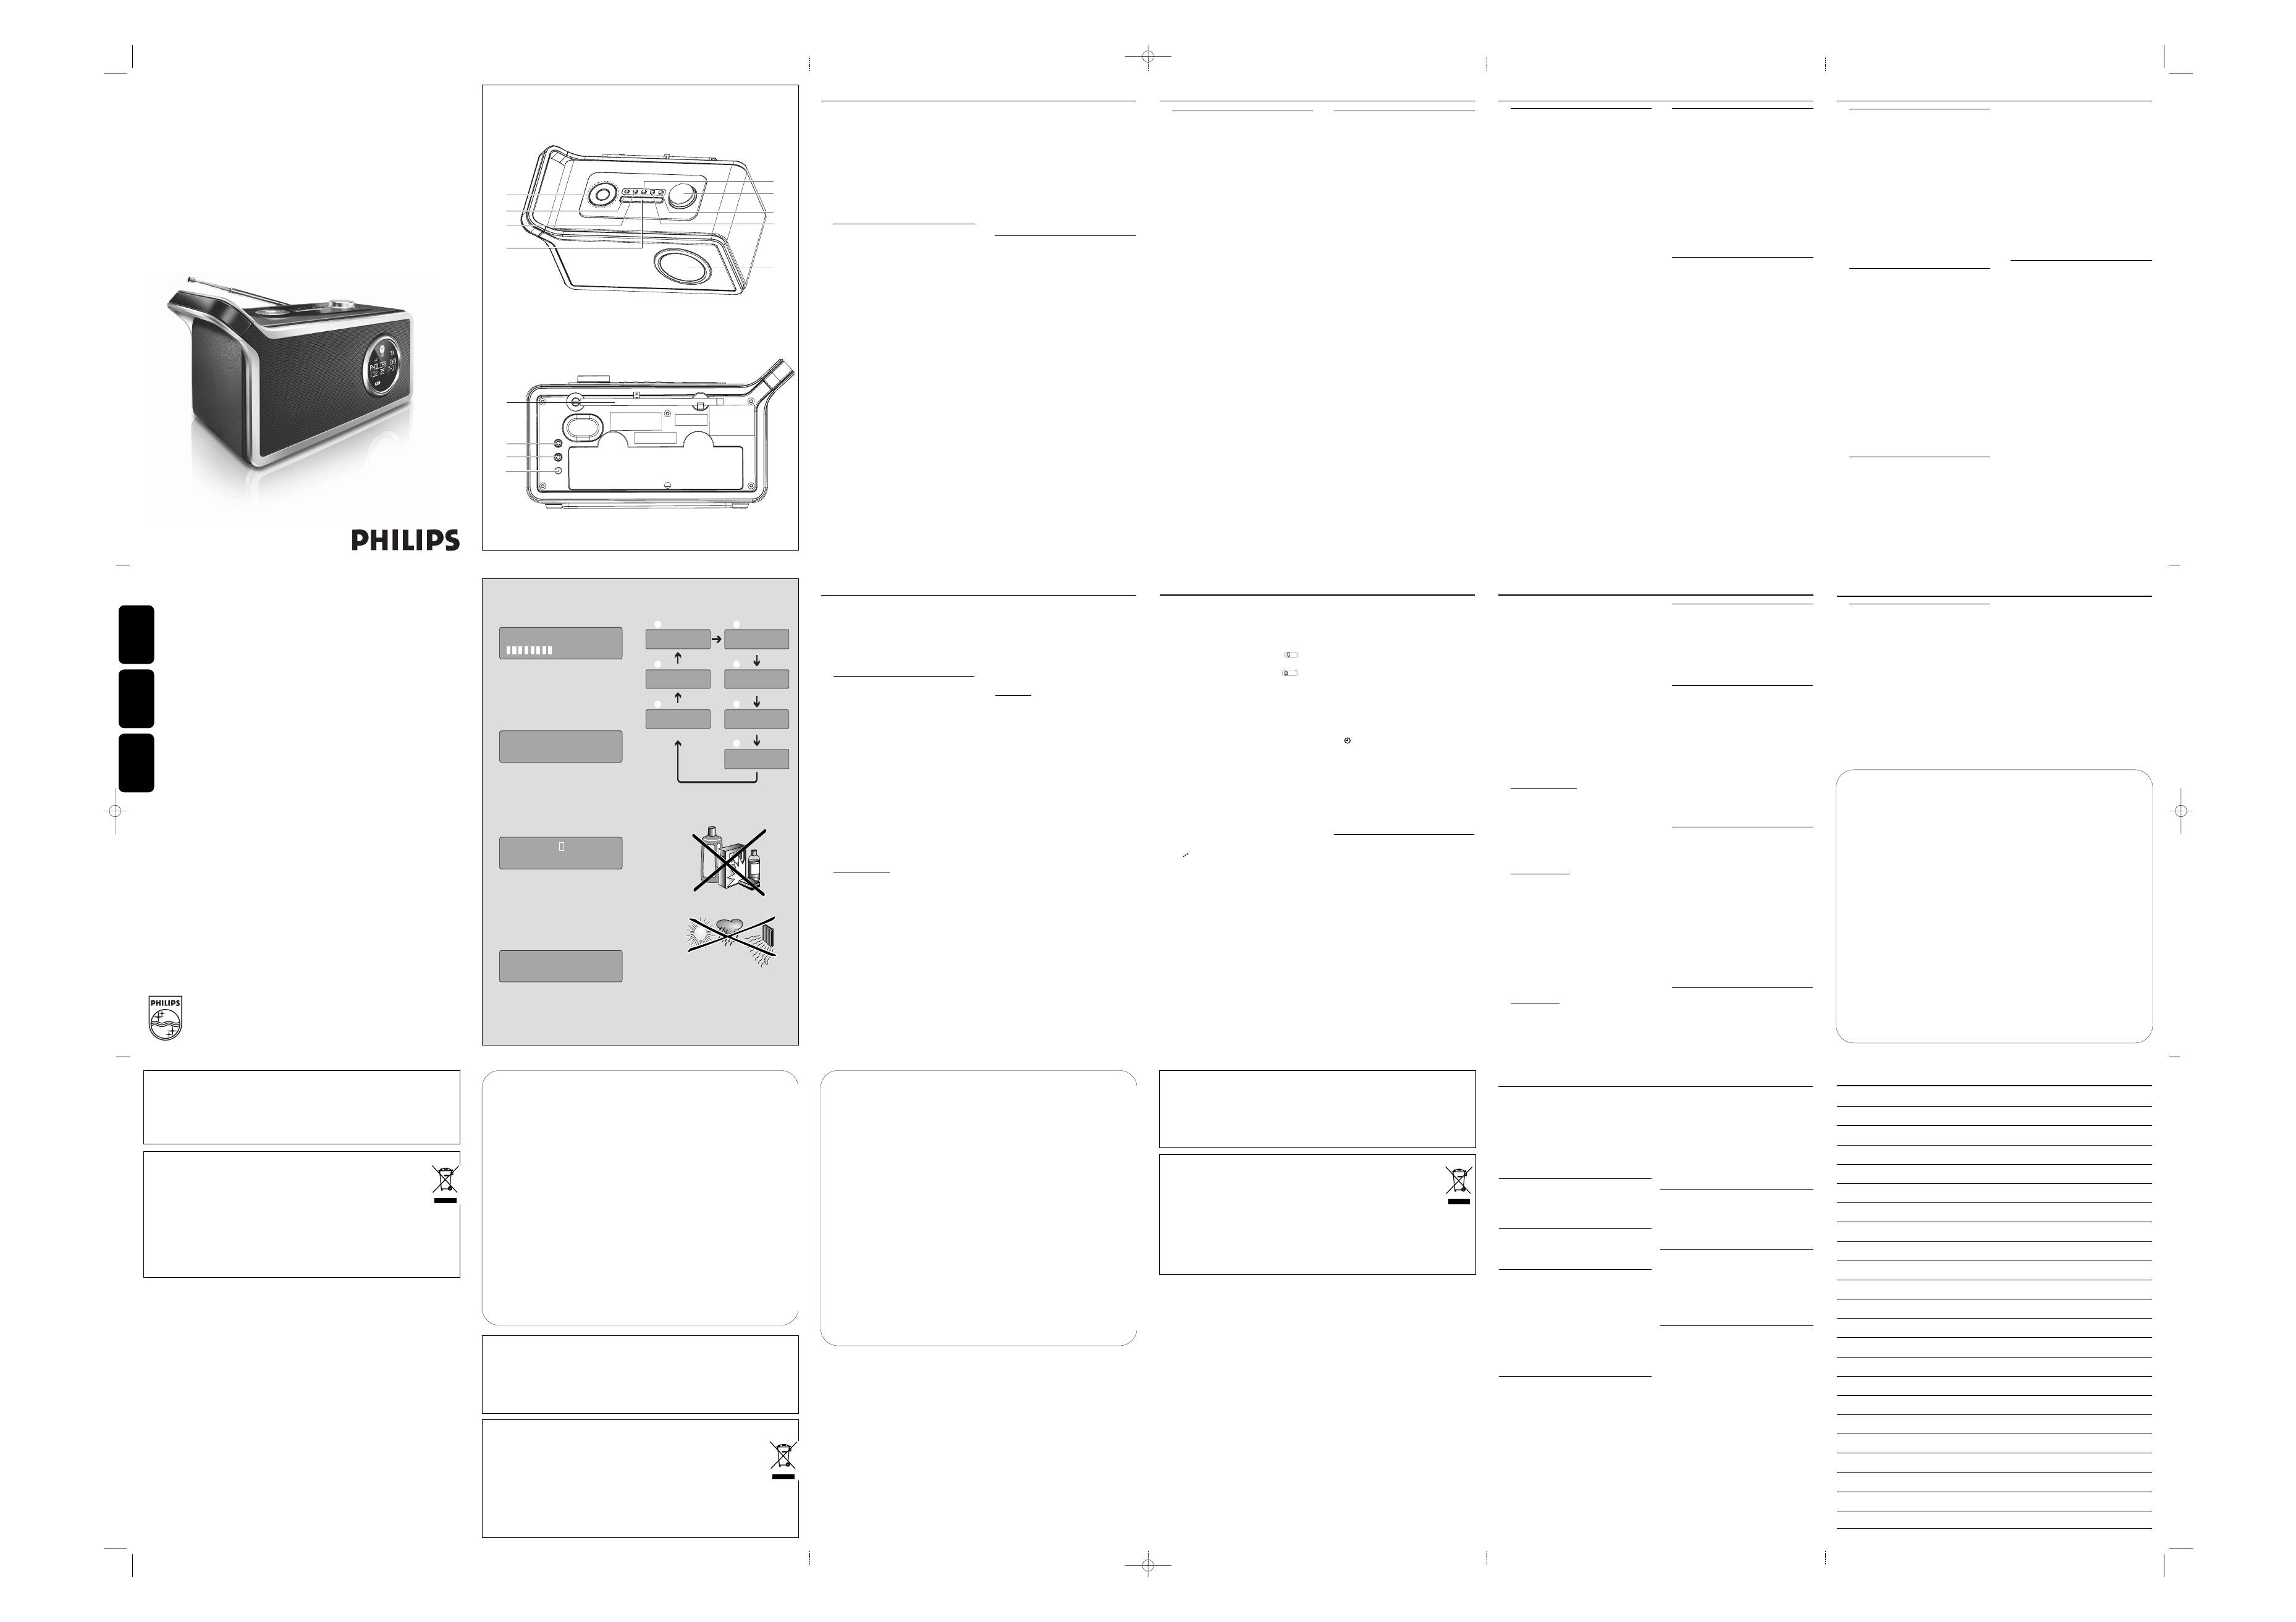
Top & front panels (see 1)
1 PRESET
– stores and recalls 5 DAB/FM stations
SELECT
– in DAB/FM mode, selects a selection
– in DAB/FM mode, select a preset station
1
/ 2
TUNING +/– has not any auto search
station function.
– in DAB mode, selects DAB stations or
selects menu options
– in FM mode, fine tunes a station or selects
menu options
SOURCE
– selects DAB (on Band 3 ), FM or AUX IN
mode
2 2 – switches on/off the standby mode
3 SCAN
DAB:
– outside UK: press briefly SCAN to perform a
search of wider range (full scan) for DAB
stations.
– in UK: press and hold SCAN for more than
2 seconds to perform a local search for DAB
stations.
FM: – tunes to a station
4 DISPLAY
– in DAB mode, selects station information in
seven types
– in FM mode, selects station and time
information
– switches DIM on or off (press and hold for 2
seconds)
5 MENU
– in DAB/FM/AUX IN mode, enables access to
advance setup options
– activates resetting mode (press and hold for
2 seconds)
6 TIMER
– enters “kitchen time” setting
7 VOLUME +/– – adjusts volume level
8 SNOOZE
– repeats alarm at selected time
9 LCD display
– displays DAB/FM radio and time information
Back panel (see 1)
0 Telescopic antenna
– improves DAB and FM reception
! p – 3.5 mm stereo headphone socket
Helpful hints: The speakers will be muted
when headphones are connected to the set.
@ DC jack
– inlet for power cord
# AUX IN
– inlet for external sound source
CAUTION
High voltage! Do not open.You run
the risk of getting an electric shock.
The machine does not contain any
user-serviceable parts.
Modification of the product could
result in hazardous radiation of
EMC or other unsafe operation.
This set complies with the radio
interference requirements of the
European Union.
Power Supply
General Information
Power Supply
Using AC power
1 Check if the power voltage, as shown on
the type plate located on the rear of
the set, corresponds to your local power
supply. If it does not, consult your dealer or
service center.
2 Connect the supplied power cord to the
Switching Adapter and the wall socket, and
connect the DC jack to the set. The set is
now ready to use.
3 To switch the set off completely, withdraw the
power cord from the wall socket.
•
Install the unit near the AC outlet and where
the power plug can be easily reached.
•
Disconnect the power cord from the wall
socket to protect your set during heavy
thunderstorms.
•
AC power cord is used as the disconnect
device. It shall remain readily operable and
should not be obstructed during intended
use.To be completely disconnected the
apparatus from supply mains, the power cord
of the apparatus shall be disconnected from
the mains socket outlet completely.
The type plate is located on the
rear of the set.
General information
About Digital Audio Broadcasting
(DAB)
DAB digital radio is a new way of
broadcasting radio via a network of terrestrial
transmitters. It provides listeners with more
choice and information delivered in crystal
clear, crackle-free sound quality.
- The technology allows the receiver to lock
on to the strongest signal it can find.
- With DAB digital stations, there are no
frequencies to remember, and sets are tuned
by station name, so there is no re-tuning on
the move.
What is a multiplex?
Digital radio operation is made up of a single
block of frequencies called a multiplex. Each
multiplex works within a frequency
spectrum, such as Band III for DAB
broadcasts.
Helpful hints:
–
You will receive DAB stations only within your
DAB transmission area.
DAB Broadcasters and DLS
Each DAB broadcaster (or multiplex
operator) also provides text and audio data
services. Some programmes are supported by
Dynamic Label Segments (DLS).This is data
which you can read as scrolling text on your
DAB radio display. Some stations transmit the
latest news, travel, and weather, what's on
now and next, website addresses and phone
numbers.
For more information on digital radio
coverage and services, please visit
www.drdb.org
Basic operation
1
Connect the supplied switching adapter to
the wall outlet and the DC jack on the set.
➜ The radio tunes to a DAB station and the
clock is set automatically.
•
In DAB mode, press SOURCE to select
FM or AUX IN mode.
•
Press 2 to switch to standby mode.
➜ The clock information is displayed.
•
In standby mode, press 2 to switch to the
last selected sound source.
2
To adjust volume, turn VOLUME +/–.
3
To improve DAB/FM reception, extend and
turn the telescopic antenna. Reduce its
length if the signal is too strong.
•
To further improve DAB reception, you may
also perform manual tuning (See Manual
Tune)
Helpful hints:
–
DAB is the default sound source, and the
clock sets automatically according to the time
information of the station.
–
If there is no DAB coverage currently
available, or DAB signal is too weak, in your
area, no DAB station will be found, and
information like "No stations available" will be
displayed.
Dimming LCD brightness
1
Press and hold DISPLAY for 2 seconds to
switch Dim on or off.
➜ Auto dim on will be activated if dim
function is off in the last setting.
➜ Auto dim off will be activated if dim
function is on in the last setting.
2
If Dim function is activated and there is 5
seconds of button inactivity, the LCD
brightness is decreased to save power.
Pressing any button resumes the original
LCD brightness.
Switching on DAB radio
For the first time when the set is powered
on, DAB mode is selected and an auto scan is
performed(see 2).Then all the available DAB
stations will be stored on the set, and the
radio will tune to the first available station.
1
In standby mode, press 2 to switch to the
last selected sound source.
2
Press SOURCE repeatedly to select DAB
mode, if DAB mode is not selected.
➜ "PHILIPS DAB & FM Radio" is displayed
briefly (see 3), then the radio auto tunes
to a station.
Changing DAB stations
1
In DAB mode, press
1
/ 2
repeatedly until
your desired station name is displayed.
2
Press SELECT to confirm.
➜ The radio will immediately tune to the
selected station.
About station display symbols
You may see some symbols displayed before
the station names as follows:
?:The symbol indicates that the station is not
currently available, or not active.
>>:This symbol indicates that the station is a
primary station with secondary service.
<<:This symbol indicates that the station is a
secondary station.
Basic Operation
DAB Radio
7: Signal Error Rate: If the transmisstion
signal contains errors, the system can apply
correction.The amount of signal correction
can be displayed as a numerical value
between 0 and 99. As the value increases, the
signal will be degraded.To improve reception,
try adjusting the position of the antenna.
Using the MENU control
The menu control lets you access the DAB
radio setup options.
1
In DAB mode, press MENU to enter the
menu options.
➜ The first setup option "Manual tune" is
displayed.
2
Press
1
/ 2
to scroll up and down the menu
options:
Manual tune -> Autoscan local -> Autoscan
full - > Clock - > DRC value -> Sw version
3
To select an option, press SELECT.
4
Repeat steps 2-3 if sub-option is available
under one option.
Helpful hints:
–
In FM/AUX IN mode,when you press MENU
there are only two options: Clock and Sw
version.
Manual tune
By using this feature, it is possible to manually
tune to a specific channel/frequency. In
addition to antenna orienting for better radio
reception, the optimum reception can also be
obtained by using this feature.
1
In DAB mode, press MENU to display
"Manual tune" option.
2
Press SELECT to make a selection.
➜ Display shows a channel and its
frequency.
3
Press
1
/ 2
repeatedly until desired
channel/frequency appears.
4
Press SELECT to confirm the selection.
➜ The second line of the display shows the
selected channel and its frequency. The
first line of the display shows a rectangle.
The position of the rectangle indicates
the degree of signal strength (The further
towards the right, the greater the signal
strength. See 4).
5
Adjust the position of the antenna to obtain
the optimum signal strength.
6
Press SELECT to return to normal display.
➜ You may press DISPLAY to change the
service information on the display.
CLOCK
CLOCK lets you enter time and alarm setting
options:
1
In DAB/FM/AUX IN mode, press MENU to
enter menu options.
2
Press
1
/ 2
repeatedly until “Clock” appears.
3
Press SELECT to confirm the setting.
4
Press
1
/ 2
to select the options:
Set alarm - >Alarm On/Off - >
Snooze- > Sleep- > Auto-set Clock- >
Set clock- >kitchen time
–
“Auto - set clock” option is not available in
FM or AUX IN mode.
5
Press SELECT to confirm the setting.
Set alarm
Make sure you have correctly set the time
before you set the alarm.
1
In “Set alarm” mode, press
1
/ 2
to set time
➜ Press SELECT to switch hour setting to
minute setting.
2
Press SELECT to confirm the setting.
➜ “Alarm source” appears.
3
Press
1
/ 2
to select the alarm sound source:
DAB - > FM - > BUZZER
➜ “Set alarm date” appears.
4
Press
1
/ 2
to select the options:
Once- > Daily
5
Press SELECT to confirm the setting.
DAB Radio
Scanning for DAB stations
New stations and services will be regularly
added in the DAB broadcast.To make new
DAB stations and service available on your
DAB radio, a search is needed.
DAB Scanning outside UK:
•
In DAB mode, press briefly SCAN to
perform a search of wider range (full scan)
for DAB stations.
DAB Scanning in UK:
•
In DAB mode, press and hold SCAN for
more than 2 seconds to perform a local
search for DAB stations.
➜ Local scan time is shorter than full scan.
Storing DAB presets
You can preset up to 5 DAB stations on the
preset button for easy access.
1
In DAB mode, press
1
/ 2
repeatedly until
your desired station name is displayed.
•
To select desired DAB station, you may also
perform manual tuning (see Manual Tune).
2 Press PRESET once, and then press
1
/ 2
to
select preset numbers.
3
Press SELECT on the top of the set to
store the preset station.
Helpful hints:
–
If you have already saved a DAB station in
that preset location, it will be overwritten by a
new station.
–
When you store DAB stations, these do not
overwrite your FM presets.
Selecting a preset DAB
station
1
In DAB mode, press PRESET on the top of
the set.
2
Press
1
/ 2
to select presets 1-5.
3
Press SELECT to confirm the selection.
Resetting to the factory setting
(also available in FM mode)
Resetting to the factory setting will delete all
of the preset stations.
1
In DAB or FM mode, press and hold MENU.
➜ "Press SELECT to confirm reset" is
displayed.
2
To reset, press SELECT.
➜ All the presets will be deleted, and
"PHILIPS DAB & FM Radio" is displayed.
•
To not to reset, wait a few seconds until
"Press SELECT to confirm reset" disappears.
➜ The radio will revert to the previous
operating status.
Changing the DAB station
information
In DAB broadcasting, on the display, the first
line shows a station name, and the second
line shows the service information for the
current station.You are offered with 7 types
of information.
•
Press DISPLAY repeatedly to cycle through
the display information in the sequency as
follow (See 6, take "BBC Radio 5 Live" as an
example of a station name):
1: Dynamic Label Segment (DLS):This
is scrolling text information supplied by the
DAB station, such as music titles or details of
the programme.
2: Program Type (PTY):This is a
description of the type of programme, provided
by the DAB station and the broadcaster.
3: Multiplex Name:This will show the
multiplex that is broadcasting the programme
you are listening to.
4: Time and Date:This displays the time
and date, provided by the broadcaster.
5: Channel and Frequency:This displays
the channel number and the transmission
frequency.
6: Signal information:This shows the
digital bit-rate and the signal mode.
DAB Radio
DAB Radio
Alarm On/Off
1
In “Alarm On/Off ” mode, press
1
/ 2
to enter
options:
On -> Off
2
Press SELECT to confirm the setting.
➜ When the alarm is switched on,
appears.
➜ When the alarm is switched off,
appears.
SNOOZE
Make sure you have correctly set the time
and alarm.
1
In “Snooze” mode, press
1
/ 2
to enter
options:
5 minutes-> 10 minutes- >
15 minutes- >20 minutes- > off
2
Press SELECT to confirm the setting.
➜ The alarm repeats at the selected time.
SLEEP
1
In “SLEEP” mode, press
1
/ 2
to enter
options:
15 minutes-> 30 minutes->
45 minutes-> 60 minutes-> off
2
Press SELECT to confirm the setting.
➜
appears. At the selected time, the set
switches to standby mode.The clock
information is displayed on the LCD.
➜ The alarm/timer setting still works.
Auto - set clock
(only available in DAB mode)
In DAB mode, the clock of the set is auto-set
according to the time information of the
current station.
1
In “Auto - set clock” mode, press
1
/ 2
to
enter options:
No -> Yes
2
Press SELECT to confirm the setting.
Helpful hints:
–
In DAB mode, before you set clock, make
sure you have set “Auto-set clock” option as
“NO”. Otherwise, “Auto-set NO at first” is
displayed.
Set clock
1
In “Set clock” mode, press
1
/ 2
to set time
➜ Press SELECT to switch hour setting to
minute setting.
2
Press SELECT to confirm the setting.
Helpful hints:
–
If there is no power supply for more than 3
to 5 minutes, all the time settings are cleared.
Kitchen time
1
In “Kitchen time” mode, press
1
/ 2
to select
desired time.
–
The maximum time is 120 minutes.
2
Press SELECT to confirm the setting.
➜
appears.
➜ At the selected time, alarm rings for 5
minutes unless you interrupt it by pressing
TIMER.
–
The volume of the alarm increases from low
to high.
Helpful hints:
–
Another way to access “Kitchen time” is to
press TIMER on the set.
Dynamic Range Control (DRC)
DRC adds or removes a degree of
compensation for the differences in the
dynamic range between radio stations. For
example, a station broadcasting popular music
may have a high level of compensation
applied since the emphasis is on a constant
high listening level, whereas a station
broadcasting classical music will have little or
no compensation as the listener requires all
of the highs and lows in the music to define
the detail.
There are three levels of compensation:
DRC 0: No compensation applied.
DRC 1: Maximum compensation applied
(This is the default.).
DRC1/2: Medium compensation applied.
OFF
ON
Safety & maintenance
information
•
Place the set on a flat, hard and stable surface
so that the system does not tilt.
•
Do not expose the set, batteries, CDs to
humidity, rain, sand or excessive heat caused
by heating equipment or direct sunlight.
•
The apparatus shall not be exposed to
dripping or splashing.
•
Adequate ventilation with a minimum gap of
15cm (6 inches) between the ventilation
holes and surrounding surfaces is necessary
to prevent heat build-up.
•
Do not cover the ventilation openings with
items such as newspapers, table-cloths,
curtains, etc.
•
No objects filled with liquids, such as vases,
shall be placed on the apparatus.
•
No naked flame sources, such as lighted
candles, should be placed on the apparatus.
•
The mechanical parts of the set contain self-
lubricating bearings and must not be oiled or
lubricated.
•
To clean the set, use a dry cloth. Do not use
any cleaning agents containing alcohol,
ammonia, benzene or abrasives as these may
harm the housing.
Safety & Maintenance (See 7)
1
In DAB mode, press MENU to enter menu
options.
2
Press
1
/ 2
repeatedly until "DRC value" is
displayed.
3
Press SELECT to enter the sub-menu.
➜ The current DRC level will be displayed
on the first line.
4
Press
1
/ 2
to select a DRC value (DRC 0,
DRC 1 and DRC1/2) displayed on the
second line.
5
Press SELECT to confirm the selection
when the requied value is displayed.
➜ You should be able to hear the difference
in compression immediately.
Helpful hints:
–
The best way to determine which of these
DRC value settings suits you best is to
experiment with them on a variety of source
material.
Autoscan local
1
In DAB mode, press MENU to enter menu
options.
2
Press
1
/ 2
repeatedly until "Autoscan
local" is displayed.
3
Press SELECT to confirm the selection.
➜ The local search for DAB station(s) will
be performed.
Autoscan full
1
In DAB mode, press MENU to enter menu
options.
2
Press
1
/ 2
repeatedly until "Autoscan full"
is displayed.
3
Press SELECT to confirm the selection.
➜ The wide range (full scan) search for
DAB station(s) will be performed.
Helpful hints:
–
Performing a DAB scan will restore the
cancelled station(s) to the selection list if the
station(s) become(s) activated again.
Sw version
This is only provided as the version number
for this product.
Switching on FM radio
1
In standby mode, press 2 to switch to the
last selected sound source.
2
Press SOURCE to select FM mode if "FM"
is not displayed.
➜ Waveband and radio frequency are
displayed (see 5).
Tuning to radio stations
1
In FM mode, press SCAN until frequency
number starts running.
➜ The radio will auto tune to a station of
strong signal strength, and search will stop.
2
To tune to a weak station, press
1
/ 2
until
an optimum reception is found.
3
Repeat the steps above until you find the
desired station.
Helpful hints:
–
Before pressing SCAN, you may first press
2
to select a scan up, or press
1
to select a
scan down.
Storing FM presets
You can store up to 5 FM stations on
PRESET for easy access.
1
In FM mode, tune to your desired radio
station (See "Tuning to radio stations").
2 Press PRESET once, and then press
1
/ 2
to
select preset numbers.
3
Press SELECT on the top of the set to
store the preset station.
Helpful hints:
–
If you have already saved a FM station in that
preset location, it will be overwritten by a
new station.
–
When you store FM stations, these do not
overwrite your DAB presets.
Selecting a preset FM station
1
In FM mode, press PRESET on the top of
the set.
2
Press
1
/ 2
to select presets 1-5.
3
Press SELECT to confirm the selection.
DAB Radio
FM Radio
AE5900
DAB FM radio
1
4
7
6
5
9
1
2
3
8
0
!
#
@
Register your product and get support at
www.philips.com/welcome
User Manual
Brukerhåndbok
Brugervejledning
BBC Radio 5 Live
BBC National DAB
BBC Radio 5 Live
Signal error 7
BBC Radio 5 Live
10:32
BBC Radio 5 Live
80kpbps Mono
BBC Radio 5 Live
12B 225.64MHz
BBC Radio 5 Live
DLS Scrolling...
BBC Radio 5 Live
News
1
2
3
7
6
4
5
Scanning...
PHILIPS
DAB & FM Radio
7A
188.92MHz
88.10MHz St FM
FM
2
3
4
5
6
7
Problem
– Possible cause
• Remedy
The radio has no power.
– Power cord not securely connected.
• Connect the power cord properly.
No sound is heard.
– Volume not adjusted.
• Adjust the VOLUME.
– Headphones connected to the set.
• Disconnect headphones.
– The station is currently out of service.
• Wait until the service resumes, or tune to a new
station.
The indication “No stations available” is
displayed.
– DAB coverage is currently not available in your area.
• Wait until the coverage resumes.
– DAB signal is weak.
• Re-locate the radio, or adjust the position of
the telescopic antenna.
The indication “Station off air” is
displayed.
– The station is currently out of service.
• Wait until the service resumes. Or, perform a scan
by pressing SCAN in DAB mode.
Poor reception
– Signal strength is weak.
• Re-locate the radio, or adjust the position of
the telescopic antenna. For DAB, you may also
perform manual tuning. See Manual tune.
I cannot hear the DAB station I have
selected.
– SELECT button was not pressed after changing a
station by pressing
1
/ 2
.
• Press SELECT button to tune to the selected
station.
Note:
In case of malfunciton due to electrostatic discharge,
just reset the product (Reconnect of power source
may be required.) to resume normal operation.
Troubleshooting
If a fault occurs, first check the points listed below before taking the set for repair.
If you are unable to remedy a problem by following these hints, consult your dealer or
service centre.
WARNING
:
Do not open the set as there is a risk of electric shock. Under no
circumstances should you try to repair the set yourself, as this will
invalidate the guarantee.
Hørselssikkerhet
Lytt til et moderat volum.
•
bruke hodetelefoner med høyt volum kan skade hørselen. Dette produktet kan gi lyder på
desibelskalaen som kan forårsake hørselstap for en vanlig person, selv ved eksponering i mindre
enn ett minutt. Lydene høyt på desibelskalaen tilbys for de som allerede er rammet av hørselstap.
•
Lyd kan bedra. Over tid vil "komfortnivået" til hørselen tilpasses høyere lydvolumer. Etter mye
lytting, kan det som høres "normalt" ut faktisk være høyt og skadelig for hørselen. For å beskytte
deg mot dette setter du volumet på et trygt nivå før hørselen din tilpasser seg, og lar det står der.
Slik finner du et trygt lydvolum:
•
Sett volumkontrollen lavt.
•
Øk lyden sakte til du hører den komfortabelt og tydelig uten forvrenging.
Lytt i rimelige perioder:
•
Langvarig lydeksponering, selv ved vanlige "trygge" nivåer, kan også forårsake hørselstap.
•
Husk å bruke utstyret ditt fornuftig og ta passende pauser.
Husk å gjøre deg kjent med følgende retningslinjer når du bruker hodetelefonene
•
Lytt til et fornuftig lydvolum i rimelige perioder.
•
Husk å ikke stille volumet når hørselen din tilpasser seg.
•
Ikke skru volumet så høyt at du ikke hører hva som skjer rundt deg.
•
Du bør utvise forsiktighet eller stoppe bruken midlertidig i potensielt farlige situasjoner.
•
Ikke bruk hodetelefoner når du styrer et motorisert kjøretøy, sykler, skateboarder osv. Det kan
være trafikkfarlig og er ulovlig mange steder.
Høresikkerhed
Lyt ved moderat lydstyrke.
•
Brug af hovedtelefoner ved høj lydstyrke kan skade hørelsen. Dette produkt kan frembringe lyd
med så høje decibelværdier, at det kan forårsage høreskader for en normalt hørende person, også
selv om det kun foregår i mindre end et minut. De høje decibelværdier er for at imødekomme de
personer, der allerede lider af nedsat hørelse.
•
Lyd kan snyde. Efter et stykke tid vil dine ører vænne sig til høj lyd og tilpasse sig en mere kraftig
lydstyrke. Så det, der efter længere tids lytning forekommer normalt, kan faktisk være meget højt
og skadeligt for hørelsen. Hvis du vil undgå det, kan du indstille lydstyrken til et fornuftigt niveau,
før din hørelse vænner sig til lydstyrken, og så lade være med at skrue op.
Sådan indstilles lydstyrken til et fornuftigt niveau:
•
Indstil lydstyrken til et lavt niveau.
•
Øg langsomt lydstyrken, til den når et behageligt niveau, hvor du kan høre lyden klart uden forvrængning.
Undlad at lytte i for lange perioder ad gangen:
•
For lang tids udsættelse for lydpåvirkning, selv ved et fornuftigt niveau, kan også forårsage
hørenedsættelse.
•
Sørg for at anvende udstyret på en fornuftig måde, og hold passende pauser.
Overhold følgende retningslinjer, når du anvender dine hovedtelefoner.
•
Lyt ved en fornuftig lydstyrke i kortere tidsrum.
•
Vær omhyggelig med ikke at justere på lydstyrken undervejs, da din hørelse tilpasser sig lydniveauet.
•
Undlad at skrue så højt op for lyden, at du ikke kan høre, hvad der foregår omkring dig.
•
Du bør være ekstra forsigtig eller slukke midlertidigt i potentielt farlige situationer.
•
Undlad at bruge hovedtelefonerne, mens du fører et motoriseret køretøj, cykler, står på
skateboard o.l., da det kan føre til farlige situationer i trafikken. Desuden er det ulovligt i mange
områder
AE5900_ 05_Eng/Nor/Dan 2007.9.3 17:07 Page 1