Analog recording via the tape monitor jacks, What you may need, Tape monitor zone & record outputs – Parasound Halo C1 Controller User Manual
Page 44: Record input playback output, Rca plug
Analog Recording Via the Tape Monitor Jacks
With some audio recorders, the Tape Monitor feature enables you to observe the quality of your
recording as it’s being made, without having to rewind the tape or go back to the beginning of
the disc and play it through again to be sure it is okay. Analog recorders with separate record
and playback heads can play the signal from the tape as soon as it’s passed from the recording
to the playback head. If you’re recording to the analog inputs of a CD, DAT, or other digital
recorder, using Tape Monitor lets you hear the signal after it’s gone through the recorder’s ana-
log-to-digital (and digital-to-analog) converters, so you can make sure there’s no overload distor-
tion. If you do hear any problems, the Tape Monitor helps you determine, by comparing the orig-
inal signal to the recorder’s output, whether that signal or your recorder is causing the problem.
(If it is your recorder, check its level settings; setting the level too high is the most common
cause of distortion in recording.)
If your recorder is connected to the Record Out jacks next to the Zone output, you can also
monitor its output by selecting it as the source for your main zone. But while you’re recording,
be sure not to select any active recorder as the source for the Zone output, or you’ll hear an
annoying (and possibly speaker-damaging) loud howl.
The analog record outputs carry only two-channel signals. Surround information will be recorded
if your source is matrix-encoded analog material such as a video tape with a Dolby Surround
soundtrack. When recording from DVDs or other digital sources, add left- and right-channel
analog connections from the source to the C 1 and select that analog input for recording, as
multichannel digital signals are fed only to the digital output.
(Note: The Tape Monitor jacks can also be used as an external processor loop, connected to an
equalizer or other two-channel processor. With the processor connected between Rec/Out and
Play/In jacks, you can switch it in and out of the signal path from your chair, using the Tape key
on the Master remote.)
Optical 1
Optical 3
Coax 1
Coax 2
Coax 3
Coax 4
Optical 2
Optical 4
Video 1
Video 2
Video 3
Video 4
Video 5
Video 6
Audio 1
Audio 2
Audio 3
Audio 4
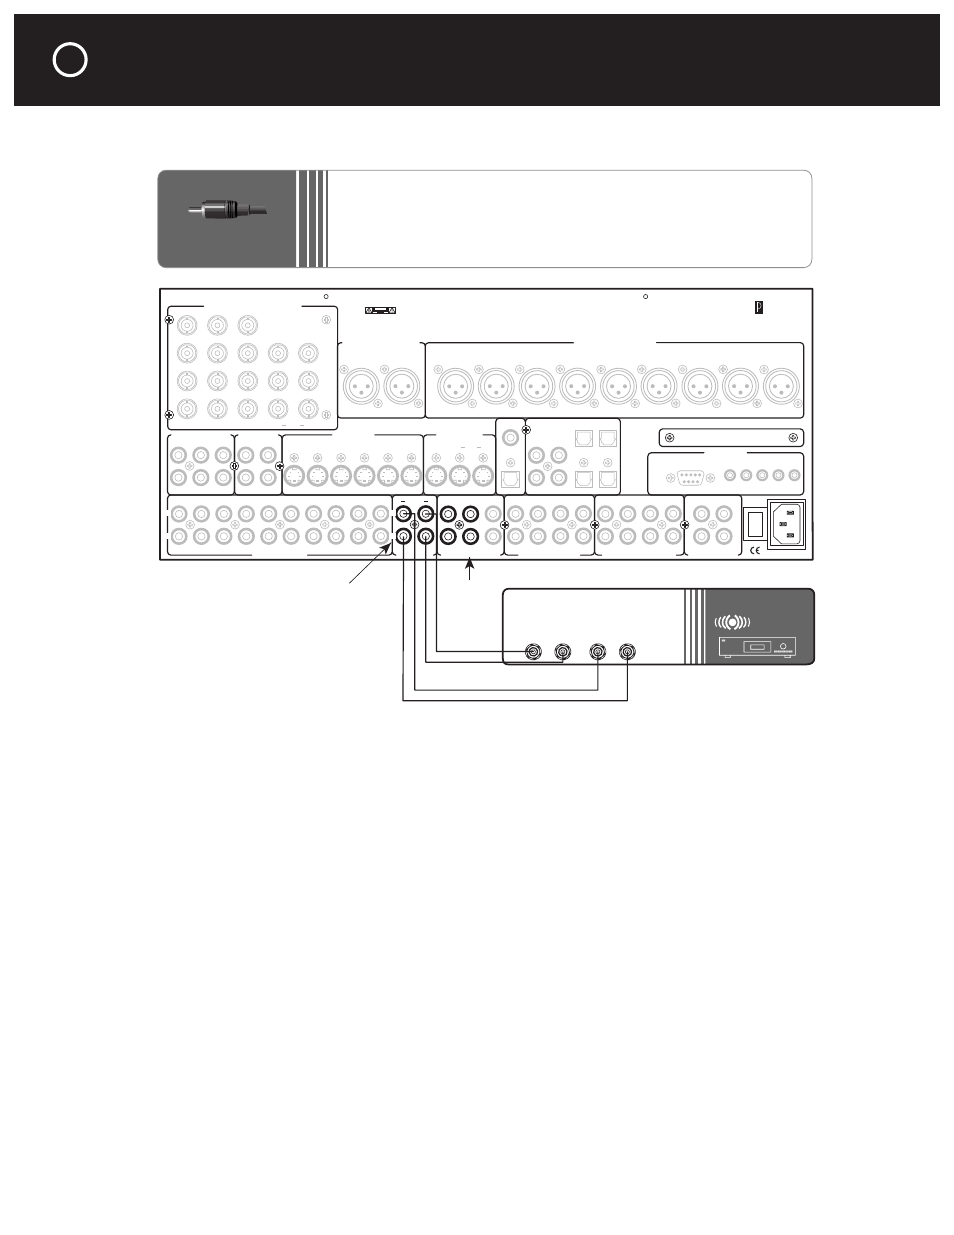
Record 1 Record 2
Zone
Audio 5
Play/In
Rec/Out
Balanced Analog Audio Outputs
Balanced Analog Audio Inputs
C2 Controller
Parasound Products, Inc.
San Francisco, California, USA
Input 1
Input 2
Input 3
Output
Component Video Inputs and Outputs
Sync
Red
Green
Blue
H
V
Pr
Y
Pb
Composite Video Inputs
Video Outputs
S-Video Inputs
Video 1
Video 2
Video 3
Video 4
Video 5
Video 6
S-Video Outputs
Record
Main
Digital Out
Coax
Digital Audio Inputs
Optical
Made In
Finland
Expansion Port For
Future Technologies
IR Inputs
– 12V Triggers –
RS-232 Control
External Control
L
R
L
R
Analog Audio Inputs
Tape Monitor
Analog Audio Outputs
Programmable Out
Main Analog Audio Outputs
7.1 Analog Audio Inputs
1
0
AC Power
CAUTION
TO PREVENT ELECTRIC SHOCK,
DO NOT REMOVE COVER. NO USER
SERVICEABLE PARTS INSIDE,
REFER SERVICING TO QUALIFIED
SERVICE PERSONNEL.
Left
Right
Left
Right
Center
Subwoofer
Left Surround
Right Surround
Left Back
Right Back
Pro 1
Video 1
Video 2
Video 3
Video 4
Video 5
Video 6
Record
OSD
Zone
NoOSD
Main
Pro 3
Pro 1
Pro 4
Pro 2
Sub
Front
Surround
Center
Back
Front
Surround
Center
Sub
Back
Digital Out
Optical
Main
Zone
P1
P2
On-Off
Tape
Monitor
Zone &
Record
Outputs
DIGITAL
AUDIO
RECORDER
Record
Input
Playback
Output
L
R
L
R
RCA Plug
CONNECTING AUDIO AND VIDEO SOURCES AND RECORDERS
continued
44
What You May Need:
•
Two pairs of unbalanced interconnects with RCA plugs
•
Analog tape recorder, preferably with off-tape
(third-head) monitoring