Press [ 2 , 1 ] to select “erase” and press [enter, Editing – Panasonic DMR-E100H User Manual
Page 37
37
RQT6986
Editing
0:19 SP
Remaining Recording Time
Shorten Segment
Corresponding PLAY LIST will also be erased.
Erase
Cancel
RETURN
ENTER
SELECT
Shorten
Segment
0 : 00 . 01
Start
– : – – . – –
End
3
Start
End
Next
Exit
0 : 00 . 01
PLAY
03
RETURN
ENTER
SELECT
N
S
0 : 00 . 01
Start
End
3
Start
End
Next
Exit
0 : 10 . 15
RETURN
ENTER
SELECT
0 : 10 . 15
N
S
Shorten
Segment
03
3
Divide Program
Divide
Cancel
RETURN
ENTER
SELECT
Once you divide the program,
it will not be restored to the original.
DIRECT NAVIGATOR
No
DATE
CH
TIME
EDIT
TITLE
01
4
02
6
03
13
3
3
1
1
1
1
1
ENTER
0
~
9
No
TOTAL 3
SELECT
RETURN
9 : 00 PM
Auto action
6/20 WED
11 : 00 PM
USJ
6/20 WED
6/20 WED 10 : 00 AM
Dinosaur
DVD
DVD
DVD
[Note]
≥
The disc’s available recording time may not increase after
erasing short programs.
≥
Computer data cannot be erased.
≥
The available recording time on DVD-R does not increase when
you erase programs.
The lock symbol
appears when the
program is write-
protected.
Press [
2
,
1
] to set
protection and press
[ENTER].
[Note]
≥
You can use basic functions like fast forwarding/rewinding and slow-motion
play (
➜
page 20).
≥
You can use the skip function to jump to another program (
➜
page 20).
≥
Play pauses if the end of the program is reached during this procedure.
≥
You may not be able to specify points within 3 seconds of each other.
≥
You cannot specify an end point before a start point.
≥
You cannot specify points on still pictures in the program.
≥
The disc’s available recording time may not increase after erasing short segments.
[Note]
≥
You can use basic functions like fast forwarding/
rewinding and slow-motion play (
➜
page 20).
≥
You can use the skip function to jump to another
program (
➜
page 20).
≥
The beginning and ending scenes cannot be
set.
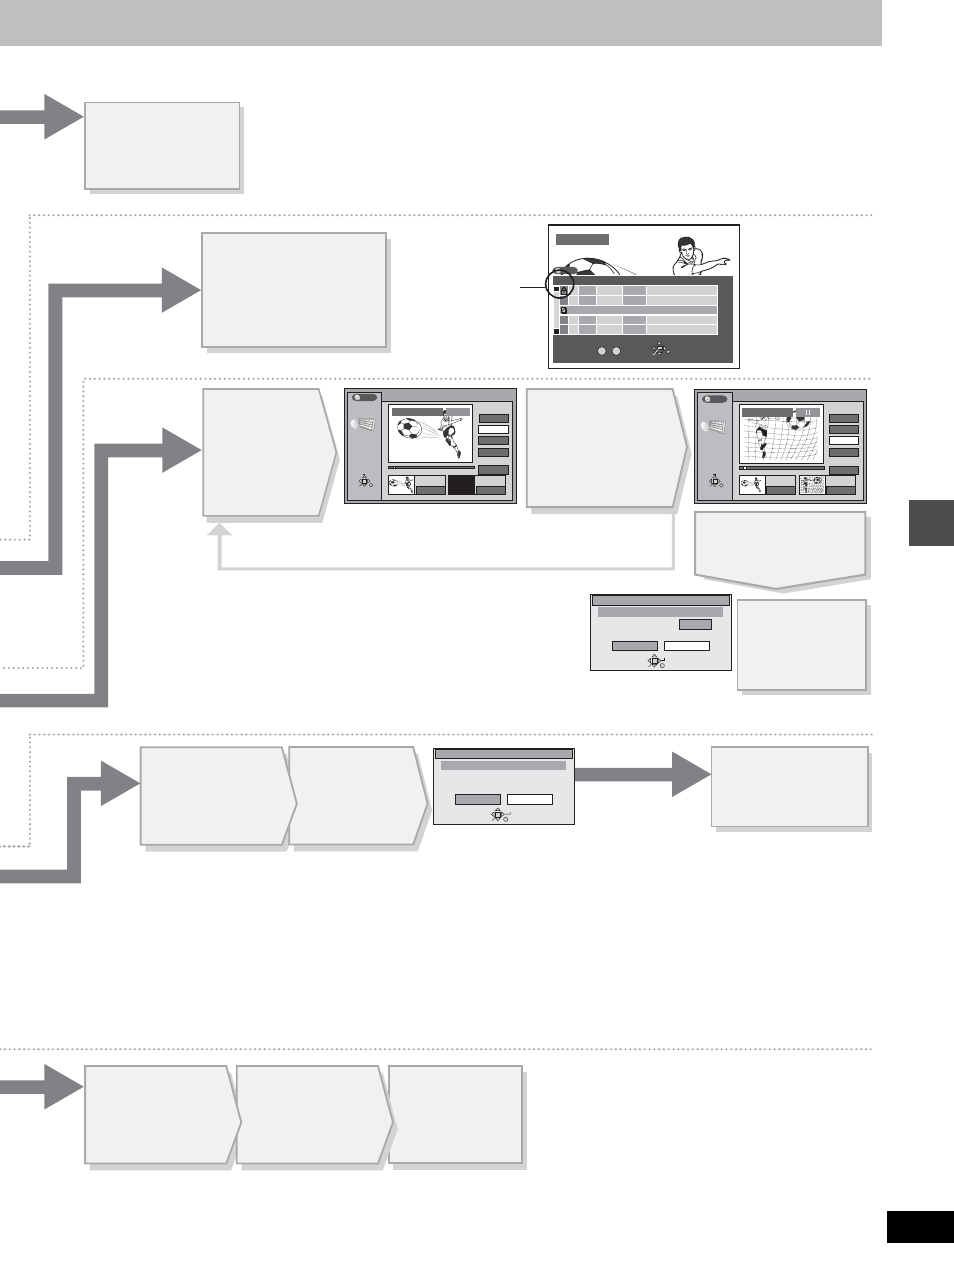
Repeat to enter other sections.
Press [
3
,
4
] to
select “Exit” and
press [ENTER].
Press [
2
,
1
]
to select
“Erase” and
press [ENTER].
Press [
3
,
4
] to select “Next” and press [ENTER], then press [
2
,
1
]
to select “Erase” and press [ENTER].
Press [
2
,
1
] to
select “Erase” and
press [ENTER].
The program is erased.
Press [ENTER]
at the end point
of the section
you want to
erase.
Press [
3
,
4
]
to select “Exit”
and press
[ENTER].
[Note]
≥
You can use basic functions like fast forwarding/rewinding and slow-motion
play (
➜
page 20).
≥
You can use the skip function to jump to another program (
➜
page 20).
≥
The divided programs retain the title and CPRM property (
➜
page 62) of
the original program.
≥
Video and audio just before and after the dividing point may momentarily cut
out.
≥
It is not possible to carry out Divide Program in the following cases:
–when the program is extremely short.
–when the total number of programs is more than 250 (HDD) or 99
(DVD-RAM).
To confirm the division point
Press [
3
,
4
] to select “Preview” and press
[ENTER]. (Play will begin from a point 10
seconds prior to and after the division point.)
To change the division point
Restart play and press [
3
,
4
] to select
“Divide”, then press [ENTER] at the point you
want to change.
To change the thumbnail
Press [
3
,
4
] to select “Change” and repeat the operation above.
Press [ENTER]
at the point you
want to divide
the program.
Press [
3
,
4
]
to select “Exit”
and press
[ENTER].
Press [ENTER]
at the desired
point to be the
thumbnail.
Press
[ENTER] at
the start point
of the section
you want to
erase.
Press [
1
] (PLAY).
Press [
2
,
1
] to
select “Divide” and
press [ENTER].
The program is divided.