Changing this unit’s settings, About the auto standby function, Setting preferences – Pioneer DJ Mixer DJM-T1 User Manual
Page 25: Chang ing the settings
24
25
DRB1558-A
En
25
Chang
ing
the
settings
Changing this unit’s settings
1 Press the [UTILITY (WAKE UP)] button for over 1 second.
The [UTILITY (WAKE UP)] indicator and the top of the [CH 1] channel level indicator
flash.
2 Press the [LOAD (DUPLICATE) B] button.
The setting item changes each time the [LOAD (DUPLICATE) B] button is pressed.
The flashing position of the [CH 1] channel level indicator moves downwards.
! When the [LOAD (DUPLICATE) A] button is pressed, the selection returns to the
previous setting item.
The flashing position of the [CH 1] channel level indicator moves upwards.
3 Turn the rotary selector.
Change the setting value.
! When the setting value can be switched on and off
— On: The green section of the [CH 2] channel level indicator lights.
— Off: The green section of the [CH 2] channel level indicator turns off.
! When the setting value can be switched in steps
— One’s place of setting value: Value indicated by the number of segments
of the [CH 2] channel level indicator that are lit.
— Ten’s place of setting value: Value indicated by the number of segments
of the master level indicator that are lit.
4 Press the rotary selector.
The settings are stored in this unit.
The [UTILITY (WAKE UP)] button flashes rapidly. Do not turn this unit’s power off
while the settings are being stored.
! Storing is completed when the [UTILITY (WAKE UP)] button switches from
flashing rapidly to flashing normally.
! Press the [UTILITY (WAKE UP)] button to return to normal operation.
About the auto standby function
When [Auto Standby] is set to [ON], the standby mode is set automatically if 4
hours pass with all of the conditions shown below met.
— That none of this unit’s buttons or controls are operated.
— That no audio signals are input to this unit’s input terminals.
— That no computer is connected by USB.
! When the [UTILITY (WAKE UP)] button is pressed, the standby mode is
canceled.
! This unit is shipped with the auto standby function turned on. If you do not want
to use the auto standby function, set [Auto Standby] to [OFF].
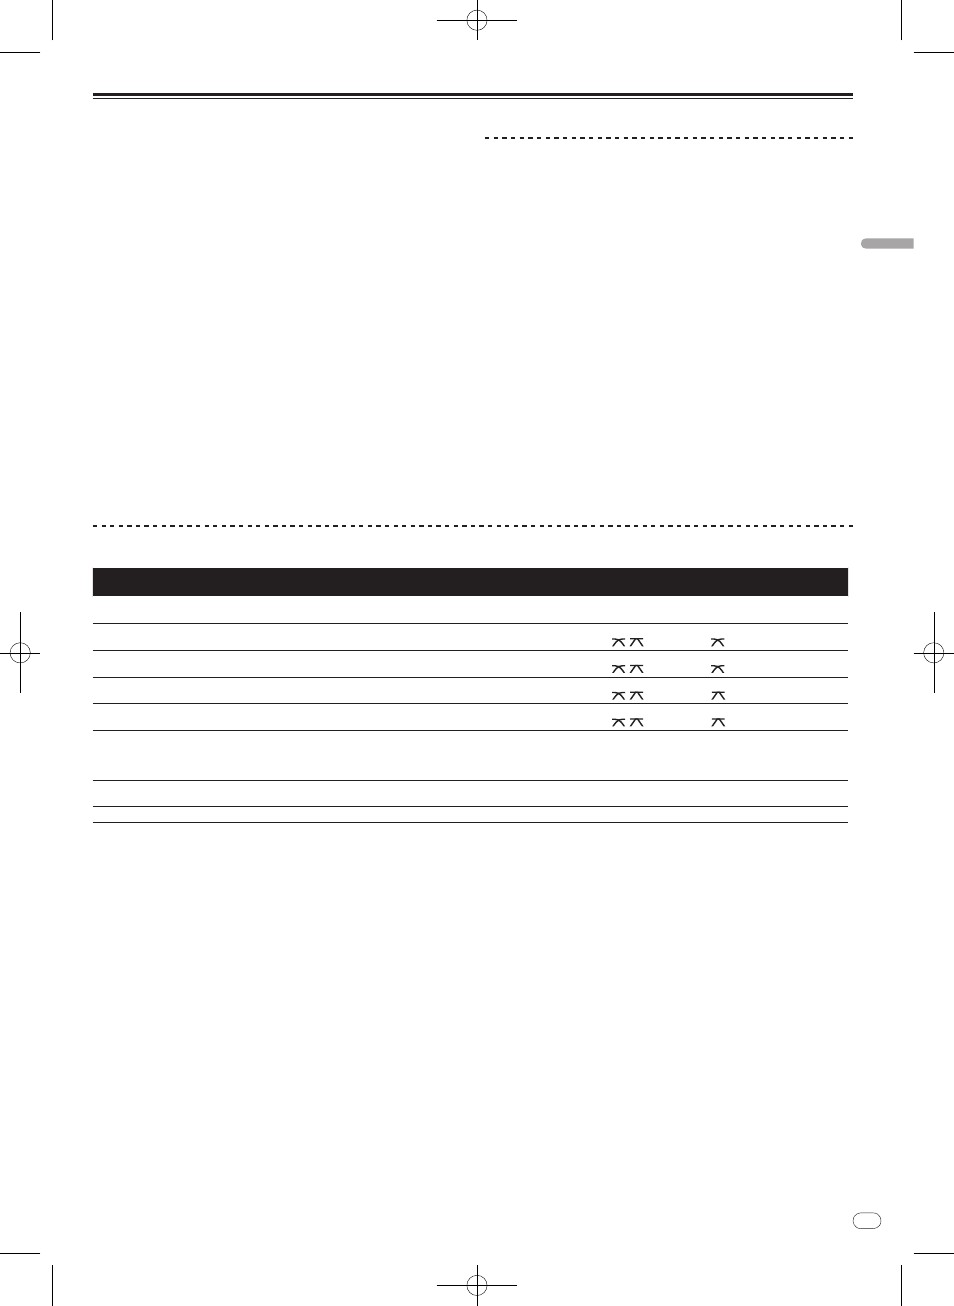
Setting preferences
Options settings
Flashing position of [CH 1]
channel level indicator
Setting value
Default value
Descriptions
Cross Fader Cut Lag
Very top
0 to 52
6
Adjusts the play at the edges of the crossfader (the cut lag). The cut lag can
be adjusted between 0.74 mm and 5.94 mm, in 0.1 mm units.1
Cross Fader Curve Slow A
Second from top
0 to 32
16
Adjusts the [CH 1] side attenuation curve characteristics when the [CROSS F.
CURVE (THRU,
,
)] switch is set to [
].2
Cross Fader Curve Slow B
Third from top
0 to 32
16
Adjusts the [CH 2] side attenuation curve characteristics when the [CROSS F.
CURVE (THRU,
,
)] switch is set to [
].2
Cross Fader Curve Fast A
Fourth from top
0 to 32
32
Adjusts the [CH 1] side attenuation curve characteristics when the [CROSS F.
CURVE (THRU,
,
)] switch is set to [
].2
Cross Fader Curve Fast B
Fifth from top
0 to 32
32
Adjusts the [CH 2] side attenuation curve characteristics when the [CROSS F.
CURVE (THRU,
,
)] switch is set to [
].2
Generic Controller Mode
Sixth from top
ON/ OFF
OFF
Turns on and off the function for selecting effects using the effect control
buttons.
When off, the LFO CONTROL and CROSS FADER CONTROL functions can
be used.
Mic Output To Booth Monitor
Seventh from top
ON/ OFF
ON
Sets whether or not to output the microphone’s audio signals from [BOOTH]
terminals.
Auto Standby
Eighth from top
ON/ OFF
ON
Turns the auto standby function on and off.
1
If the setting value is extremely small, the sound may not be completely muted even when the crossfader is positioned at the very edge.
2
Attenuation has an abrupt curve characteristic when the setting value is small, a gentle curve characteristic when the setting value is large.