Using the cross fader control function, Table of hot cue/ sampler button operations, Op eration – Pioneer DJ Mixer DJM-T1 User Manual
Page 21
20
21
DRB1558-A
En
21
Op
eration
Switches to the mode in which the [SELECT] indicator, [HOT CUE/ SAMPLER] button
and [ACTIVE] button light orange.
3 Press the [HOT CUE/ SAMPLER] button.
The track loaded in deck [A] is loaded into the sampler slot on sample deck [C].
! The track is sampled for 48 seconds from the position playing when the button
was pressed, and this is loaded into the sampler slot.
! The track selected with the cursor in the [TRACK] area can be loaded into the
sampler slot by pressing the [HOT CUE/ SAMPLER] button while pressing the
[SHIFT] button. (Tracks with a playing time longer than 48 seconds cannot be
loaded.)
4 Press the [ACTIVE] button while pressing the [SHIFT] button.
The sample’s loop mode switches.
— [
] Loop play mode:
When the end of the sample is reached, sample playback returns to the
beginning and continues.
— [
] One shot play mode:
When the end of the sample is reached, sample playback stops.
5 Press the [ACTIVE] button.
The [HOT CUE/ SAMPLER] button’s button mode switches.
— Sample play mode:
The sample is played or muted each time the button is pressed.
— Trigger play mode:
When the button is pressed, the sample is played from the beginning, and
stops when the button is released.
! For details, see Table of HOT CUE/ SAMPLER button operations on page 21.
6 Press the [HOT CUE/ SAMPLER] button or press and hold the
[HOT CUE/ SAMPLER] button.
The sample is played.
! When the [HOT CUE/ SAMPLER] button is pressed again or the [HOT CUE/
SAMPLER] button is release, output of the sample’s sound stops.
Using the CROSS FADER CONTROL function
CROSS FADER CONTROL is a function allowing you to call out hot cues and start
playing samples in association with operation of the crossfader.
! First make the following preparations.
— Turn off [Generic Controller Mode] in this unit’s settings.
= See Changing this unit’s settings on page 25.
— Register a hot cue in deck [A] or [B].
= See Using the hot cue function on page 20.
— Load a sample in sample deck [C] or [D].
= See Using the sampler function on page 20.
! The section operated differs according to the decks to be associated.
— To associate deck [A] and sample deck [C]:
Operate the hot cue/ sampler section on this unit’s [CH 1] side.
— To associate deck [B] and sample deck [D]:
Operate the hot cue/ sampler section on this unit’s [CH 2] side.
! When the [CROSS F. REVERSE] switch is on, the crossfader’s direction of operation
is inverted.
1 Press the [SELECT] button while pressing the [SHIFT] button.
The CROSS FADER CONTROL function turns on.
The [SELECT] indicator flashes.
! When the [SELECT] button is pressed again while pressing the [SHIFT] button,
the CROSS FADER CONTROL function turns off.
2 Press the [SELECT] button.
Select the function to be associated with the CROSS FADER CONTROL function (the
hot cue function or the sampler function).
— To associate the hot cue function:
Switches to the mode in which the [SELECT] indicator, [HOT CUE/
SAMPLER] button and [ACTIVE] button light and flash green.
— To associate the sampler function:
Switches to the mode in which the [SELECT] indicator, [HOT CUE/
SAMPLER] button and [ACTIVE] button light and flash orange.
! It is also possible to associate both the hot cue function and the sampler func-
tion with operation of the crossfader. (The hot cue and sample to be associated
with the crossfader must be selected separately for each function.)
3 Press the [HOT CUE/ SAMPLER] button.
Select the hot cue and sample to be associated with operation of the crossfader.
— To select a hot cue:
Press the [HOT CUE/ SAMPLER] button at which the hot cue is set. Only one
of hot cues [1] – [4] can be selected.
— To select a sample:
Press the [HOT CUE/ SAMPLER] button at which the sample is loaded. Up to
four of samples [1] – [4] can be selected.
! With this procedure, the hot cue and sample are not played.
! When the [HOT CUE/ SAMPLER] button is pressed again, the selection is
canceled.
4 Move the crossfader.
Move the crossfader to the side opposite the side to which the hot cue or sample to
be associated with the CROSS FADER CONTROL function is set.
5 Move the crossfader.
When the crossfader is moved to the right from the [CH 1] edge, the deck [B] hot cue
and sample deck [D] sample are played.
When the crossfader is moved to the left from the [CH 2] edge, the deck [A] hot cue
and sample deck [C] sample are played.
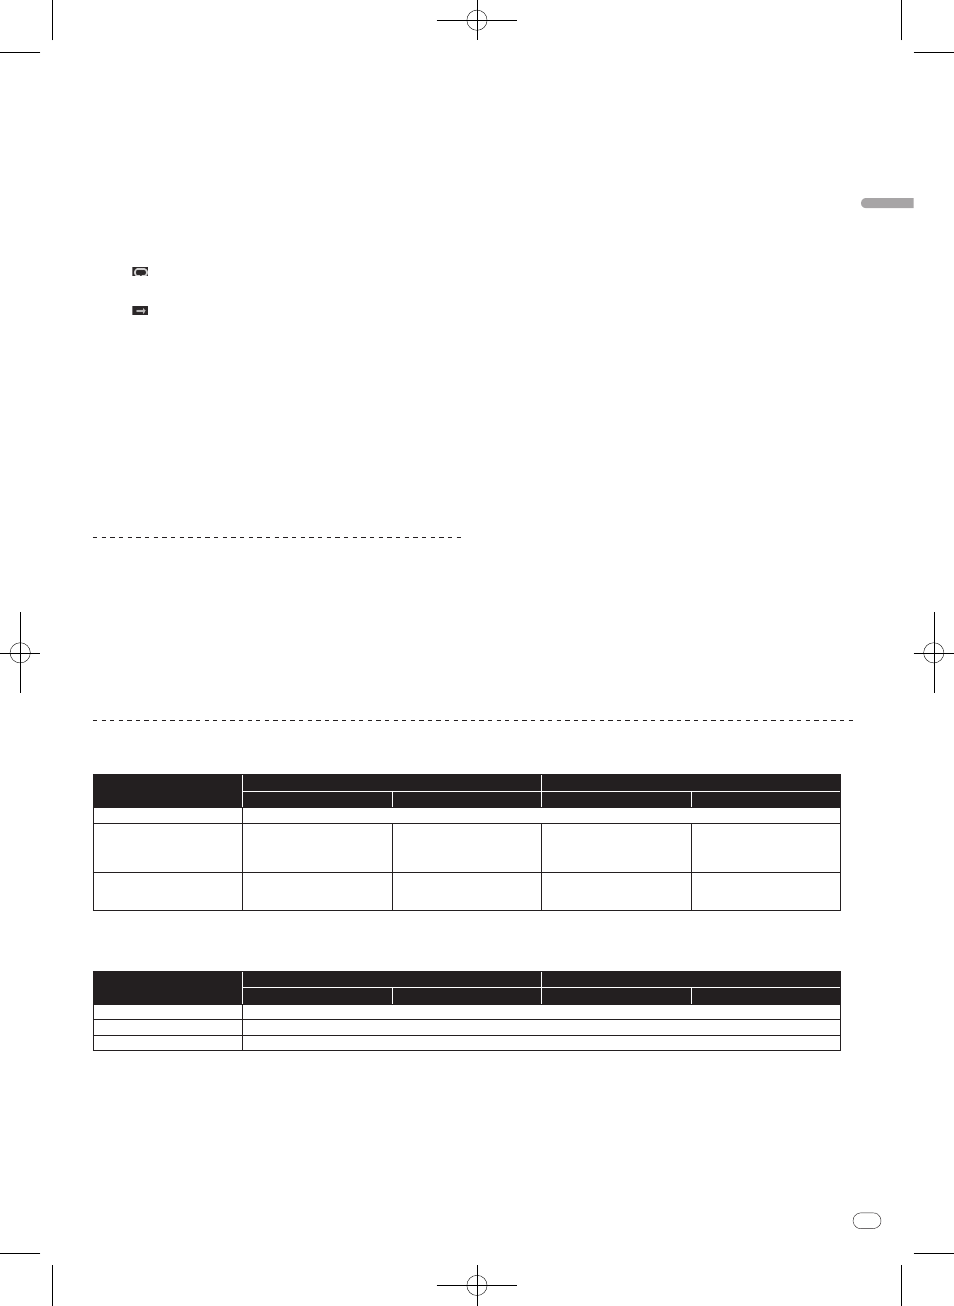
Table of HOT CUE/ SAMPLER button operations
! Press:
Sampler slot
Loop play mode
1
One shot play mode
1
Sample play mode
1
Trigger play mode
1
Sample play mode
1
Trigger play mode
1
When no sample is loaded
The music file loaded in the deck is loaded into the sampler slot as a sample.
When a sample is loaded
Playback of the sample begins.
The sample is played while the button
is pressed.
When the button is released, play-
back of the sample stops.
Playback of the sample begins.
The sample is played while the button
is pressed.
When the button is released, play-
back of the sample stops.
While playing a sample
The sample is muted.
2
When pressed for over 1 second,
playback of the sample stops.
The sample is cued and playback
continues.
Playback of the sample stops.
The sample is cued and playback
continues.
1
The mode can be switched using the [ACTIVE] button (page 20).
2
When the sample is muted, muting is canceled.
! [SHIFT] + press:
Sampler slot
Loop play mode
1
One shot play mode
1
Sample play mode
1
Trigger play mode
1
Sample play mode
1
Trigger play mode
1
When no sample is loaded
The music file selected in the [TRACK] area is loaded in the sampler slot as a sample.
When a sample is loaded
The sample is deleted.
While playing a sample
The sample is deleted.
1
The mode can be switched using the [ACTIVE] button (page 20).