Wiring connections – PAC Automobile Accessories User Manual
Page 2
SWI-JACK
Wiring Connections
Step 1.
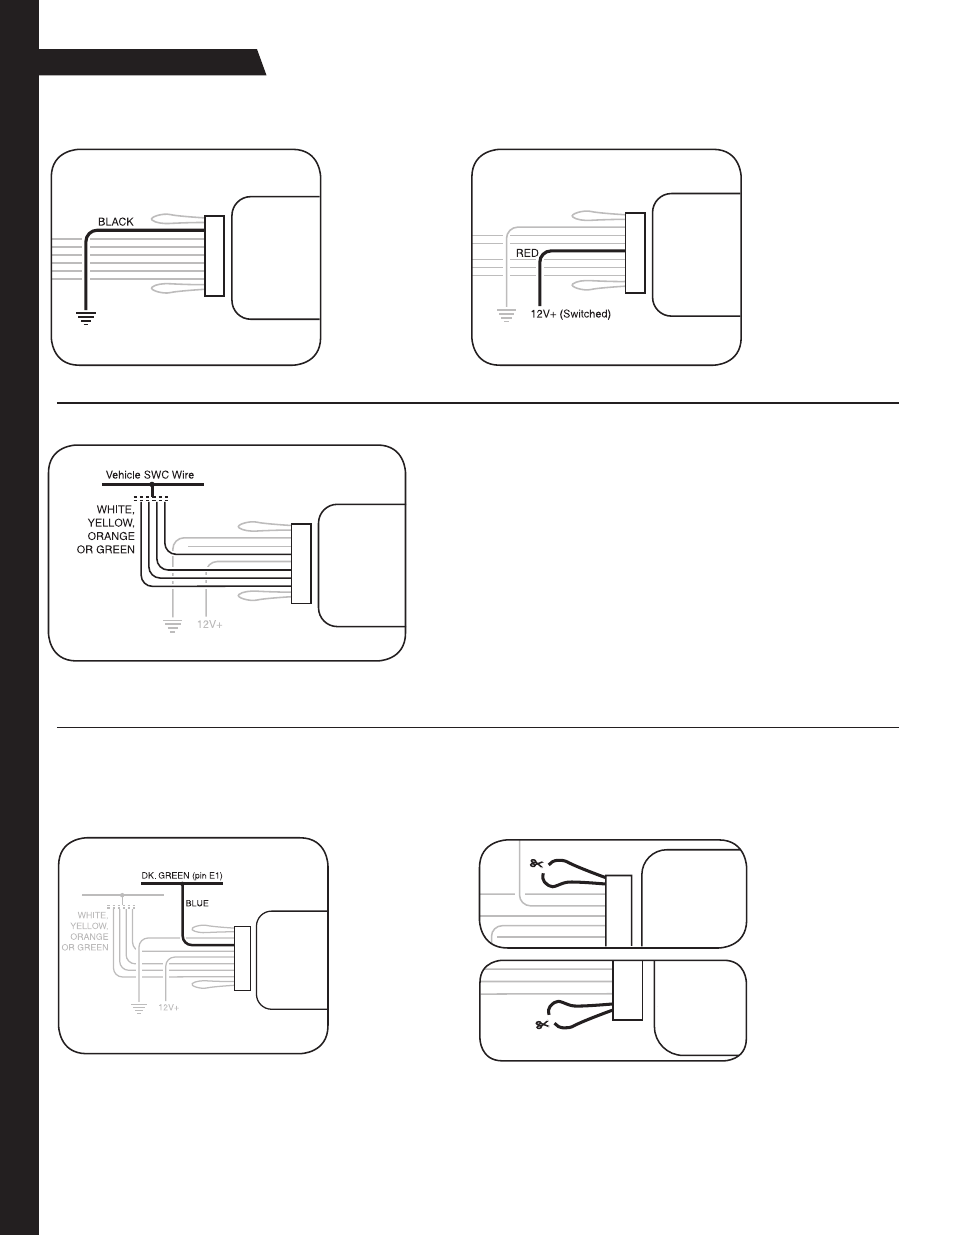
Connect the BLACK
wire to ground (-).
Verification: Wire
or location registers
a constant (-) when
probed.
Step 2.
Connect the RED wire
to switched +12V.
Verification: Wire reg-
isters +12V when the
ignition key is turned
to the ACC or ON posi-
tions.
Step 3.
Connect the appropriate interface wire (WHITE, YELLOW, ORANGE or
GREEN).
• Refer to the
Identification and Connection Chart. Locate the vehicle and
note the SWC wire color in the “Interface Wire Color” column.
• Note the vehicle wire color and location information in the “Identification”
column.
Note: You will only connect ONE of these wires. The other 3 wires will not
be used. Cut and insulate the unused wires.
• Connect the wire as indicated in the chart.
• If your vehicle is not listed on the
Identification and Connection Chart,
Visit
www.pac-audio.com/swixprogramming/swixprogramming.asp
Note: Only 3 wires from the SWI-JACK will be used during installation. GM vehicles programmed for version #4, will
use 4 wires.
Step 4a.
Connect the BLUE
serial data wire.
Connect this wire
ONLY on GM
passenger vehicles (no
trucks or SUVs) with
airbags AND steering
wheel heater controls.
For all other vehicles,
cut and insulate the
BLUE wire.
Step 4b.
If instructed by the
Vehicle Application
Guide, cut the
BROWN wire loop and
insulate both halves.
Step 4c.
If instructed by the
Vehicle Application
Guide, cut the VIOLET
wire loop and insulate
both halves, or place a
resistor in-line of wires.
Note:
Step 4a is for vehicles made by
General Motors that are programmed
for version #4 only. If no connections is
necessary, proceed to Step 4b.
Step 4
If necessary, perform the following operations as indicated by the notes in Identification and Connection Chart.
SWI-JACK
SWI-JACK
SWI-JACK
SWI-JACK
SWI-JACK
SWI-JACK