Premier Mounts Polaris Universal Projector Mount MAG User Manual
Page 6
MAG
Page - 6 -
Installation Manual
Ceiling Installation
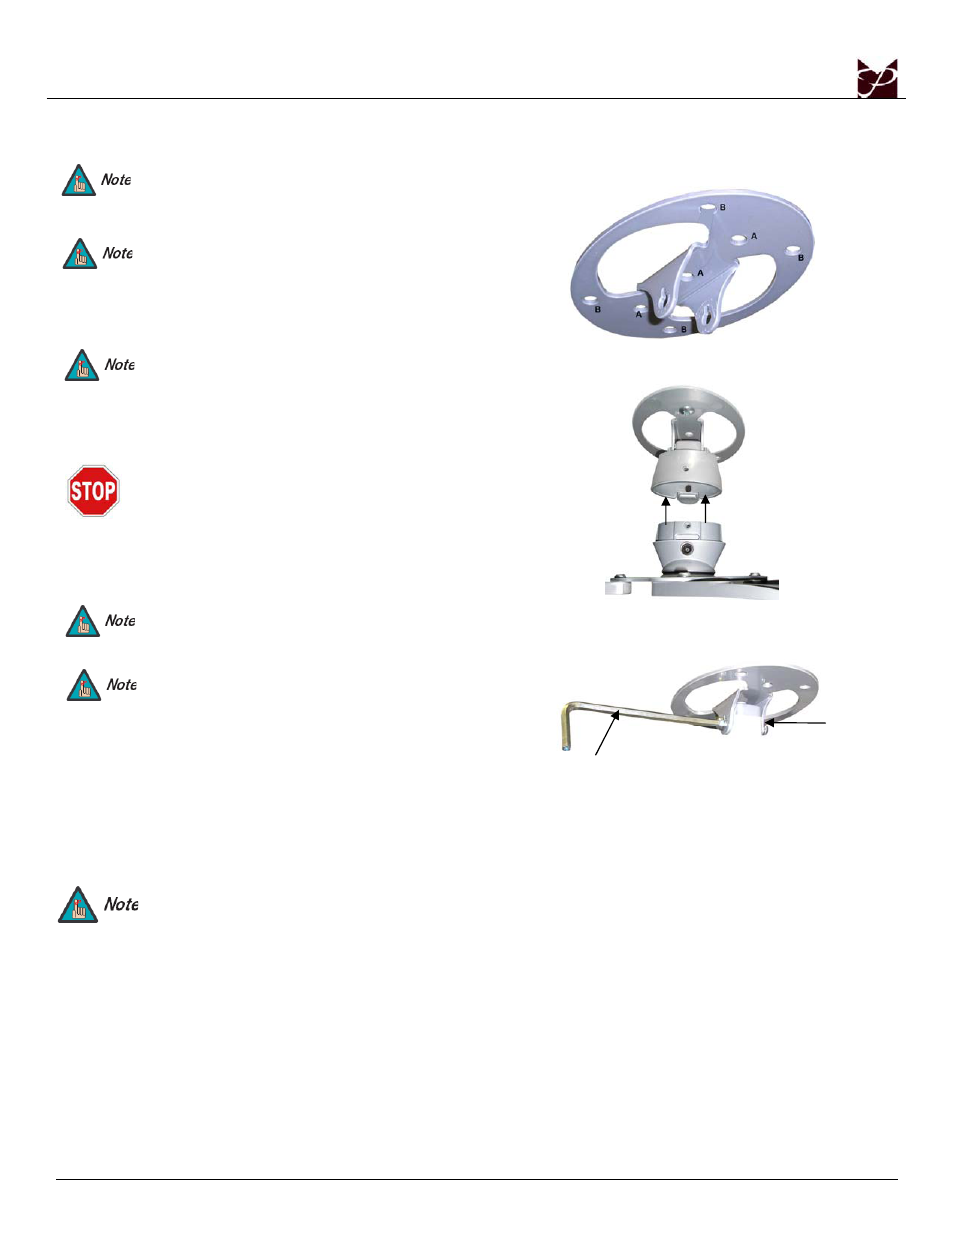
1. Mounting Surfaces
Use a 1/8” drill bit to pre-drill the mounting holes
before securing the wood screws (supplied).
Wood studs: Where denoted with the letter ‘A’, mark these
locations for wood stud installation.
Use a masonry bit to pre-drill the mounting
holes in the concrete surface.
Concrete surface: Where denoted with the letter ‘B’, mark
these locations for concrete installation.
2. Use two (2) #14 x 2” wood screws (supplied) to attach the
ceiling plate to the wooden ceiling stud.
For extra security, attach a third wood screw to
the middle mounting point (A).
3. Slowly raise the projector toward the upper assembly. Once
the projector is close to the upper assembly, MagnaGuide™
Technology will pull the lower assembly into the upper
assembly and the locking tab will engage.
THE MAGNETS ARE USED FOR GUIDING
THE UNIT ONLY! PLEASE MAKE SURE
THE TWO (2) M4 X 12MM SCREWS ARE
USED TO SECURE THE PROJECTOR.
4. Attach the two (2) M4 x 12mm security screws and
star washers that are located on each side of the locking
tab.
Do not release your hold on the projector until the
upper and lower assemblies are engaged and the
locking tab is in place.
If you choose to use the center mounting point for
added security, detach the lower assembly from
the ceiling plate by removing the two (2) M6 x
12mm security screws, drive the wood screw in
place and reattach the lower assembly and
security screws.
Concrete Mounting
The MAG can be mounted to a ceiling with a minimum 6” thickness. Concrete wedge anchors must be used for
concrete installation. It is recommended that ¼” wedge anchors be used. A masonry bit must be used to drill the pilot
hole. These items can be purchased at your local hardware store.
1. Begin by placing the ceiling plate into position against the ceiling, keeping it level.
2. Mark off four holes to be used for securing the mount and place the ceiling plate aside.
3. Next, drill holes using the appropriate masonry bit for your anchor.
4. Insert a concrete anchor into each hole.
5. If necessary, a hammer can be used to lightly tap each anchor into place so that they are flush with the ceiling.
6. Once all of the anchors are in place, move the ceiling plate back into position.
7. Attach the nut onto the threaded shaft that is protruding from the ceiling.
8. Do not tighten until all nuts are in place.
M6 x 12mm
Security Screw
M5 Allen
Wrench