Philips LTC 3924 User Manual
Page 15
14
PHILIPS LTC3924/62 (E) QR34071
SETTING [OPTIONS] ITEMS
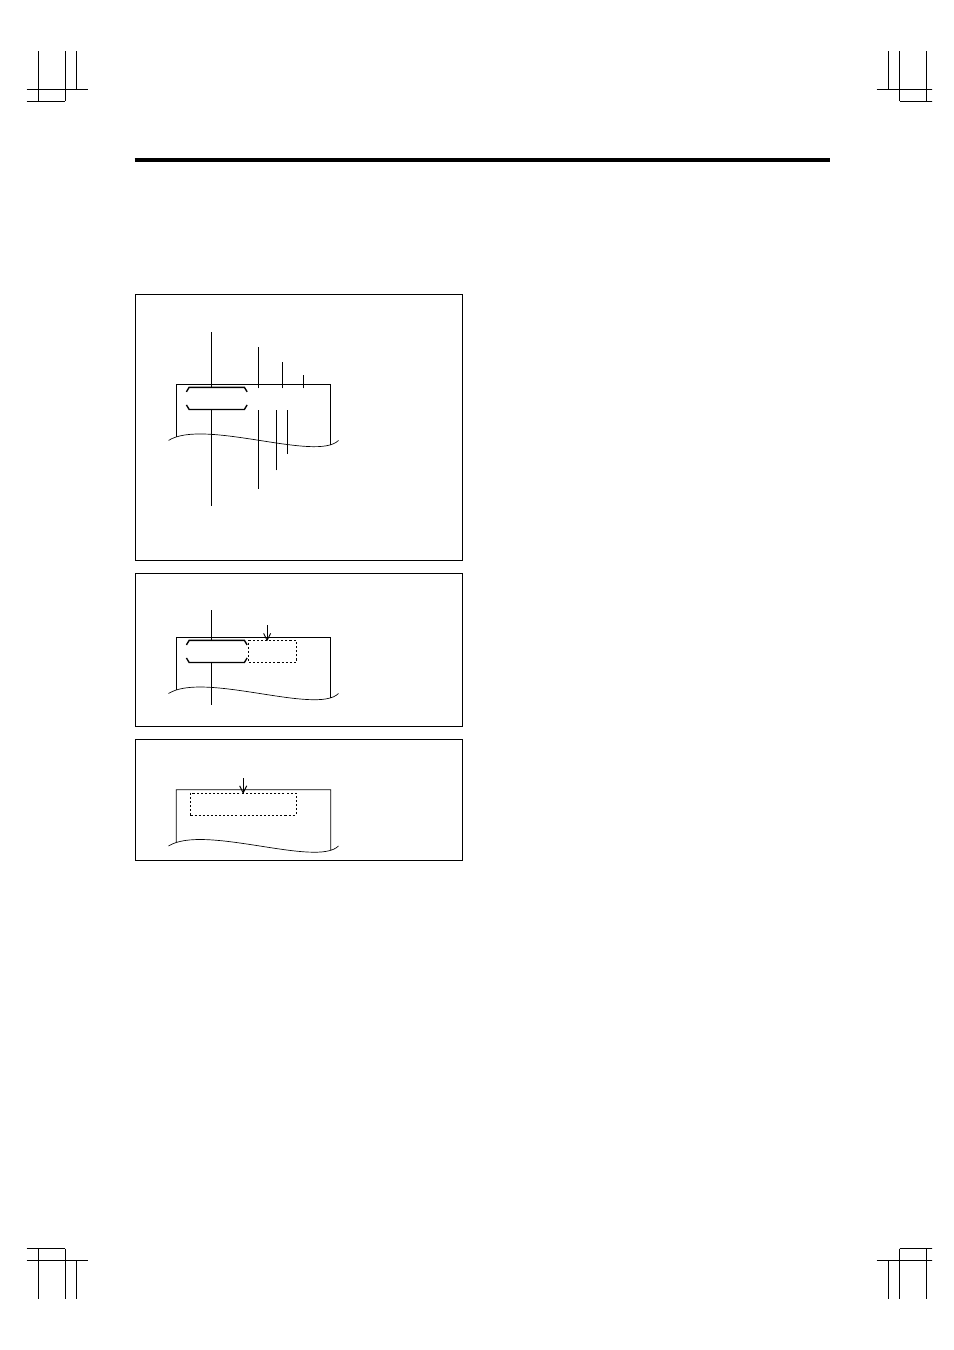
OSD TYPE: The TIME/DATE display was not
deigned to appear at the factory. If you wish to
record the time/date together with image, perform
the following procedure:
There are two types of TIME/DATE display: FULL
and HALF.
TIME ADJUST: When the two or more of this VCR
model are connected to pins i TIME ADJUST of
each EXTERNAL INTERFACE jack, the clocks in both
VCRs can automatically be set to the same time
(TIME ADJUST function).
To use the TIME ADJUST function, set one VCR to
MASTER and any others to SLAVE.
1. Press the START/STOP button twice so that
[OPTIONS] flashes on/off.
2. Press the SET button twice so that the TIME
ADJUST: setting flashes on/off.
3. Press the UP or DOWN button to select the setting
(SLAVE or MASTER).
4. Press the START/STOP button again. The selec-
ted setting will light.
Notes:
• You can set OSD TYPE and TIME ADJUST after
you have set the date and time.
• The TIME ADJUST function operates only when
the VCRs are turned on. Therefore, turn the VCRs
on around 2:00:05A. This function will not operate
if the times on the MASTER and SLAVE VCRs drift
by more than one hour and 30 minutes.
SUMMER TIME FUNCTION
Set the summer time function when a cassette is not
loaded in this VCR.
Press the EJECT and UP buttons simultaneously in
modes other than the timer recording standby
mode; the hour display will be counted up by one.
Press the EJECT and DOWN buttons simultaneously
to count the hour display down by one.
You can change the hour display in one-hour steps
without any limit by pressing the above buttons.
Note: Summer time cannot be set unless TIME/
DATE is displayed.
1. Press the START/STOP button twice so that
[OPTIONS] flashes on/off.
2. Press the SET button so that the OSD TYPE: set-
ting flashes on/off.
3. Press the UP or DOWN button to select the setting
(OFF, FULL or HALF).
4. Press the START/STOP button again. The selected
setting will light.
Note: The position of the TIME/DATE display on the
monitor can be adjusted by using the H-POS and
V-POS button on the front panel.
12– 0–
02
20
2
6 : 2 : 00P
08
1
FR
PL
I
T
07
A
L
DATE
POWER LOSS (IF SENSED)
DAY OF WEEK
ALARM COUNT*
SECURITY LOCK (IF ACTIVATED)
TIMER (IF ON)
RECORDING SPEED (IN TOTAL HOURS)
TIME
* The ALARM Count Number records alarms from 0 to 99
and then resets to 0 and continues counting.
FULL
DATE
No display
TIME
HALF
12– 0–
02
20
2
6 : 2 : 00P
1
No display
OFF