Maintenance – Porter-Cable PCB270TS User Manual
Page 29
– 29 –
MAINTAINING YOUR TABLE SAW
GENERAL MAINTENANCE
For your own safety, turn the switch OFF and
remove the switch key. Remove the plug from
the power source outlet before maintaining or
lubricating your saw.
1. Clean out all sawdust that has accumulated inside
the saw cabinet and the motor.
2. Polish the saw table with an automotive wax to keep
it clean and to make it easier to slide the workpiece.
3. Clean cutting blades with pitch and gum remover.
4. A worn, cut, or damaged power cord should be
replaced immediately.
All electrical or mechanical repairs should be
attempted only by a trained repair technician.
Contact the nearest Porter-Cable Authorized Service
Center for service. Use only identical replacement
parts. Any other parts may create a hazard.
5. Use only mild soap and a damp cloth to clean
the tool. Never let any liquid get inside the tool;
never immerse any part of the tool into a liquid.
IMPORTANT: To assure product SAFETY and
RELIABILITY, repairs, maintenance and adjustment
(other than those listed in this manual) should be
performed by authorized service centers or other
qualified service organizations, always using identical
replacement parts.
NOTE: Certain cleaning chemicals can damage
plastic parts.
6. Avoid use of cleaning chemicals or solvents,
ammonia and household detergents containing
ammonia.
LUBRICATION
All motor bearings are permanently lubricated at the
factory and require no additional lubrication.
On all mechanical parts of your table saw where a pivot
or threaded rod are present, lubricate using graphite or
silicone. These dry lubricants will not hold sawdust as
would oil or grease.
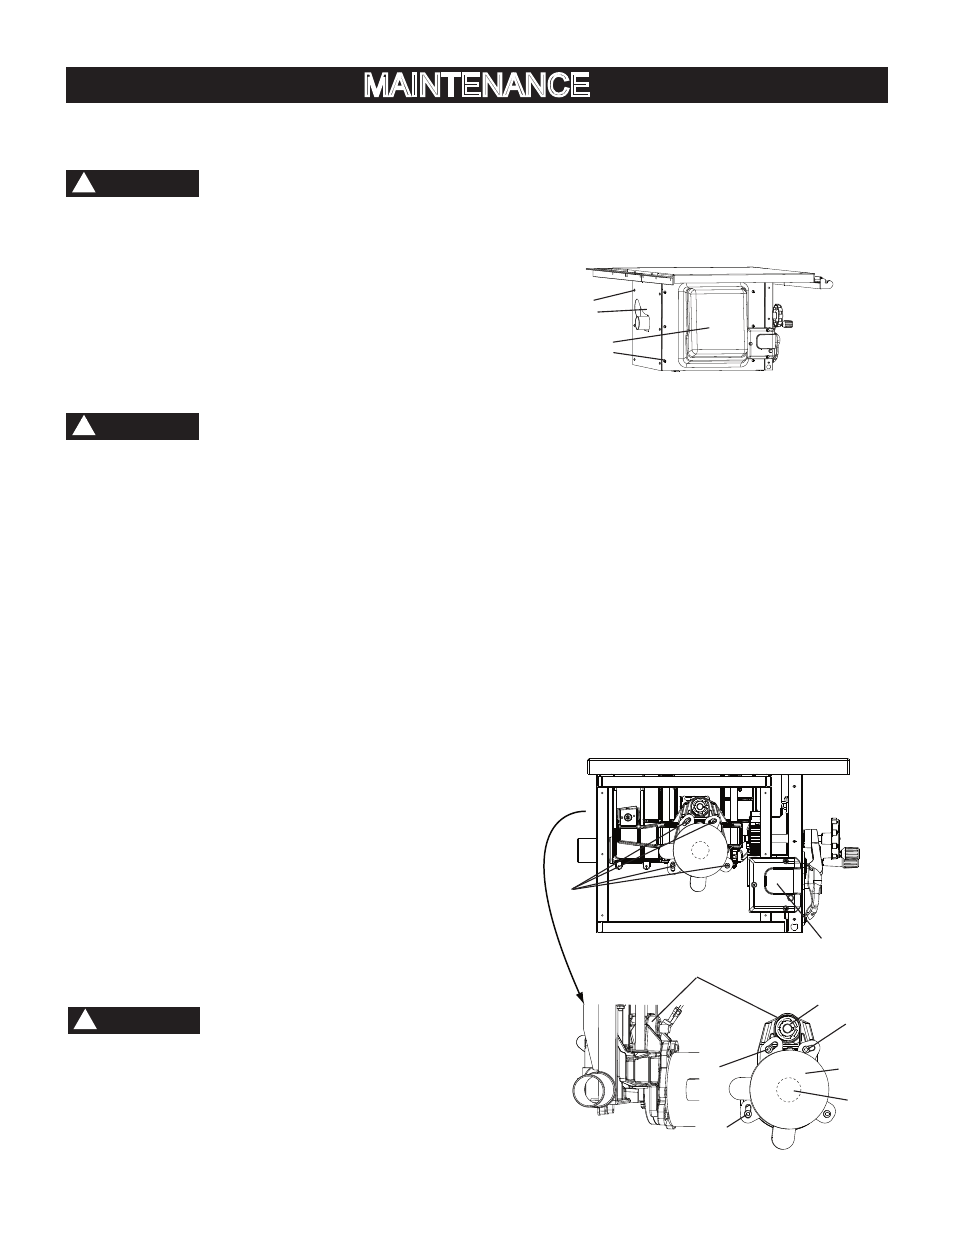
CHANGING DRIVE BELT (FIG. aa, bb)
All electrical or mechanical repairs should be
attempted only by a trained repair technician.
Contact the nearest Porter-Cable Authorized Service
Center for service. Use only identical replacement
parts. Any other parts may create a hazard.
NOTE: Occasionally changing the drive belt may be
necessary as a result of normal wear and use.
1. Unplug the unit from power source. Lower the blade
to its lowest position.Turn the blade tilting handwheel
until the blade tilting scale is around 45°.
2. Remove the rear body shell (1) and left body shell (2)
by removing the twelve screws (3), slide the left body
shell backwards.
Fig. aa
3. Turn the blade tilting handwheel until the blade tilting
scale is around 0°.
4. Loosen four bolts (4) two full turns using a 6 mm hex
key. Do not remove the bolts.
5. Rotate the motor (5) slightly to reduce the tension on
the driven pulley (6). The three curved slots (7) allow
for the movement of the motor.
6. Remove the old belt from the pulleys.
7. Fit the new belt on the motor pulley (8) first and then
on the driven pulley (6).
NOTE: Make sure the belt is
fitted properly on the central position of pulleys.
8. Lower and rotate the motor (5) downwards away
from the driven pulley (6) along the curved slots (7).
9. Tighten four bolts (4) securely.
10.Test the drive belt by hand and check to confirm that
drive belt runs smoothly and straight on the pulleys.
11.Replace the rear body shell (1) and left body shell (2)
with the screws (3).
Fig. bb
MAINTENANCE
WARNING
!
WARNING
!
3
1
2
3
4
7
7
5
8
Drive belt
Overload box
(remains on unit)
7
6
WARNING
!
Rear side view