Linksys WAP54GPE User Manual
Page 19
13
Chapter 4: Connecting the Wireless-G Exterior Access Point
Hardware Installation
Wireless-G Exterior Access Point
6. Make sure that you properly ground the Access Point.
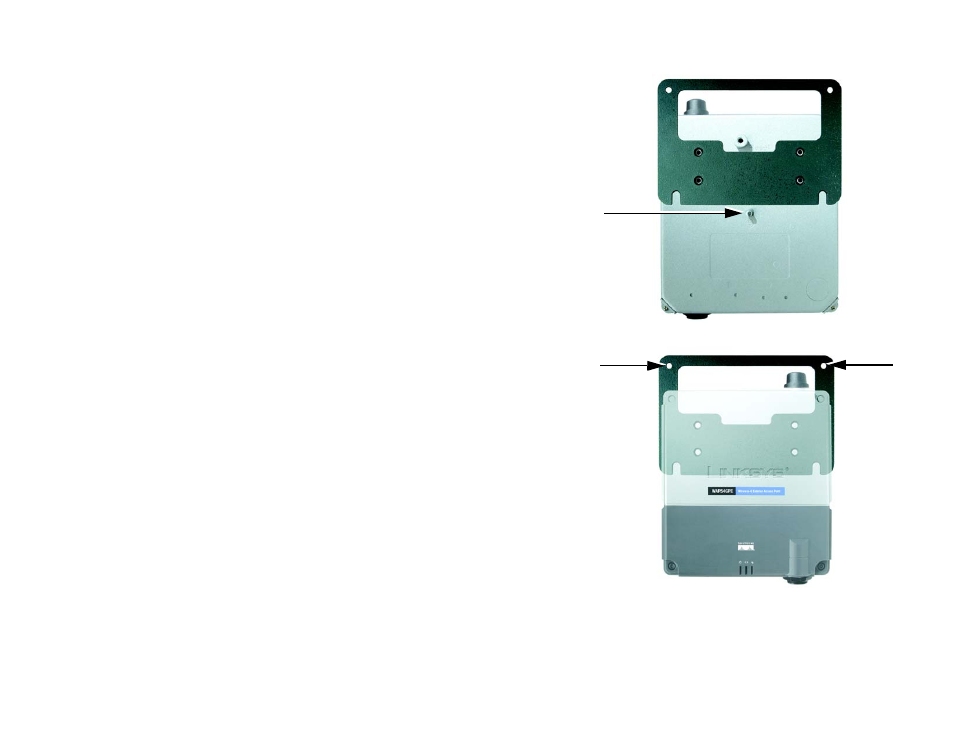
7. Line up the Access Point’s wall-mount slots with the two screws on the wall. Then, slide the Access Point
down so that the screws fit snugly in the slots.
8. Attach a screw (not included) in each of the two holes on the top of the mounting plate so that the Access
Point is securely mounted to the wall.
9. Connect the other end of the Ethernet network cable to a switch, router, or other device that supports Power
over Ethernet. The Access Point will then be connected to your wired network.
Now that the hardware installation is complete, proceed to "Chapter 5: Setting Up the Wireless-G Exterior Access
Point," for directions on how to configure the Access Point.
Figure 4-4: Attach the Access Point to the Wall
Figure 4-3: Ground the Access Point
- WAP610N (41 pages)
- EtherFast BEFCMU10 (18 pages)
- RT31P2-NA (81 pages)
- ETHERFAST 10/100 (42 pages)
- BEFW11S4 (35 pages)
- BEFW11S4 (55 pages)
- Instant Powerline PLUSB10 (2 pages)
- BEFSR11 (39 pages)
- AG041 (EU) (80 pages)
- WAP200E (3 pages)
- Etherfast BEFSX41 (75 pages)
- Router RV042 (26 pages)
- USB200M (2 pages)
- AG300 (78 pages)
- WET54G V3 (54 pages)
- Compact Wireless-G Broadband Router WRT54GC (2 pages)
- Compact USB 2.0 (29 pages)
- RVS4000 (68 pages)
- RVS4000 (3 pages)
- WAG200G (39 pages)
- RT042 (68 pages)
- EtherFast BEFSR41W (38 pages)
- WPS11 (31 pages)
- PCMPC200 (2 pages)
- PAP2-VU (46 pages)
- DSSXFXSC (20 pages)
- 2 (4 pages)
- 4 GHz Wireless-N Notebook Adapter WPC300N (65 pages)
- PAP2-NA (33 pages)
- BEFVP41 (45 pages)
- PLEBR10 (29 pages)
- PLUSB10 (26 pages)
- WUSB100 (34 pages)
- WAG110 (33 pages)
- NSS6000 (24 pages)
- Dual-Band Wireless-N Gigabit Router WRT320N (54 pages)
- WAG120N (23 pages)
- USB1000 (26 pages)
- EG0801SK (2 pages)
- INSTANT BROADBAND BEFDSR41W (69 pages)
- RTP300 (96 pages)
- Etherfast (57 pages)
- WAP54A (21 pages)
- Instant WirelessTM Network Access Point WAP11 (2 pages)
- WTR54GS (86 pages)