Roof attachment installation, Installation of roof attachment types – Lochinvar TISUN SCH-I-O User Manual
Page 13
SCH Collectors Installation & Operation Manual
3
Roof Attachment Installation
(continued)
Double hanger bolt for universal fastening
#SRM20001
Universal fixture for parallel and inclined installation on
various roof types and freestanding installation on sufficiently
anchored frames. Two hanger bolts are to be installed on the
roof as vertically as possible with a spacing of 4 3/4" to 6 3/4".
The two are connected by an intermediate plate.
•
The hanger bolt must be screwed
into a support capable of bearing
the required static load (generally
rafters).
•
Install the hanger bolt using a field
supplied anchoring adapter.
• The roofing must be capable of
withstanding the pressure needed
to compress the gasket.
•
Beware of linear expansion in sheet
metal that prevents a linear
expansion and can cause lifting of
the
sheet.
ƽ CAUTION
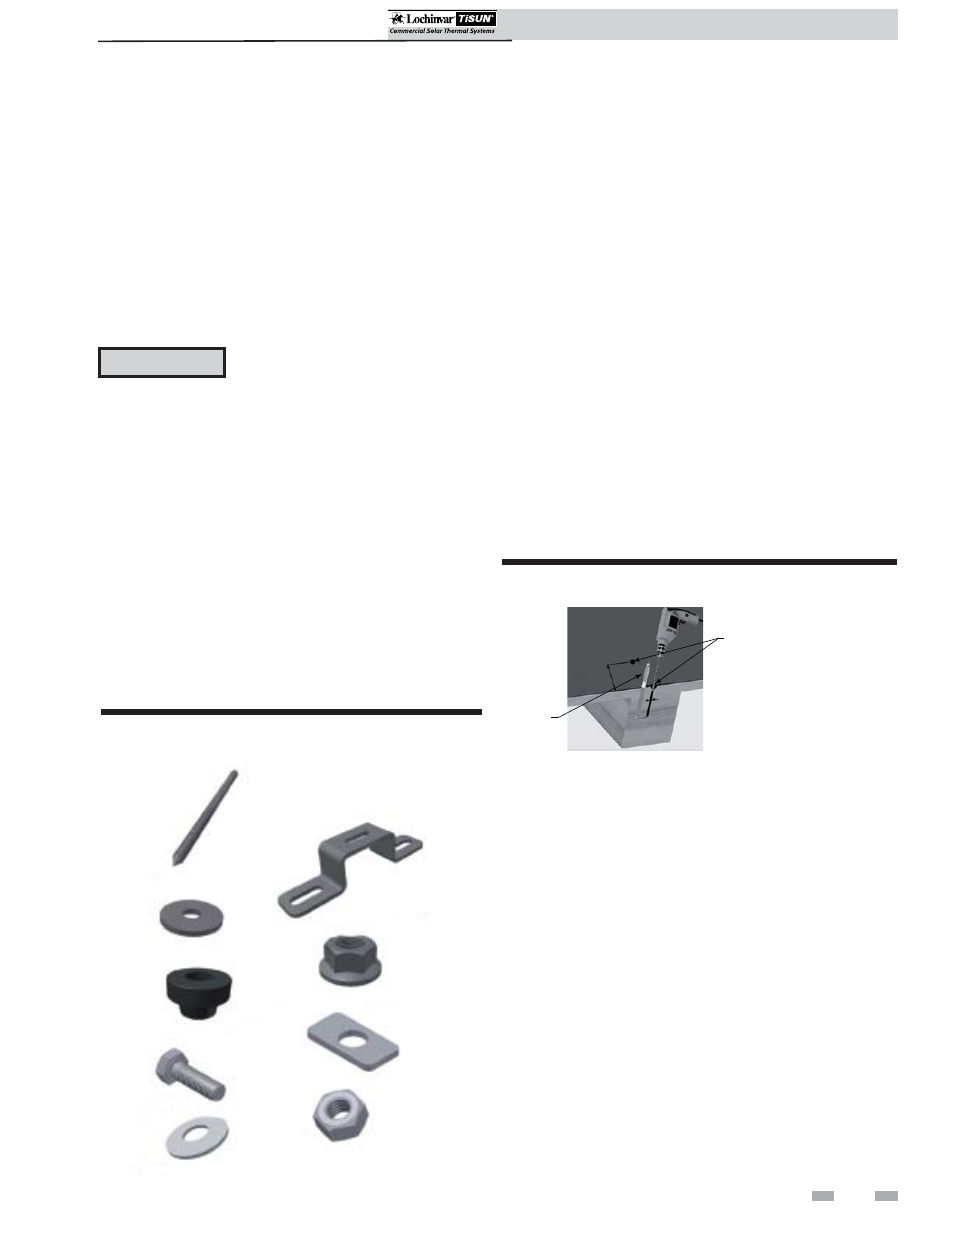
Figure 3-2 Kit #SRM20001 - Double Hanger Bolt Kit
Components
Unpacking and checking parts
When unpacking the system, check the model names of the
components of each system and check to be sure you have the
correct number of parts (see FIG. 3-2).
HANGER BOLT (M12) (2X)
WASHER (M12) (2X)
HANGER BOLT SEAL (2X)
HEX BOLT (M8) (1X)
WASHER (M8) (1X)
HEX NUT (M8) (1X)
SQUARE DISK (1X)
HEX NUT W/FLANGE (M12) (6X)
DOUBLE HANGER BOLT PLATE (1X)
SCH Collectors Installation & Operation Manual
Installation of roof attachment types
The solar thermal collectors are capable of being mounted to several different types of roofing with a wide variety of
mounting hardware available from Lochinvar.
Figure 3-3 Pre-Drill 9mm Holes Into Substructure
PRE-DRILL TWO (2) 9MM HOLES
PERPENDICULAR TO THE ROOF
(APPROX. 4 IN. DEEP)
INSTALL
HANGER
BOLT(S)
6. Slide the hanger bolt seals over the machine threads until
the seal is touching the roof’s surface (FIG. 3-4A).
7. Slide the washer (M12) on top of the hanger bolt seal
(FIG.
3-4A).
8. Thread the hex nut with flange (flange side down) onto
the washer, compressing the washer and hanger bolt seal
to the roof (FIG. 3-4B).
9. Install the second hex nut with flange (flange side up)
until the hex nut reaches the desired substructure height
(FIG.
3-4B).
10. Slide the hanger bolt plate onto the flange of the hex nut
installed in Step 9 (FIG.’s 3-4A and 3-4B).
11. Install the remaining hex nut with flange (flange side
down) to the top of the double hanger bolt plate.
Tighten and secure both hex nuts (top and bottom) to
the double hanger bolt plate.
12. Make certain all double hanger bolt plates are facing the
same
direction.
Install double hanger bolt
1. Determine roof type. Inspect the structural integrity of
the roof and the durability of the roof materials.
2. Determine the number of collectors needed for the
installation and the number of required roof attachments
from Table 3B or 3C on page 11.
3. Determine collector connection points (spacing).
Measure the spacing of the rafters or trusses to confirm
the dimensions and prepare for the system layout
(reference the Roof Attachment Spacing Section on
page
12).
4. Pre-drill two 9mm holes, a minimum of 4 inches deep
into the roof substructure (see FIG. 3-3), perpendicular
to the roof with a spacing of 4 3/4" to 6 3/4".
5. Install the hanger bolts into the pre-drilled holes
until the threads are level with the roof’s surface.
13