Land Pride Primary Seeders PSN2096 User Manual
Page 13
Section 1: Assembly & Set-Up (Standard)
PSN2096 Primary Seeder 313-306M
11
5/29/13
Section 1: Assembly & Set-Up (Standard)
Tractor Requirements
This Primary Seeder is designed for tractors with a
3-point Category 2 or 3 and Cat. 2 Quick-Hitch. Tractors
outside the hitch category must not be used. Make
certain that the tractor’s 3-point lifting capacity and
weight is capable of lifting and controlling the seeder
under all operating conditions. Refer to “Specifications
& Capacities” on page 35 for seeder weight.
A Pull-Type hitch is available as an option. This Pull-Type
Hitch can be used with smaller HP tractors, which may
not have the required capacity to maneuver a
3-point hitch configuration.
The lower 3-point arms must be stabilized to prevent
side-to-side movement. Most tractors have sway blocks
or adjustable chains for this purpose.
Torque Requirements
Refer to “Torque Values Chart” on page 38 to determine
correct torque values when tightening hardware.
Pre-Assembly Checklist
Check
Reference
All major frame components.
Operator’s
Manual
Location of fasteners and pins.
NOTE: All hardware from the factory has
been installed in the location where it will
be used. If a part is temporarily removed
for assembly reasons, remember where it
goes. Keep parts separated.
Operator’s
Manual
Be sure the part gets used in the correct
location. Use parts manual to identify
location of parts that have been removed
and are unsure where to replace them. By
double checking while you assemble, you
will lessen the chance of using a bolt
incorrectly that may be needed later.
313-306P
Parts
Manual
All working parts are moving freely, bolts
are tight and cotter pins are spread.
Operator’s
Manual
All grease fittings are in place and
lubricated.
Proper tension and alignment on all drive
chains.
Safety decals are correctly located and
legible. Replace if damaged.
NOTE: In order to maintain steering control, ballast
may need to be added to your tractor. Refer to your
tractor’s operator manual to determine if additional
ballast is needed.
Sling Bracket
Refer to Figure 1-1:
The sling brackets on each end of the Native Grass
Seedbox provide points to hook the chain for lifting the
unit. When hooking a chain to the sling brackets, be
certain to use a spreader bar on the chain or a long chain
to prevent bending the sling brackets.
Sling Bracket
Figure 1-1
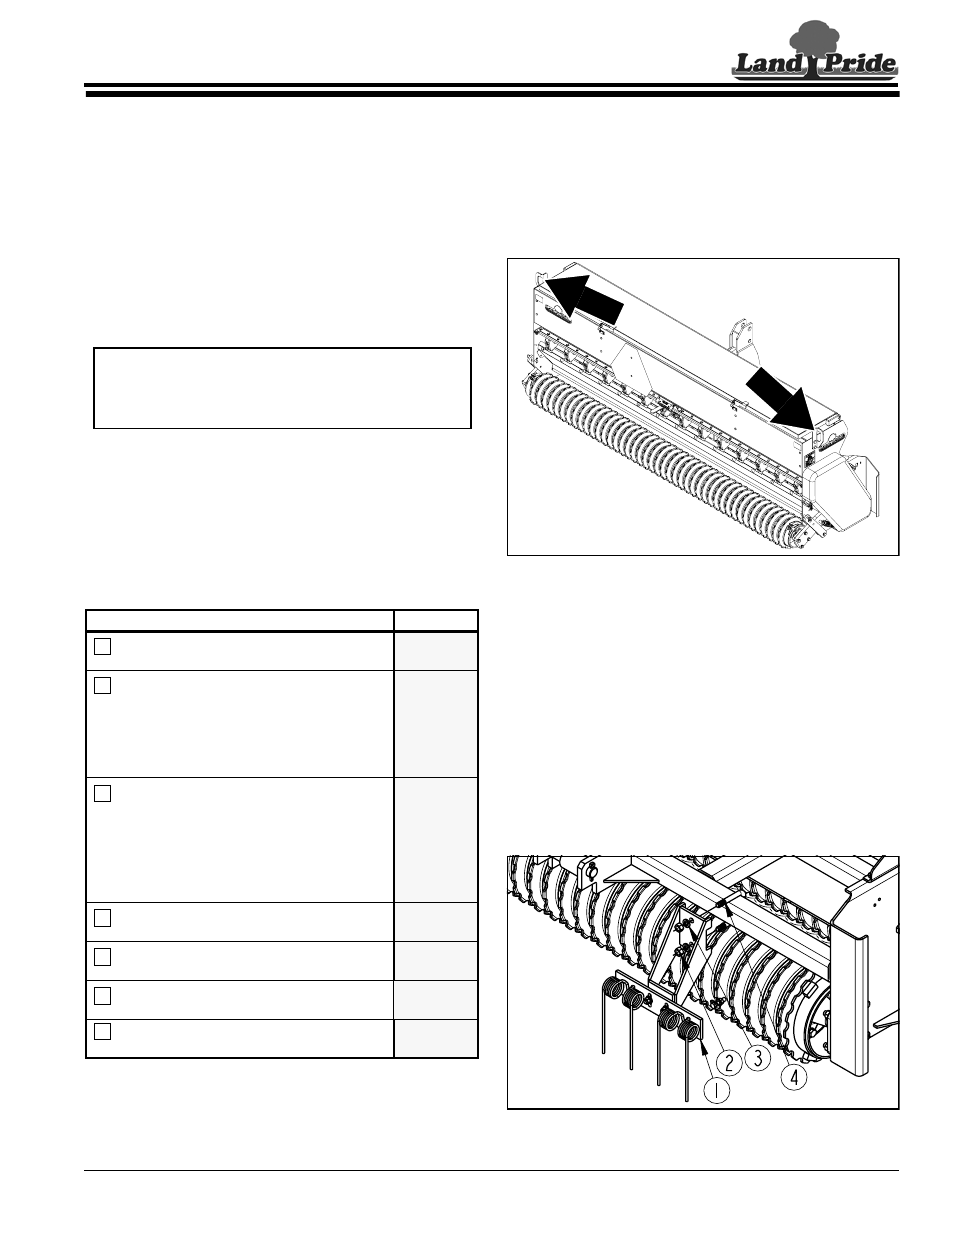
Tire Track Remover Assembly
Refer to Figure 1-2:
The Tire Track Removers are assembled 180 degrees
from their operating position for shipping purposes.
1.
Remove Track Remover (#1). Keep hardware for
reuse.
2.
Flip Track Remover over 180 degrees and
reassemble as shown with 1/2" u-bolt (#4), lock
washers (#3), and nuts (#2). Tighten nuts to the
correct torque.
3.
Repeat steps 1 & 2 for the other side.
Tire Track Remover
Figure 1-2
20577
20589