Wiring diagram – Legacy Car Audio LCD18M User Manual
Page 4
Page 3
Page 8
ESP 10 seconds/40 seconds:
IN ESP mode, you can select 10 seconds or 40 seconds electronic shockproof
mode by using the + and - button.
Turn the device on by using any button except the REL button, EJECT key and
TUNING knob on the front panel; and the LCD will display WELCOME. It can
also turn on this device to insert a disc into the CD slot with label surface up.
Press power button and hold for approximately 1 second to turn power off; and
the LCD will display GOOD BYE.
Whilst in CD/MP3 mode, press the >>| button briefly to play next track.
Press the |<< button briefly to play the previous track.
Press the >>| or |<< button and hold to skip forwards or backwards, release to
resume disc playback.
In CD/MP3 playback process, press the INT button briefly to activate the CD
track scan mode.
Whilst INTRO is on, it begins playing the first 10 second section of each song,
until the last song is played. It stops the CD track scanning and begins playing
the selected track when the INT button is pressed again.
In CD/MP3 playback process, press the TOP/
button to pause the CD play-
back, press again to resume normal playback.
First song will be played when the TOP/
button is pressed for longer than 1
second during CD/MP3 playback.
The loaded CD can be ejected by pressing the EJECT button. If the CD is left
in the CD slot after ejection, it will reload the CD after 8 seconds.
This button serves to switch the MUTED state on/off.
Press the MUTE button to suppress the loudspeaker temporarily, and press
again to resume listening. The muted state will be also released when the
MODE, BAND, SEL and the + and - button on the front panel is pressed.
When a disc is present in the CD slot, pressing the MODE button will allow you
to change to RADIO mode (and back). The LCD display information changes
with the mode (please note: when no disc is present in the unit, this button does
not provide a function).
4. POWER ON/OFF
5. LCD DISPLAY
6. CD SLOT
7&8. CD TRACK UP / DOWN AND CD FF/REW BUTTONS
9. INTRO ON/OFF BUTTON
10. TOP/
BUTTON
11. CD EJECT BUTTON
12. MUTE ON/OFF BUTTON
13. MODE BUTTON
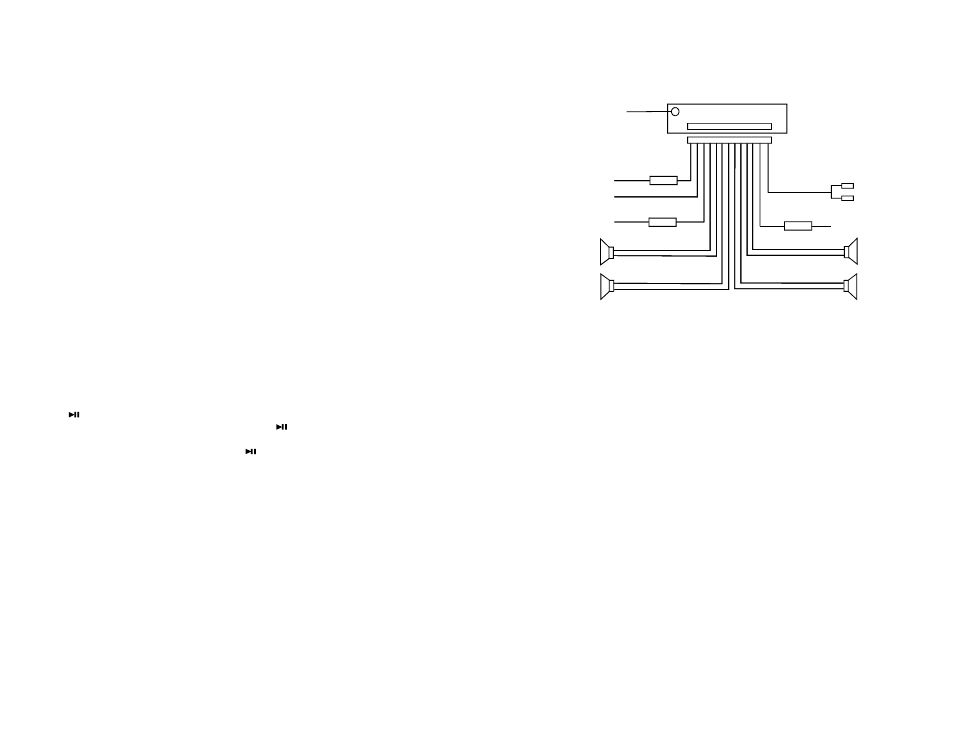
WIRING DIAGRAM
+
+
+
+
FUSE 7A
YELLOW
ANTENNA PLUG
CONSTANT B+
BLACK(GND)
FRONT
REAR
RIGHT
FRONT
WHITE
WHITE/BLACK
GREEN/BLACK
VIOLET/BLACK
GRAY/BLACK
GRAY
VIOLET
GREEN
REAR
LEFT
LOUDSPEAKER
FUSE 0.5A
-
-
-
-
BLUE AUTO ANT
RED R
WHITE L
LOUDSPEAKER
FUSE 0.5A
IGNITION SWITCH
RED (B+)
RCA OUTPUT LINE
Note:
1. Make sure you use a speaker with 4 ohm load impedance
2. Make sure the auto antenna wire does not come into contact with the vehicle
chassis.
CAUTION:
Black
Blue
White (+) White/Black (-)
Violet (+)
Violet/Black (-)
Red
White
Yellow
Red
In order to protect power IC from being burnt out during installation the car stereo,
it is necessary to follow the steps below to connect the wires during installation:
Step 1: Connect the ground wire (
);
Step 2: Connect all speaker wires and power antenna wire (
):
Left speaker
Right speaker
Front speaker:
Rear speaker:
Step 3: RCA Line Out (R-
/ L-
).
Step 4: Connect Back up (
) and Acc wire (
)
Gray (+)
Gray/Black (-)
Green (+) Green/Black (-)