Figure 25, Figure 26 – Life Fitness 8500 3 User Manual
Page 23
23
STEP 26:
STEP 25:
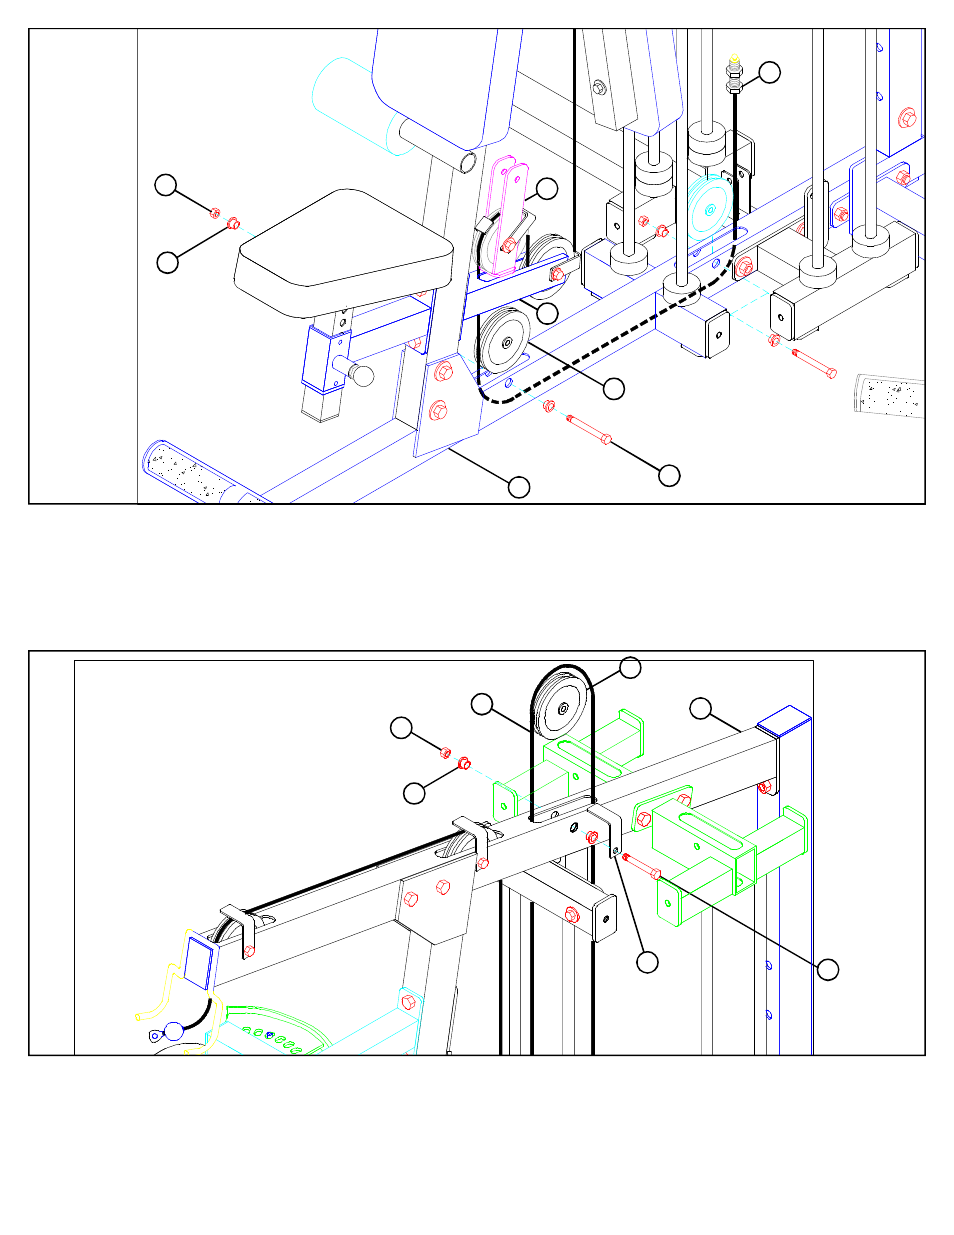
FIGURE 25
• Route the LAT CABLE (42) around the pulley in FLOATING PULLEY STOP (11) and the FLOATING PULLEY BRACKET (55) as shown in
FIGURE 25. (NOTE: The CABLE CLIPS may need to be loosened.)
• SECURELY assemble two 4-1/2” PULLEYS (48) into the slots of the BASE (25) using two 3/8 X 2-3/4” BOLTS (90), four 3/8” FLANGE
SPACERS (69), and two 3/8” LOCK NUTS (82). (NOTE: Loop the cable around each pulley prior to inserting it in the the slot.)
• SECURELY assemble one 4-1/2” PULLEY (48) into the rear slot of the TOP BOOM (30) using one 3/8 X 2-3/4” BOLT (90), two 3/8” FLANGE
SPACERS (69), one 2-7/8” X 2-1/4” CABLE CLIP (116) and one 3/8” LOCK NUT (82). (NOTE: Loop the cable around the pulley prior to inserting
it in the the slot.)
• Route the threaded end of the LAT CABLE (42) through the TOP BOOM (30) and down through the PEC GUIDE ROD SUPPORT (22) as
shown in FIGURE 26.
FIGURE 26
90 3/8 X 2-3/4”
42
LAT
CABLE
55
11
69
82
90 3/8 X 2-3/4”
LAT CABLE 42
30
69
48
82
48
25
116
- T3 Treadmill (6 pages)
- F3 Folding Treadmill (12 pages)
- T5 Treadmill (1 page)
- T7 Treadmill (8 pages)
- T3 Treadmill (19 pages)
- Platinum Club Series Treadmill (21 pages)
- Arctic Silver T3.5 Treadmill (9 pages)
- FZTP (17 pages)
- MTSLE (18 pages)
- Sport and Essential Consumer Treadmills (3 pages)
- CTSX30-0102-01 (8 pages)
- Cable Motion 8352100 REV. B (26 pages)
- Cable Motion 39721 (24 pages)
- Pro 2 Series PSPD (11 pages)
- 91Xi (83 pages)
- 91TW (22 pages)
- Utility Bench (8 pages)
- Hammer Strength OHDRacks (6 pages)
- 8216 (7 pages)
- GS5 (11 pages)
- TR-7500 (3 pages)
- Parabody 805 (11 pages)
- HDCR9 (13 pages)
- 18 \ 90 Series (8 pages)
- OHD-MIP (10 pages)
- Pro 2 Series PSFLY (10 pages)
- Hammer Strength OHDMR (15 pages)
- GS6 (1 page)
- UPRIGHT LIFECYCLE 95C (1 page)
- LIFECYCLE R3 (2 pages)
- GS4 (12 pages)
- FZHAD (13 pages)
- FIT 3 (1 page)
- 889 (16 pages)
- MTSRL (21 pages)
- 887 (16 pages)
- GK53-00002-0012 (2 pages)
- C3 (2 pages)
- Pro 2 Series PSSLPSE (22 pages)
- T7i (8 pages)
- Arctic Silver 93XW-0XXX-03 (17 pages)
- 874 (12 pages)
- Classic Series Cross-Trainer CLSXH (8 pages)
- Exercise Bike Inspire Console 97C Lifecycle (42 pages)
- Hammer Strength MTS (6 pages)