Wire routing in right headlight bracket, Run wire harness to left headlight bracket, Wire routing in left headlight bracket – Land Pride ZT60 User Manual
Page 3: Assembly instructions
3
7/18/08
Manual No. 357-178M
Assembly Instructions
Land Pride
■
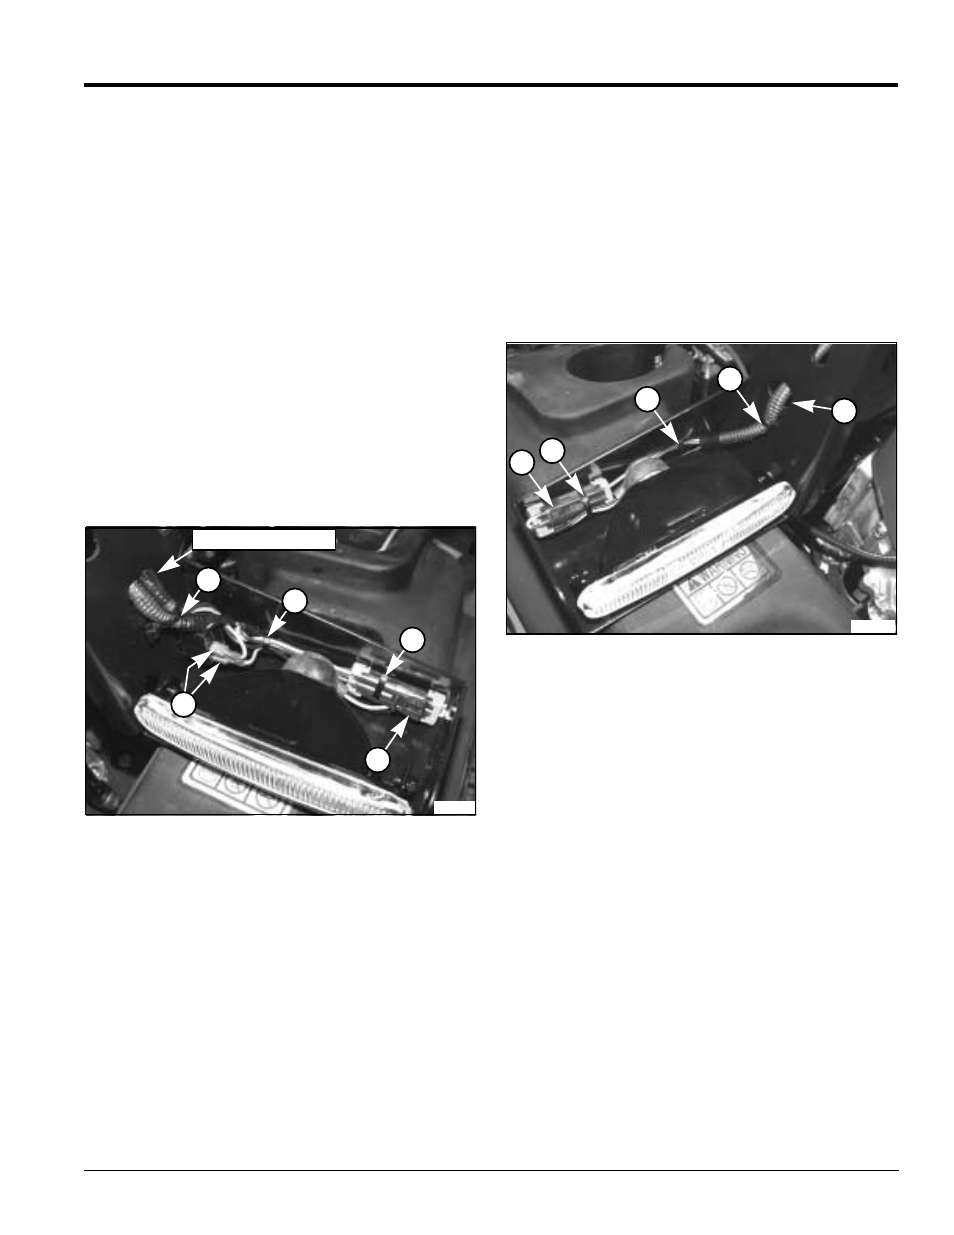
Wire Routing in Right Headlight Bracket
1.
Insert end “A” (Figure 2) through wire harness
opening (Figure 1) in right hand light bracket.
Refer to Figure 3 on page 3:
2.
Attach female terminals to headlight switch (#1).
3.
Attach headlight connector (#2) to headlight.
4.
With smooth side of plastic tie (#3) turned out,
secure connector (#2) using slits in back of light
bracket. Draw plastic tie up loosely. Do not tighten
plastic ties.
5.
With smooth side of plastic tie (#4) turned out,
secure wiring harness using slits in back of light
bracket. Draw plastic tie up loosely. Do not tighten
plastic ties.
6.
With smooth side of plastic tie (#5) turned out,
secure wiring harness to mounting leg using slits in
leg of light bracket. Draw plastic tie up loosely. Do
not tighten plastic ties.
7.
Verify wiring harness does not interfere with
headlight and light switch; then draw all three plastic
ties up tight.
Right Hand Light & Switch Wiring
Figure 3
5
4
3
2
1
Wire Harness Opening
24954
Run Wire Harness to Left Headlight Bracket
Refer to Figure 2 on page 2:
Run end “B” of headlight loom along back side of seat to
hole in left light bracket. Actual placement of loom and
plastic tie instructions will be later.
Wire Routing in Left Headlight Bracket
Refer to Figure 4:
1.
Insert end “B” through wire harness hole (#1) in left
mounting bracket.
2.
Attach headlight connector (#2) to headlight.
Right Hand Light & Switch Wiring
Figure 4
3.
With smooth side of plastic tie (#3) turned out,
secure connector (#2) using slits in back of light
bracket. Draw plastic tie up loosely. Do not tighten
plastic ties.
4.
With smooth side of plastic tie (#4) turned out,
secure wiring harness using slits in back of light
bracket. Draw plastic tie up loosely. Do not tighten
plastic ties.
5.
With smooth side of plastic tie (#5) turned out,
secure wiring harness to mounting leg using slits in
leg of light bracket. Draw plastic tie up loosely. Do
not tighten plastic ties.
6.
Verify wiring harness does not interfere with
headlight; then draw all three plastic ties up tight.
1
2
3
4
5
24955