Sony SRS-PC51 User Manual
Page 2
D
C
AC power adaptor (supplied)
PO
Pu
Cz
Hn
the DC IN 9 V jack
PO
Pu
Cz
Hn
A
B
the INPUT 2 jack (rear)
PO
Pu
Cz
Hn
a wall outlet
PO
Pu
Cz
Hn
the PC monitor
PO
Pu
Cz
Hn
to the R OUT jack
PO
Pu
Cz
Hn
an audio output jack (stereo mini jack)
PO
Pu
Cz
Hn
OUTPUT (WOOFER)
PO
Pu
Cz
Hn
Connecting cord (not supplied)
PO
Pu
Cz
Hn
Connecting cord RK-G136HG (not
supplied)
PO
Pu
Cz
Hn
Left speaker (rear)
PO
Pu
Cz
Hn
Right speaker (rear)
PO
Pu
Cz
Hn
the headphones jack (stereo mini jack)
PO
Pu
Cz
Hn
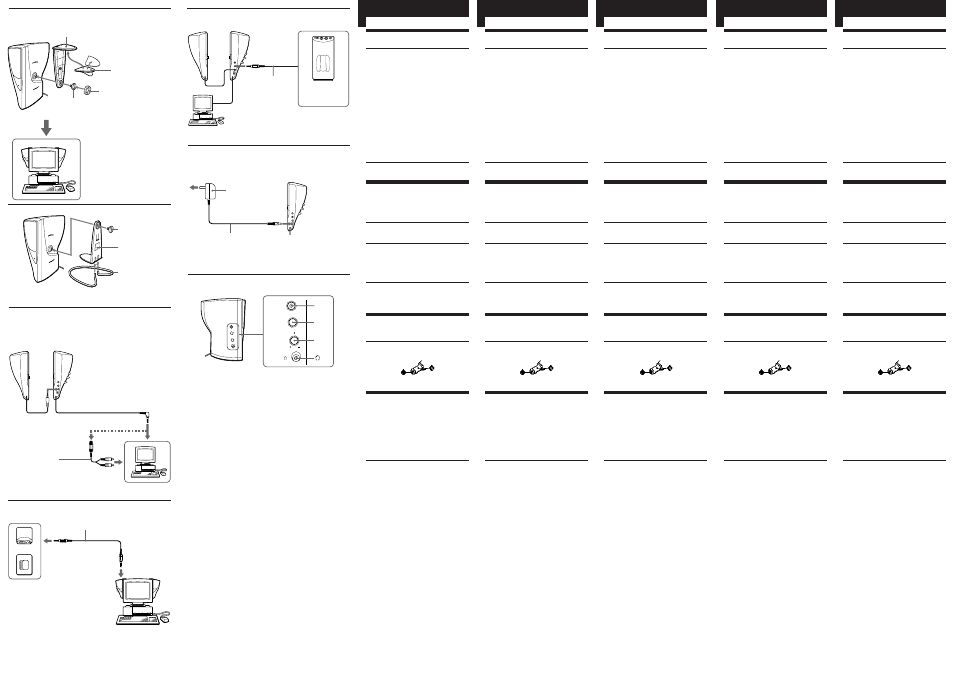
Installation (See fig. A)
Installing to the PC monitors 1
Notes
• The supplied mounting brackets may not fit some PC
monitors. In such a case, place the system beside the
computer on top of the desk.
• Clean the surface of the mounting brackets and the PC
monitor before attaching the double-sided tapes.
Otherwise, the double-sided tapes may not adhere
firmly to the surface of the PC monitor and the system
may fall off.
• To attach the system to the PC monitor firmly using the
double-sided tapes, press the mounting bracket firmly to
the PC monitor.
• If the picture on the PC monitor is distorted by the
vibration from the speaker system, turn down the
volume first. If there seems to be no improvement, try
placing the speaker system on top of a desk etc.
• Depending on the mounting surfaces, there may be
cases in which the mounting brackets becomes difficult
to remove once attached. Also the double-sided tapes
used on the mounting brackets may leave some marks
on the surface of the PC monitor when they are
removed.
Placing on top of the desk 2
Connections (See fig. B)
Connect the left speaker to the source equipment.
When the left speaker is connected to a computer
equipped with a monaural jack, the sound may be heard
only from the left speaker.
To connect to a stereo phonetype headphones jack
Use the optional PC-234HG plug adaptor or the
RK-G138HG connecting cord.
Connecting to a Discman, Walkman, etc. 1
Note
When two types of equipment are connected to the system
and are played at the same time, the sound from both of
them will come out of the speakers. When you wish to
play only one equipment, make sure that the other
equipment is turned off or its volume is turned down.
Connecting to a sub woofer 2
Connect a sub woofer to OUTPUT (WOOFER) jack (stereo
mini jack). The volume of the connected speaker system is
adjustable with the VOLUME control.
Power Source (See fig. C)
The mains power source is required when the system is
used.
Note on the AC power adaptor
Use only the supplied AC power adaptor. Do not use any
other AC power adaptor.
Polaritry of the plug
How to use (See fig. D)
1
Press the POWER switch (
Ø) to turn on the
system.
The POWER indicator lights up.
2
Adjust the volume with the VOLUME control.
3
Adjust the TREBLE control to your preference.
Turn off the MEGA BASS (Walkman) or BASS BOOST
(Discman, etc.) function as it may cause sound distortion.
After listening, press the POWER switch (
ø) to turn off
the system. The POWER indicator goes out.
Listening with the headphones
Connect the headphones (not supplied) to the
2
(headphones) jack on the left speaker. The sound from the
speakers is automatically turned off.
Double-sided tapes
PO
Pu
Cz
Hn
Rubber cushion
PO
Pu
Cz
Hn
Screw
PO
Pu
Cz
Hn
Mounting bracket
PO
Pu
Cz
Hn
1
Stand
PO
Pu
Cz
Hn
Screw
PO
Pu
Cz
Hn
Mounting bracket
PO
Pu
Cz
Hn
MIDI sound source (phono jacks)
PO
Pu
Cz
Hn
1
2
2
sub woofer
PO
Pu
Cz
Hn
English
Installation (See fig. A)
Installing to the PC monitors 1
Notes
• The supplied mounting brackets may not fit some PC
monitors. In such a case, place the system beside the
computer on top of the desk.
• Clean the surface of the mounting brackets and the PC
monitor before attaching the double-sided tapes.
Otherwise, the double-sided tapes may not adhere
firmly to the surface of the PC monitor and the system
may fall off.
• To attach the system to the PC monitor firmly using the
double-sided tapes, press the mounting bracket firmly to
the PC monitor.
• If the picture on the PC monitor is distorted by the
vibration from the speaker system, turn down the
volume first. If there seems to be no improvement, try
placing the speaker system on top of a desk etc.
• Depending on the mounting surfaces, there may be
cases in which the mounting brackets becomes difficult
to remove once attached. Also the double-sided tapes
used on the mounting brackets may leave some marks
on the surface of the PC monitor when they are
removed.
Placing on top of the desk 2
Connections (See fig. B)
Connect the left speaker to the source equipment.
When the left speaker is connected to a computer
equipped with a monaural jack, the sound may be heard
only from the left speaker.
To connect to a stereo phonetype headphones jack
Use the optional PC-234HG plug adaptor or the
RK-G138HG connecting cord.
Connecting to a Discman, Walkman, etc. 1
Note
When two types of equipment are connected to the system
and are played at the same time, the sound from both of
them will come out of the speakers. When you wish to
play only one equipment, make sure that the other
equipment is turned off or its volume is turned down.
Connecting to a sub woofer 2
Connect a sub woofer to OUTPUT (WOOFER) jack (stereo
mini jack). The volume of the connected speaker system is
adjustable with the VOLUME control.
Power Source (See fig. C)
The mains power source is required when the system is
used.
Note on the AC power adaptor
Use only the supplied AC power adaptor. Do not use any
other AC power adaptor.
Polaritry of the plug
How to use (See fig. D)
1
Press the POWER switch (
Ø) to turn on the
system.
The POWER indicator lights up.
2
Adjust the volume with the VOLUME control.
3
Adjust the TREBLE control to your preference.
Turn off the MEGA BASS (Walkman) or BASS BOOST
(Discman, etc.) function as it may cause sound distortion.
After listening, press the POWER switch (
ø) to turn off
the system. The POWER indicator goes out.
Listening with the headphones
Connect the headphones (not supplied) to the
2
(headphones) jack on the left speaker. The sound from the
speakers is automatically turned off.
Po
Installation (See fig. A)
Installing to the PC monitors 1
Notes
• The supplied mounting brackets may not fit some PC
monitors. In such a case, place the system beside the
computer on top of the desk.
• Clean the surface of the mounting brackets and the PC
monitor before attaching the double-sided tapes.
Otherwise, the double-sided tapes may not adhere
firmly to the surface of the PC monitor and the system
may fall off.
• To attach the system to the PC monitor firmly using the
double-sided tapes, press the mounting bracket firmly to
the PC monitor.
• If the picture on the PC monitor is distorted by the
vibration from the speaker system, turn down the
volume first. If there seems to be no improvement, try
placing the speaker system on top of a desk etc.
• Depending on the mounting surfaces, there may be
cases in which the mounting brackets becomes difficult
to remove once attached. Also the double-sided tapes
used on the mounting brackets may leave some marks
on the surface of the PC monitor when they are
removed.
Placing on top of the desk 2
Connections (See fig. B)
Connect the left speaker to the source equipment.
When the left speaker is connected to a computer
equipped with a monaural jack, the sound may be heard
only from the left speaker.
To connect to a stereo phonetype headphones jack
Use the optional PC-234HG plug adaptor or the
RK-G138HG connecting cord.
Connecting to a Discman, Walkman, etc. 1
Note
When two types of equipment are connected to the system
and are played at the same time, the sound from both of
them will come out of the speakers. When you wish to
play only one equipment, make sure that the other
equipment is turned off or its volume is turned down.
Connecting to a sub woofer 2
Connect a sub woofer to OUTPUT (WOOFER) jack (stereo
mini jack). The volume of the connected speaker system is
adjustable with the VOLUME control.
Power Source (See fig. C)
The mains power source is required when the system is
used.
Note on the AC power adaptor
Use only the supplied AC power adaptor. Do not use any
other AC power adaptor.
Polaritry of the plug
How to use (See fig. D)
1
Press the POWER switch (
Ø) to turn on the
system.
The POWER indicator lights up.
2
Adjust the volume with the VOLUME control.
3
Adjust the TREBLE control to your preference.
Turn off the MEGA BASS (Walkman) or BASS BOOST
(Discman, etc.) function as it may cause sound distortion.
After listening, press the POWER switch (
ø) to turn off
the system. The POWER indicator goes out.
Listening with the headphones
Connect the headphones (not supplied) to the
2
(headphones) jack on the left speaker. The sound from the
speakers is automatically turned off.
Ru
Installation (See fig. A)
Installing to the PC monitors 1
Notes
• The supplied mounting brackets may not fit some PC
monitors. In such a case, place the system beside the
computer on top of the desk.
• Clean the surface of the mounting brackets and the PC
monitor before attaching the double-sided tapes.
Otherwise, the double-sided tapes may not adhere
firmly to the surface of the PC monitor and the system
may fall off.
• To attach the system to the PC monitor firmly using the
double-sided tapes, press the mounting bracket firmly to
the PC monitor.
• If the picture on the PC monitor is distorted by the
vibration from the speaker system, turn down the
volume first. If there seems to be no improvement, try
placing the speaker system on top of a desk etc.
• Depending on the mounting surfaces, there may be
cases in which the mounting brackets becomes difficult
to remove once attached. Also the double-sided tapes
used on the mounting brackets may leave some marks
on the surface of the PC monitor when they are
removed.
Placing on top of the desk 2
Connections (See fig. B)
Connect the left speaker to the source equipment.
When the left speaker is connected to a computer
equipped with a monaural jack, the sound may be heard
only from the left speaker.
To connect to a stereo phonetype headphones jack
Use the optional PC-234HG plug adaptor or the
RK-G138HG connecting cord.
Connecting to a Discman, Walkman, etc. 1
Note
When two types of equipment are connected to the system
and are played at the same time, the sound from both of
them will come out of the speakers. When you wish to
play only one equipment, make sure that the other
equipment is turned off or its volume is turned down.
Connecting to a sub woofer 2
Connect a sub woofer to OUTPUT (WOOFER) jack (stereo
mini jack). The volume of the connected speaker system is
adjustable with the VOLUME control.
Power Source (See fig. C)
The mains power source is required when the system is
used.
Note on the AC power adaptor
Use only the supplied AC power adaptor. Do not use any
other AC power adaptor.
Polaritry of the plug
How to use (See fig. D)
1
Press the POWER switch (
Ø) to turn on the
system.
The POWER indicator lights up.
2
Adjust the volume with the VOLUME control.
3
Adjust the TREBLE control to your preference.
Turn off the MEGA BASS (Walkman) or BASS BOOST
(Discman, etc.) function as it may cause sound distortion.
After listening, press the POWER switch (
ø) to turn off
the system. The POWER indicator goes out.
Listening with the headphones
Connect the headphones (not supplied) to the
2
(headphones) jack on the left speaker. The sound from the
speakers is automatically turned off.
Cz
Installation (See fig. A)
Installing to the PC monitors 1
Notes
• The supplied mounting brackets may not fit some PC
monitors. In such a case, place the system beside the
computer on top of the desk.
• Clean the surface of the mounting brackets and the PC
monitor before attaching the double-sided tapes.
Otherwise, the double-sided tapes may not adhere
firmly to the surface of the PC monitor and the system
may fall off.
• To attach the system to the PC monitor firmly using the
double-sided tapes, press the mounting bracket firmly to
the PC monitor.
• If the picture on the PC monitor is distorted by the
vibration from the speaker system, turn down the
volume first. If there seems to be no improvement, try
placing the speaker system on top of a desk etc.
• Depending on the mounting surfaces, there may be
cases in which the mounting brackets becomes difficult
to remove once attached. Also the double-sided tapes
used on the mounting brackets may leave some marks
on the surface of the PC monitor when they are
removed.
Placing on top of the desk 2
Connections (See fig. B)
Connect the left speaker to the source equipment.
When the left speaker is connected to a computer
equipped with a monaural jack, the sound may be heard
only from the left speaker.
To connect to a stereo phonetype headphones jack
Use the optional PC-234HG plug adaptor or the
RK-G138HG connecting cord.
Connecting to a Discman, Walkman, etc. 1
Note
When two types of equipment are connected to the system
and are played at the same time, the sound from both of
them will come out of the speakers. When you wish to
play only one equipment, make sure that the other
equipment is turned off or its volume is turned down.
Connecting to a sub woofer 2
Connect a sub woofer to OUTPUT (WOOFER) jack (stereo
mini jack). The volume of the connected speaker system is
adjustable with the VOLUME control.
Power Source (See fig. C)
The mains power source is required when the system is
used.
Note on the AC power adaptor
Use only the supplied AC power adaptor. Do not use any
other AC power adaptor.
Polaritry of the plug
How to use (See fig. D)
1
Press the POWER switch (
Ø) to turn on the
system.
The POWER indicator lights up.
2
Adjust the volume with the VOLUME control.
3
Adjust the TREBLE control to your preference.
Turn off the MEGA BASS (Walkman) or BASS BOOST
(Discman, etc.) function as it may cause sound distortion.
After listening, press the POWER switch (
ø) to turn off
the system. The POWER indicator goes out.
Listening with the headphones
Connect the headphones (not supplied) to the
2
(headphones) jack on the left speaker. The sound from the
speakers is automatically turned off.
Hn
POWER
VOLUME
TREBLE
MAX
MIN
1
2
3