Playing a cassette, Selecting the play system mode – Samsung SV7000W User Manual
Page 15
29
GB
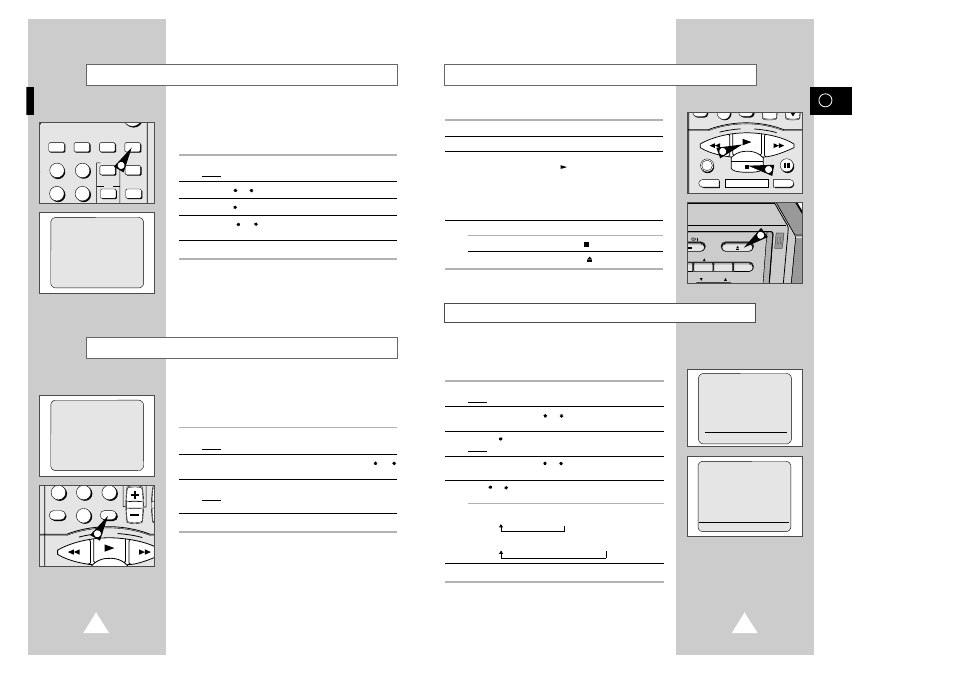
This function enables you to play back any pre-recorded cassette.
1
Switch on both the television and your VCR.
2
Select the television AV or AUX input.
3
Insert the video cassette to be played. If the safety tab on the
cassette is intact, press PLAY (
).
Otherwise, the cassette is played automatically.
➢
When a cassette is loaded, the tape position is optimized
automatically to reduce disturbance (Digital Auto Tracking).
When playing a cassette, if the end of the tape is reached,
the cassette is rewound automatically.
4
To:
press:
stop the playback
STOP (
).
eject the cassette
EJECT (
).
0
REW
PLAY
F.F
DISPLAY MONITOR A.DUB
REC
P/STILL
STOP
EJECT
RACKING
SPEED AUDIO OUT
T
ER
CHANNEL
Playing a Cassette
3
4
4
Selecting the PLAY SYSTEM Mode
You can choose the PLAY SYSTEM if your system does not match
the SV-7000W VCR.
This function only needs to be used when there is no color or
picture during playback.
1
Press MENU on the remote control.
Result:
The programming menu is displayed.
2
Press the corresponding
or
buttons, until the cursor is placed
in front of the
USER SET
option.
3
Press the
button to select this option.
Result:
The
USER SET1
menu is displayed.
4
Press the corresponding
or
buttons, until the cursor is placed
in front of the
PLAY SYSTEM
option.
5
Press
or
buttons until you select the appropriate system is
selected.
Case1 : NTSC or PAL-M Tape Playback
AUTO
➝
NTSC
➝
PAL-M
Case2 : PAL, SECAM, MESECAM Tape Playback
AUTO
➝
PAL
➝
SECAM
➝
MESECAM
6
On completion, press MENU twice to exit the menu.
☛
If you encounter a system error or the picture has no color
when in AUTO mode, select the play system manually.
28
You can cancel any programs that are:
◆ incorrect.
◆ no longer required.
1
Press the TIMER button and select STANDARD TIMER.
Result:
The preset programs are displayed.
2
Select the program to be cancelled by pressing the
or
button.
3
Press the CLR/RST button to cancel the selected program.
Result:
All the recording information is deleted and the broad-
cast will not be recorded.
4
On completion, press MENU twice.
You can check your preset recordings:
◆ when you have finished presetting the VCR ; or
◆ if you have forgotten which programs will be recorded.
1
Press the TIMER button and select STANDARD TIMER.
Result:
The preset programs are displayed.
2
Press the
or
button to select the required program.
3
Press the
button to select the CH.
4
Press the
or
button to select and change any values as
required.
5
On completion, press MENU twice.
Checking a Preset Recording
Cancelling a Preset Recording
REC.SPEED CLK/COUNT PICTURE TIMER
ART INPUT
2
3
5
6
STROBE AUDIO
1
7
8
9
0
CLR/RST
100
REW
PLAY
F.F
REC
P/S
STOP
3
CLOCK: 1/JAN WED 12:32P
CH DAY START
→
STOP
❿
1 SU19
7:05P
→
7:25P
❿❿
--- ---- --:--
→
--:--
❿❿
--- ---- --:--
→
--:--
❿❿
--- ---- --:--
→
--:--
❿❿
--- ---- --:--
→
--:--
❿❿
--- ---- --:--
→
--:--
❿❿
#
❷
SET:
❿
DELETE:(CLR/RST) (MENU)
CLOCK: 1/JAN WED 12:32P
CH DAY START
→
STOP
❿
1 SU19
7:05P
→
7:25P
❿❿
--- ---- --:--
→
--:--
❿❿
--- ---- --:--
→
--:--
❿❿
--- ---- --:--
→
--:--
❿❿
--- ---- --:--
→
--:--
❿❿
--- ---- --:--
→
--:--
❿❿
#
❷
SET:
❿
DELETE:(CLR/RST) (MENU)
** USER SET1 **
TAPE SELECT
:E180/
T120
CLOCK TYPE :12H
❿
PLAY SYSTEM
:AUTO
OSD
:ON
USER SET2
#
❷
❿
END:(MENU)
** M E N U **
TIMER PROGRAMMING
❿
USER SET
INSTALLATION
LANGUAGE SET
CLOCK SET
#
❷
❿
END:(MENU)