Connection/installation, Menu setting, Back focus adjustment – JVC TK-WD310 User Manual
Page 8: Menu settings, Shoot a pattern closely, Turn the lens focus ring to, Shoot a comparatively dark scene with thin lines, Selector button set button, Operation
22
CONNECTION/INSTALLATION
Back focus adjustment
Be sure to make back-focus adjustments when changing the lens
mounting method or using a different lens.
● To make accurate back focus adjustments, carry out adjustments
in a state where the lens iris is released.
To open the lens iris, set MODE in the FOCUS ADJUST menu
screen to ON. (
੬ Page 27)
● The auto iris lens may operate under extremely bright condi-
tions (7000lx or higher). In this case, use an ND filter to adjust
the amount of light.
(The ND fiter acts to reduce the amount of incident light enter-
ing the lens evenly over the entire wavelength band.)
Memo
If the iris cable length of the lens is insufficient when turning
the back focus adjustment rings, lock the back focus locking
screws, turn the lens and loosen the back focus locking screws
again for achieving back focus.
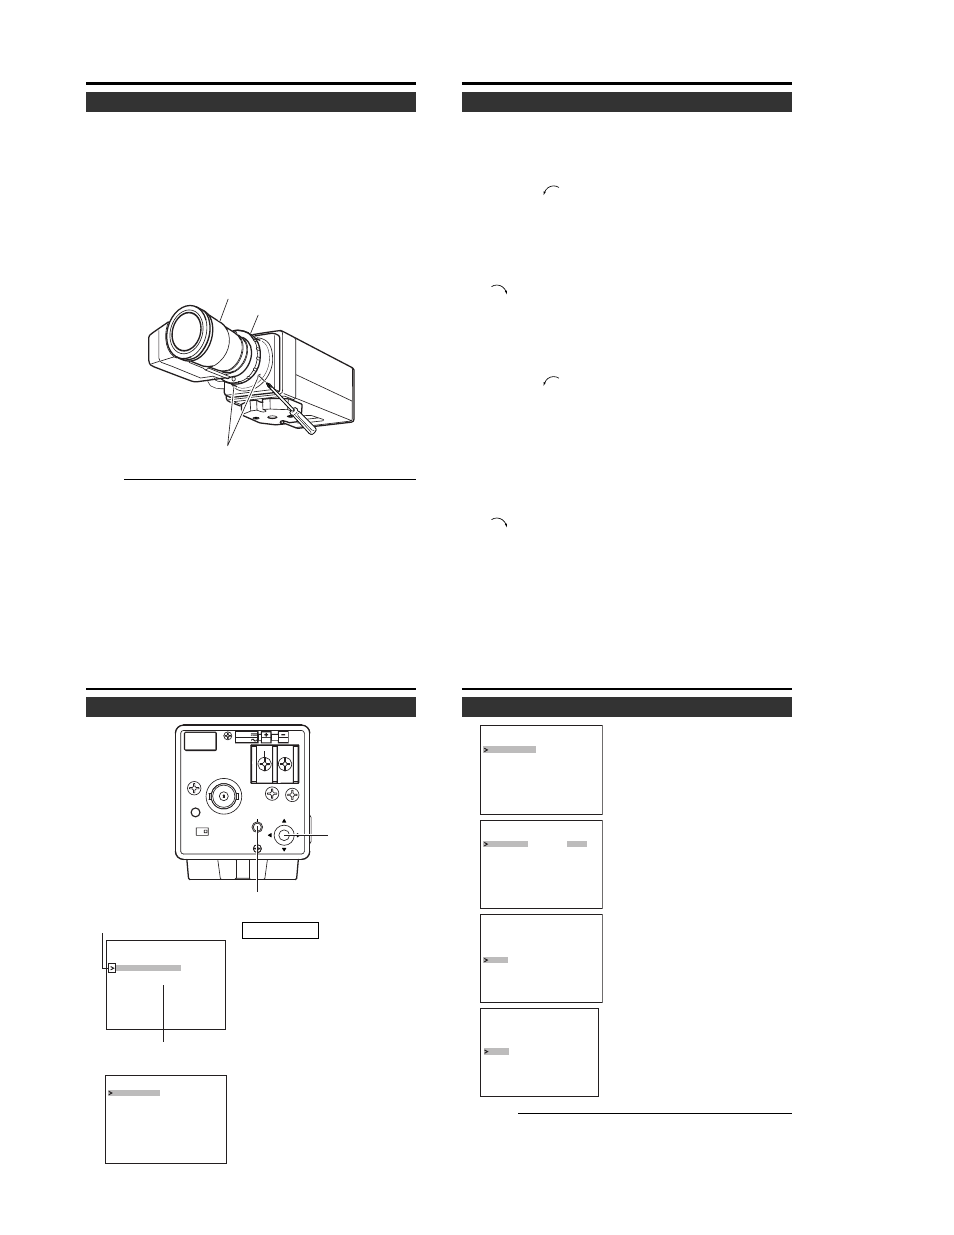
Phillips screwdriver
Back focus adjust ring
Lens focus ring
Back focus locking screws
23
• With a fixed-focus lens
If the focus can not be adjusted correctly by rotating the lens focus
ring, adjust the back focus as follows.
1.
Loosen the back focus locking screws by turning it counter-
clockwise (
) with a Phillips screwdriver. (2 locations)
2.
Shoot a pattern closely.
3.
Turn the lens focus ring to .
4.
Turn the back focus adjustment ring to focus at the best point.
5.
Tighten the back focus locking screws by turning it clockwise
(
). (2 locations)
• With a zoom lens
If the image is out of focus when zooming (telephoto wide-angle),
adjust the camera as follows:
1.
Loosen the back focus locking screws by turning it counter-
clockwise (
) with a Phillips screwdriver. (2 locations)
2.
Shoot a comparatively dark scene with thin lines.
3.
Set the lens to the maximum telephoto position, and adjust
the lens focus.
4.
Set the lens to the maximum wide-angle position, and turn
the back focus ring to adjust the focus.
(Repeat steps
3. and 4. two or three times.)
5.
Tighten the back focus locking screws by turning it clockwise
(
). (2 locations)
24
MENU SETTING
Menu settings
SEE INST-
RUCTION
MANUAL
DC12V
AC24V
1
2
CLASS 2 ONLY (U TYPE)
ISOLATED POWER ONLY
(E TYPE)
POWER VIDEO OUT
INT
LL
SET
SELECTOR
SELECTOR
button
SET button
1.
Press and hold the SET button
for more than 2 seconds.
● The MENU screen appears.
2.
Press the SELECTOR button in
the vertical direction (
6 or 7)
and move the cursor (>) to the
desired submenu.
3.
Press the SET button
● The selected submenu screen
appears.
Cursor
Submenu (“..” displayed
at the end.)
V I D E O
A D J U S T . .
F O CU S
A D J U S T . .
C AM E R A
S E T T
N G S
I
. .
F A C T
E X I T
O R Y
S E T T
N G S
I
. .
ME N U
— — —
— — —
— — —
— — —
D R
A G C
C O L O R
L E V E L
E N H A N C E
E X I T
L E V E L
M
M
O
O
D
D
E
E
W
W
H I
E
T
B A L A N C E
J U ST
A D
V I D E O
MO
E 2
D
L OW
A T W
N O
MA L
R
N O
MA L
R
Operation
25
4.
Press the SELECTOR button in
the vertical direction (
6 or 7)
and move the cursor (>) to the
desired item.
5.
Press the SELECTOR button in
the horizontal directional (
8 or
t) and change the set value.
Ⅵ To change the set value of mul-
tiple items, repeat steps
4. and
5. above.
6.
Exit the menu screen.
Move the cursor (>) to EXIT of
the menu screen and press the
SET button.
7.
Return to the normal screen.
Move the cursor (>) to EXIT of
the MENU screen and press the
SET button.
● The screen returns to the nor-
mal screen (screen with no
menu display).
D R
A G C
C O L O R
L E V E L
E N H A N C E
E X I T
L E V E L
M
M
O
O
D
D
E
E
W
W
H I
E
T
B A L A N C E
J U ST
A D
V I D E O
MO
E 2
D
L OW
A T W
N O
MA L
R
N O
MA L
R
— — —
— — —
D R
A G C
C O L O R
L E V E L
E N H A N C E
E X I T
L E V E L
M
M
O
O
D
D
E
E
W
W
H I
E
T
B A L A N C E
J U ST
A D
V I D E O
MO
E 2
D
H I
H
G
A T W
N O
MA L
R
N O
MA L
R
— — —
— — —
D R
A G C
C O L O R
L E V E L
E N H A N C E
E X I T
L E V E L
M
M
O
O
D
D
E
E
W
W
H I
E
T
B A L A N C E
J U ST
A D
V I D E O
MO
E 2
D
H I
H
G
A T W
N O
MA L
R
N O
MA L
R
— — —
— — —
V I D E O
A D J U S T . .
F O C U S
A D J U S T . .
C AM E R A
S E T T
N G S
I
. .
F A C T
E X I T
O R Y
S E T T
N G S
I
. .
ME N U
— — —
— — —
Memo
When returning to the normal screen from the TOP MENU
screen by selecting EXIT, the menu settings will be stored
in the unit memory.