C connecting to a tv with component jacks, Hint, Progressive scan video playback available – JVC XV-N510B User Manual
Page 8
6
XV-N510B/XV-N512S/GNT0055-001A/English
P
re
p
a
ra
ti
o
n
s
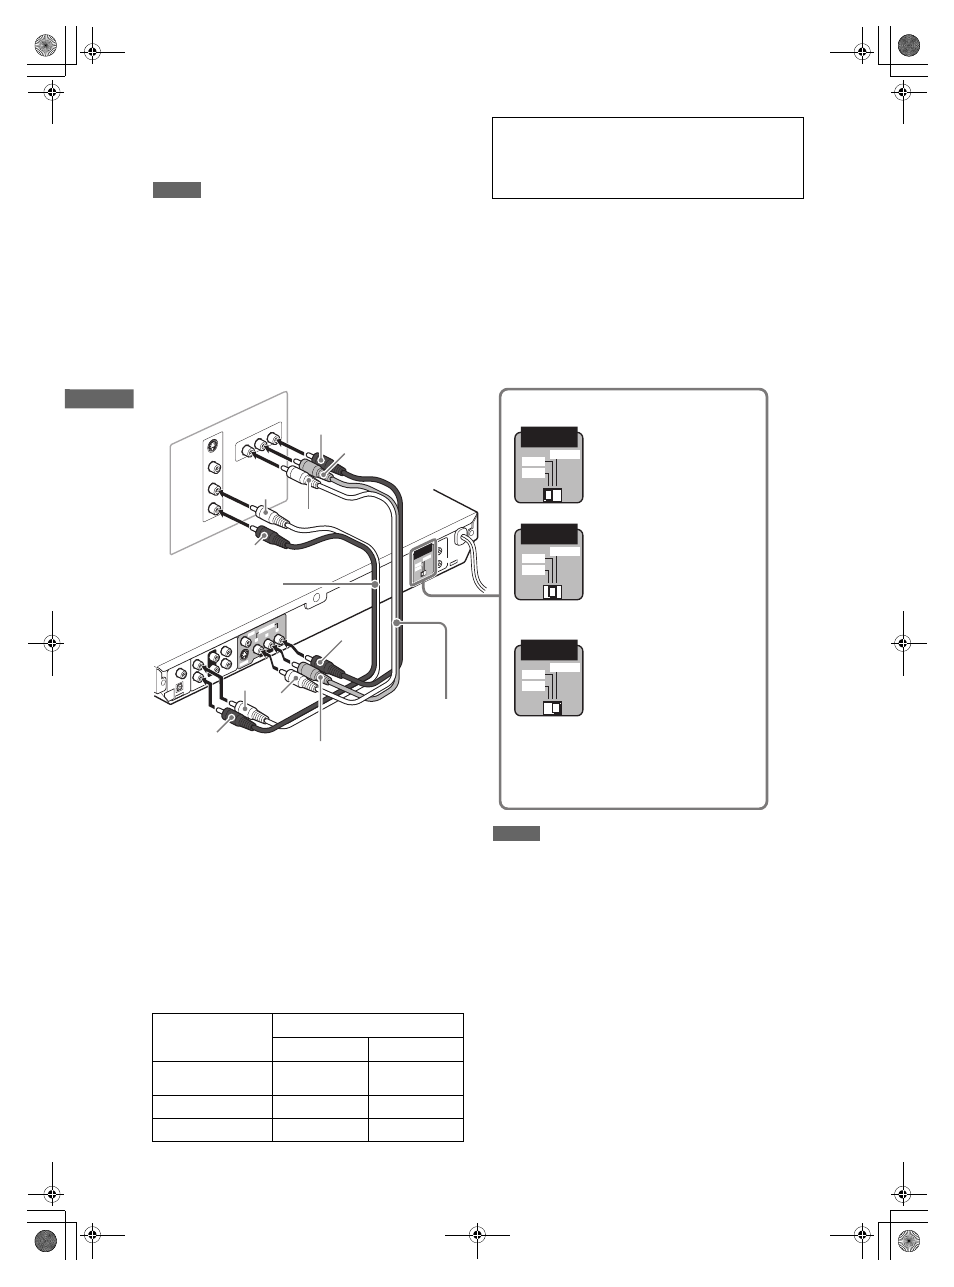
C Connecting to a TV with component jacks
You can enjoy picture of high-fidelity color reproduction by
connecting the COMPONENT VIDEO OUT jacks on the player to
your TV.
NOTES
• Be sure to connect the red and white plugs of the audio cable to
the FRONT RIGHT/LEFT jacks on the rear of the player, as
shown in the illustration.
• Connect “Y” to “Y,” “P
B
” to “P
B
” (C
B
), “P
R
” to “P
R
” (C
R
) correctly.
• When using the COMPONENT VIDEO OUT jacks, do not
connect the S-VIDEO output jack on the player.
• Set [ANALOG OUT] in the [AUDIO] preference display to [2-CH
STEREO] (see page 34).
• If your TV has component video input jacks of BNC type, use an
adapter which converts a pin jack to a BNC jack (not supplied).
Hint
Depending on the source material format, DVD VIDEO discs can
be classified into two types; film source and video source (note
that some DVD VIDEO discs contain both film source and video
source). Film sources are recorded as 24-frame-per-second
information, while (NTSC) video sources are recorded as 30-
frame-per-second (60-field-per-second interlaced) information.
When the player plays back a film source material, Progressive
(uninterlaced) signals are created using the original information.
When a video source material is played back, the player
interleaves lines between the interlaced lines on each to create
the interpolated picture and outputs as the progressive signal.
Activating the Progressive scanning mode using the remote
control unit
When the player is turned on and the VIDEO SIGNAL
SELECTOR is set to “REMOTE,” press and hold down VFP -
PROGRESSIVE SCAN for a few seconds.
The scanning mode switches between the Progressive scanning
and Interlaced scanning modes.
When the scanning mode is set to the Progressive mode, the [P]
indicator lights up in the display window.
[DD] also turns on when Progressive scanned signals on a DVD
VIDEO disc are directly output as they are from the player.
Depending on the [PICTURE SOURCE] preference display and
whether the current DVD VIDEO disc is film-source or video-
source, the indicator that lights up in the display window differs,
as shown in the table below.
NOTES
• The Progressive scanning mode works only when you connect
the player’s COMPONENT VIDEO OUT jacks to your TV.
• There are some progressive TV and High-Definition TV sets
that are not fully compatible with the player, resulting in the
unnatural picture when playing back a DVD VIDEO disc in the
Progressive scanning mode. In such a case, use the Interlaced
scanning mode. To check the compatibility of your TV set,
contact your local JVC customer service center.
• All JVC progressive TV and High-Definition TV sets are fully
compatible with the player (Example: AV-61S902).
Progressive scan video playback available
In the Progressive scanning mode, you can enjoy high quality
picture with less flickers when the COMPONENT VIDEO OUT
jacks are connected to a TV or monitor that supports the
progressive video input.
RIGHT
LEFT
AUD
IO
VIDEO
S-VIDEO
IN
Y
P
B
P
R
COMPON
ENT IN
SUB
-WO
OFE
R
CEN
TER
RIG
HT
FRO
NT
SUR
ROU
ND
LEF
T
COA
XIA
L
OPT
ICA
L
PCM
/
STR
EAM
DIGIT
AL
OUT
AU
DIO OUT
VID
EO
S-V
IDE
O
Y
P
B
P
R
AV COMPU LINK
480
i
480
p
REM
OTE
VIDEO OUT
VIDEO SIGNAL
SELECT
OR
COMPONENT
480i
480p
REMOTE
VIDEO SIGNAL
SELECTOR
480i
480p
REMOTE
VIDEO SIGNAL
SELECTOR
480i
480p
REMOTE
VIDEO SIGNAL
SELECTOR
The player
Blue
Red
Green
White
Red
Red
White
Audio cable
(supplied)
Component
video cable
(not supplied)
Red
Blue
Green
TV
Selecting the VIDEO SIGNAL SELECTOR position
• If your TV equipped with
component jacks does not
support the progressive
scanning mode:
Set the VIDEO SIGNAL
SELECTOR to “480i.”
• If your TV equipped with
component jacks supports
the progressive scanning
mode:
Set the VIDEO SIGNAL
SELECTOR to “480p.”
• If you want to select the
scanning mode between the
interlace and progressive
modes (depending on the
source condition, or when
connecting more than one TV,
etc.):
Set the VIDEO SIGNAL
SELECTOR to “REMOTE.”
Thus you can select the mode
from the remote control unit.
Setting of [PICTURE
SOURCE]
Source type of DVD VIDEO
Film source
Video source
VIDEO (NORMAL)/
(ACTIVE)
[P]
[P]
FILM
[DDP]
[DDP]
AUTO
[DDP]
[P]
Preparations.fm Page 6 Friday, March 26, 2004 2:11 PM