5. replacing switch and/or head tube – Miller Electric OM-1313 User Manual
Page 22
OM-1313 Page 18
4-5.
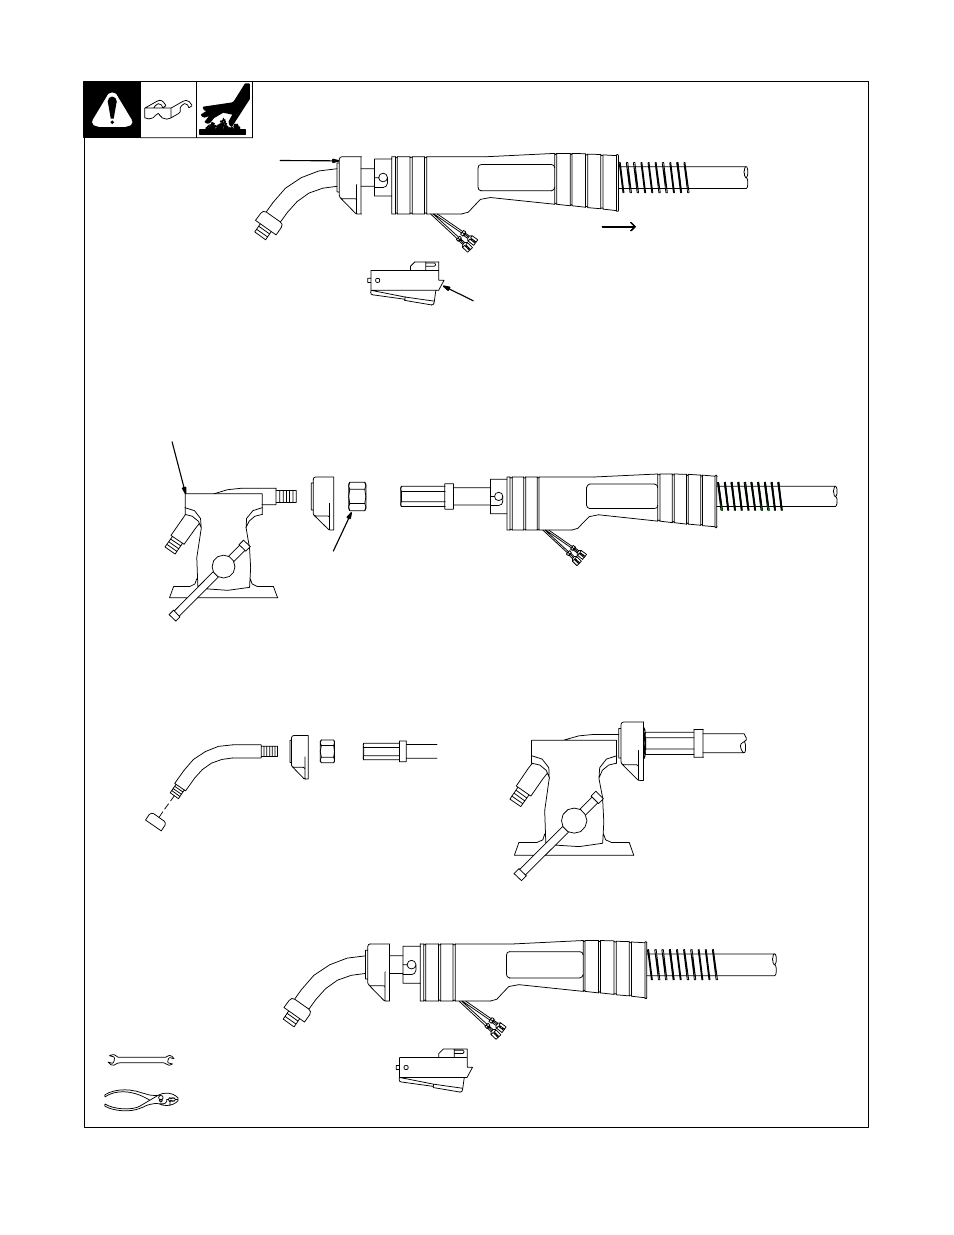
Replacing Switch And/Or Head Tube
Ref. ST-800 795-C
1
Remove handle
locking nut.
2
Remove switch housing. Note: If installing new
switch, push switch lead connectors onto terminal of
new switch (polarity is not important). Install switch
back into handle, and secure with handle locking nut.
If replacing head tube, continue to end of figure.
3
Slide handle.
4
Secure head
tube in vice.
5
Loosen jam nut. Remove
from vice and turn head
tube out by hand.
6
Install existing shock washer onto
new head tube. Hand-tighten head
tube into connector cable.
7
Place head tube in vice and tighten
until nuts are tight.
8
Remove from vice. Reposition
handle and install switch housing.
Secure with handle locking nut.
Y
Disconnect gun first.
3/4 in
Tools Needed:
See also other documents in the category Miller Electric Tools:
- OM-2241 (32 pages)
- ICE-27C (36 pages)
- Arc Welding Power Source (4 pages)
- INVISION 456 CC (44 pages)
- Welder (132 pages)
- SS-75D12 (44 pages)
- Load Bank LBP-350 (2 pages)
- OM-193 084E (36 pages)
- 750MPa (2 pages)
- APT-1000 (20 pages)
- OM-220 390F (48 pages)
- 271 (48 pages)
- Welding (32 pages)
- DC (72 pages)
- OM-129 (70 pages)
- XLi (24 pages)
- S-64 (36 pages)
- ICE-27T (36 pages)
- PipePro 304 (76 pages)
- AA40GBU (28 pages)
- D-64 (40 pages)
- Auto Arc XLT 165 (48 pages)
- 185 DX (56 pages)
- S-32S (4 pages)
- Big 40 DC/TIG 55500 A (8 pages)
- Big Blue 600D (60 pages)
- Millermatic 140 (60 pages)
- pmn (36 pages)
- LMSW Series (2 pages)
- 1250 (46 pages)
- Trailblazer Pro 350 D (8 pages)
- TS (76 pages)
- S-22P12 (28 pages)
- 602 (40 pages)
- Axcess 300 (56 pages)
- MOG-400 (40 pages)
- WC-24 (20 pages)
- Big Blue 502P (64 pages)
- Dimension 1000 (44 pages)
- DS-74DX12 (52 pages)
- 350 VS (36 pages)
- 24A (32 pages)
- GA-16C (12 pages)
- Big Blue 502D (116 pages)
- OM-229 038D (36 pages)