McCulloch MC30 User Manual
Page 21
24
TO ADJUST STEERING WHEEL
ALIGNMENT
If steering wheel crossbars are not horizontal
(left to right) when wheels are positioned
straight forward, remove steering wheel
and reassemble per instructions in the
"INSTALL STEERING COLUMN" section
of this manual.
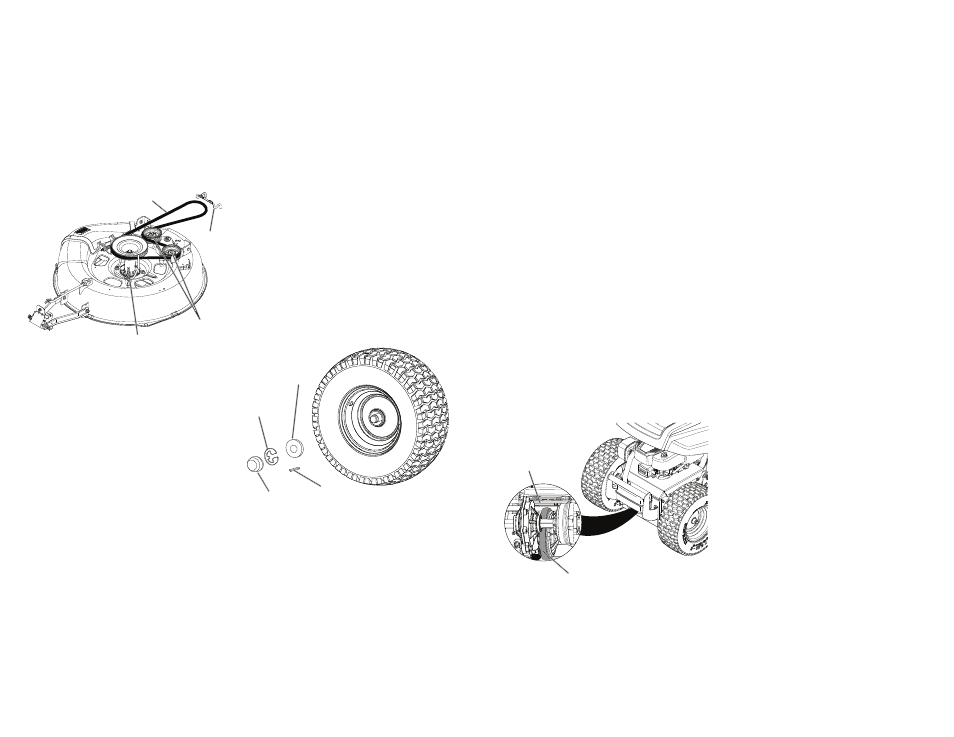
TO REMOVE WHEEL FOR REPAIRS
FRONT WHEEL
1. Block up front axle securely.
2. Remove dust cover, retaining ring, and
washer to allow wheel removal.
3. Repair tire and reassemble.
4. Replace washer and retaining ring
securely in axle groove.
REAR WHEEL
1. Block up Rear axle securely.
2. Remove dust cover, retaining ring, wash-
er, and square key while pulling tire off.
3. Repair tire and reassemble.
4. Replace square key while putting tire back
on, then replace washer and retaining
ring securely in axle groove.
NOTE: To seal tire punctures and pre vent
flat tires due to slow leaks, purchase and
use tire sealant from authorized service
center. Tire sealant also pre vents tire dry
rot and corrosion.
Retaining
Ring
Dust
Cover
Washer
Square Key
(rear wheel only)
TO CHECK BRAKE
If riding mower requires more than four (4)
feet to stop at highest speed in highest gear
on a level, dry concrete or paved surface,
then brake must be serviced.
You may also check brake by:
1. Park riding mower on a level, dry con-
crete or paved surface, depress clutch/
brake pedal all the way down and engage
parking brake.
2. Place motion control lever in neutral
position.
The rear wheels must lock and skid when
you try to manually push the riding mower
forward. If the rear wheels rotate, then the
brake needs to be serviced. Contact a quali-
fied service center.
TO REPLACE MOWER BLADE DRIVE
BELT
MOWER DRIVE BELT REMOVAL
1. Park riding mower on a level surface.
2. Set parking brake.
3. Lower mower to its lowest position.
4. Remove mandrel cover from mower deck.
5. Remove rear engine plate from unit.
6. Remove rear belt keeper from unit.
7. Carefully roll belt over the top of the
mower blade mandrel.
8. Remove belt from idler pulleys.
9. Check idler pulleys to see that they rotate
freely.
10. Remove belt from rear drive pulley.
MOWER DRIVE BELT INSTALLATION
Install in reverse order following instruc-
tions in "MOWER DRIVE BELT REMOVAL"
section.
Belt
Keeper
Mower Drive Belt
Idler Pulleys
Mandrel
21
CLEAN AIR INTAKE/COOL ING AREAS
To ensure proper cooling, make sure the
grass screen, cooling fins, and other exter-
nal surfaces of the engine are kept clean
at all times.
Every 100 hours of operation (more often
under extremely dusty, dirty conditions),
remove the blower housing and other cooling
shrouds. Clean the cooling fins and external
surfaces as necessary. Ensure the cooling
shrouds are re in stalled.
NOTE: Operating the engine with a blocked
grass screen, dirty or plugged cooling fins,
and/or cooling shrouds re moved will cause
engine damage due to overheating.
CLEAN AIR SCREEN
Air screen must be kept free of dirt and chaff
to prevent engine dam age from overheating.
Clean with a wire brush or compressed air to
re move dirt and stub born dried gum fibers.
AIR FILTER
Your engine will not run properly using a
dirty air filter. Service air cleaner more often
under dusty conditions. See engine manual.
Engine Plate
Friction Disc
MUFFLER
Inspect and replace corroded muffler and
spark arrester (if equipped) as it could create
a fire hazard and/or dam age.
SPARK PLUG(S)
Replace spark plug(s) at the beginning of
each mowing season or after every 100
hours of operation, whichever occurs first.
Spark plug type and gap setting are shown
in “PROD UCT SPEC I FI CA TIONS” section
of this manual.
CLEANING
• Clean engine, battery, seat, finish, etc. of
all foreign matter.
• Keep finished surfaces and wheels free
of all gasoline, oil, etc.
• Protect painted surfaces with au to mo tive
type wax.
We do not recommend using a garden hose
or pressure washer to clean your riding
mower unless the engine and transmission
are covered to keep water out. Water in en-
gine or transmission will shorten the useful
life of your riding mower. Use compressed
air or a leaf blower to remove grass, leaves
and trash from riding mower and mower.
CLEANING FRICTION SURFACES
To ensure proper drive performance keep
the friction surfaces free from dirt, chaff and
excess rubber at all times.
Every 25 hours of operation, the friction
surfaces need to be rubbed clean with
isopropyl alcohol or other non-filming cleaner.