Ga-6h/ga-6ha — controls and indicators – Multiquip MQ Multiquip Portable Generators ga-6h User Manual
Page 19
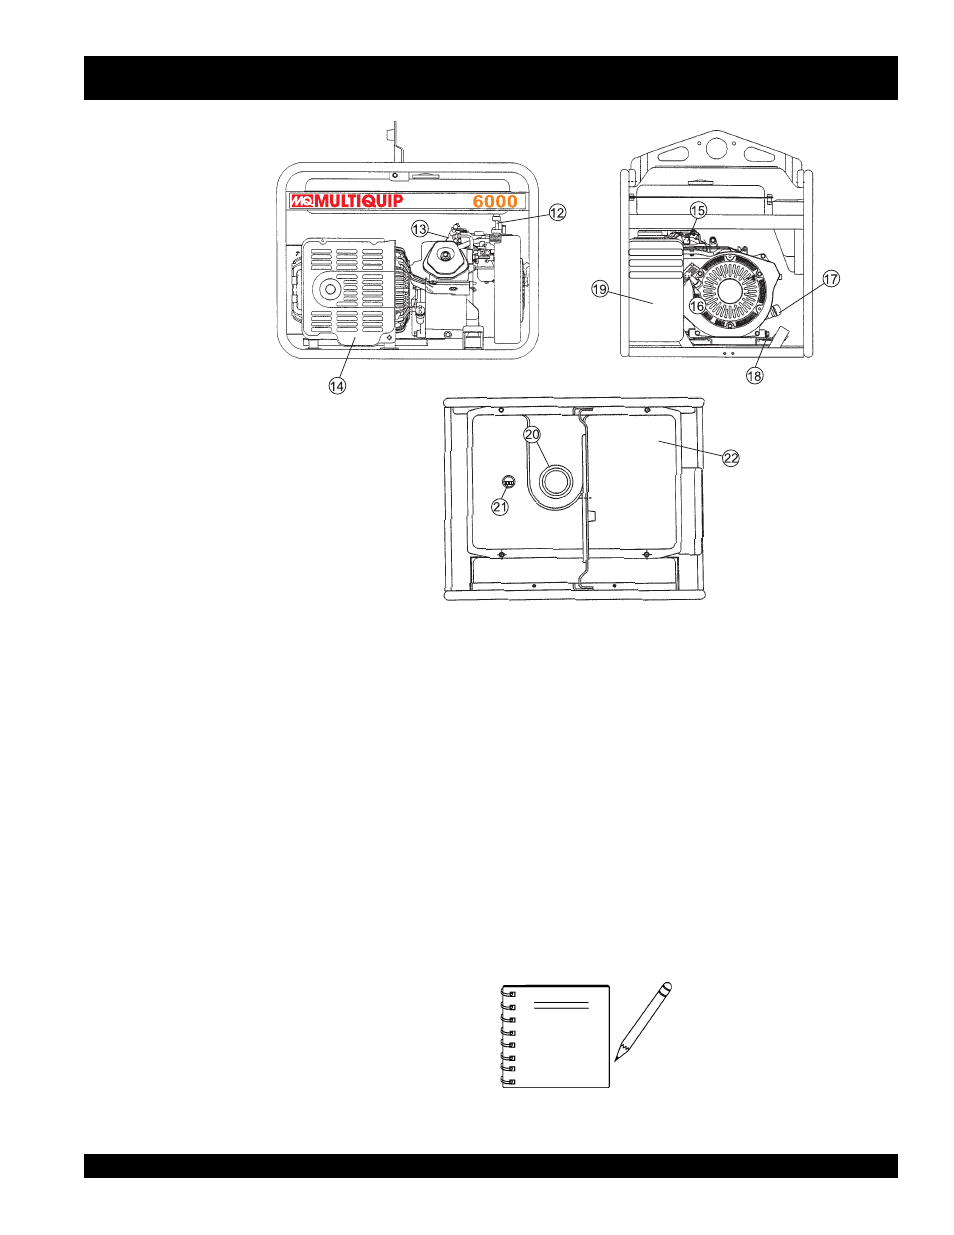
GA-6H/GA-6HA A.C. GENERATORS — OPERATION & PARTS MANUAL — REV. #0 (06/02/05) — PAGE 19
This
HONDA
engine is equipped
with a low oil shutdown capability. A
built in sensor will automatically turn
off the engine should the oil level fall
below a safe operating condition.
Make sure the generators is placed
on level ground. Placing the generators on level ground will
ensure that the low oil sensor will function properly.
NOTE
GA-6H/GA-6HA — CONTROLS AND INDICATORS
12. Fuel Cock Lever – Turn this lever
downward
to
start
(down)the flow of fuel into the carburetor. Turn
upward
to
stop (
up
)
the flow of fuel.
13. Spark Plug – Provides spark to the ignition system. Set
spark plug gap to 0.6 - 0.7 mm (0.028 - 0.031 inch) Clean
spark plug once a week.
14. Muffler/Heat Shield – Used to reduce noise and emissions.
NEVER touch this
heat shield
when the generator/welder
is in use. Always allow time for the generators to cool down
before performing maintenance.
15. Choke Lever – Used for starting the engine.
Close
the
choke lever when starting a cold engine or in cold weather
conditions. The choke enriches the fuel mixture.
Open
the
choke lever if starting a warm engine or in warm weather
conditions.
16. Recoil Starter (pull rope) – Manual-starting method. Pull
the starter grip until resistance is felt, then pull briskly and
smoothly.
17. Engine Oil Filler Cap – Remove this cap/dipstick when
the adding of engine oil is required. See Table 5 for
recommended type engine oil.
Figure 3E. Generators Components
18. Engine Oil Drain Plug – Remove this drain plug when
draining of the oil from the engine crankcase is required.
Fill with recommeded type oil as listed in Table 6.
19. Air Cleaner – Prevents dirt and other debris from entering
the fuel system. Remove wing-nut on top of air filter
cannister to gain access to filter element. NEVER run the
engine without an air cleaner.
20. Fuel Tank Cap – Remove this cap to add unleaded
gasoline to the fuel tank.
Replenish
with
clean unleaded
gasoline. Make sure cap is tightened securely. DO NOT
over fill.
21. Fuel Gauge – This gauge is located on top of the fuel tank.
Read this gauge to determine when fuel is
low
.
22. Fuel Tank – Fuel tank capacity is 5 gallons (19 liters).