Stage b: completing the basic hull structures, Installing the keel, stem & sternpost, Installing the rudder – Model Shipways 2003 User Manual
Page 6: Drilling the larger holes in the hull, Holes to be drilled as work progresses, Planking the deck & installing the waterway
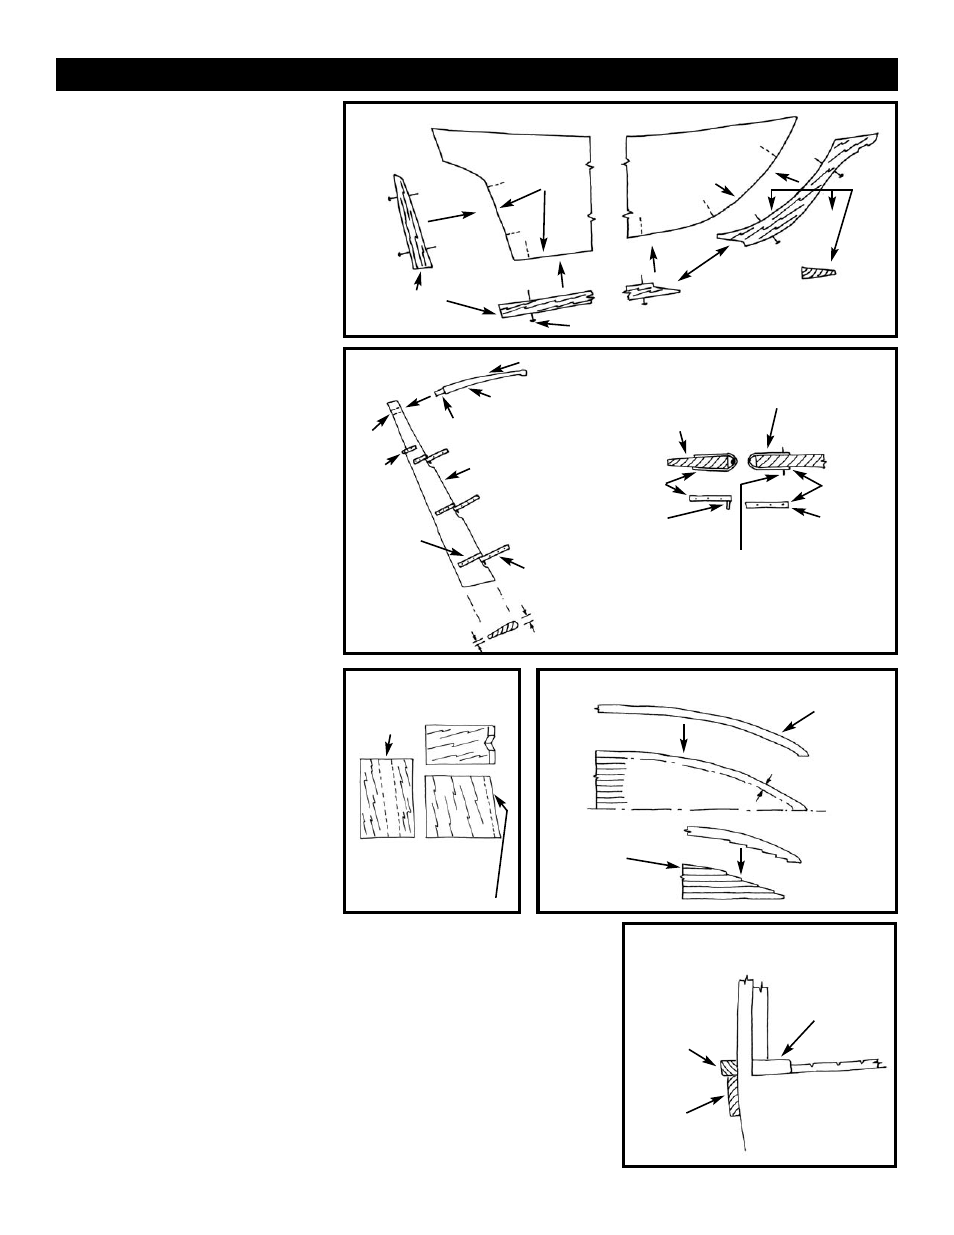
6
1. Installing the Keel, Stem
& Sternpost
The keel, stem & sternpost are laser-cut
parts. Taper the stem and install the parts
(Figure B-1). Note that the hull plan shows a
scarf joint between the keel and stem with a
step in the middle of the joint. This step has
been eliminated in the laser-cut part. Also,
the stem is shown to be made up of two
pieces. A one piece stem is provided instead.
Use pins or dowels to position the parts
before gluing. Scrape off any glue squeeze-
out. Fill any gaps remaining at the glue
joints with wood filler and then sand.
2. Installing the Rudder
The rudder, a laser-cut part, can be shaped
and installed now or later. The rudder is
tapered and has a round front edge.The pin-
tles & gudgeons are made from brass strip or
by using paper strips. See Figure B-2 for con-
struction.
3. Drilling the Larger Holes
in the Hull
Before going any further with the details,
drill all the large holes in the hull. These
would include a hole for the rudder post &
bowsprit, two mast holes and two pilot holes
in the keel for screws or pins for mounting
the model on a display base. The rudder post
hole will need to be filed to an oval shape as
shown on the plans. For the mast holes,
make a drill guide jig so you will drill at the
correct mast rake angle (see Figure B-3 for
some ideas).
4. Holes to be Drilled as
Work Progresses
There will be other holes to drill as the work
progresses. For example, the hawse holes for
the anchor cable are drilled through the bul-
warks forward. Holes will be required in the
deck for the galley funnel, the capstan, bitts,
and the pumps. You will also need to drill
small holes for inserting eyebolts that hold
blocks for the rigging and gun lines, holes
for belaying pins, and holes for pinning vari-
ous parts in place.
5. Planking the Deck & Installing
the Waterway
The deck planking supplied in the kit is a
scored basswood sheet. To represent caulked
seams darken the scored lines. The Painting
and Staining Section of these instructions
provide some suggestions how to do this. To
fit the sheet, first make a paper pattern of the
deck area. Make sure the scored plank lines
are parallel to the centerline when the sheet
is installed. Glue the sheeting down with
contact cement or airplane-type cement (see
gluing notes in the Painting and Staining
Section). Before you glue the deck consider
the options as follows:
Individual Planks -You could lay individual
planks instead of the scored sheeting, but
wood for this is not included in the kit. If
you elect to do this, paint one edge of each
plank black or brown. When the planks are
glued together, the color will show up as
caulking between planks.
Waterway -Along the inside of the bulwarks,
flush with the deck or just slightly thicker,
there is a waterway-nibbing strake. If you
want to add this detail, cut the edge off the
scored deck, the width of the waterway, and
glue the waterway to the edge of the sheet.
Figure B-4 illustrates the procedure. You
STAGE B: COMPLETING THE BASIC HULL STRUCTURES
FIG. B-1 KEEL, STEM & STERNPOST
PIN OR DOWEL ALL PARTS
GLUE
TAPER THE
STEM
1/8"
1/16"
LASER-CUT
PARTS
GLUE
FIG. B-2 RUDDER
PINTLE & GUDGEON DETAIL
1/16"
ROUND THE EDGES
CUT TENON
LASER-CUT
RUDDER
CUT
HOLE
PINTLE
BRASS
CHAIN
STRAP
GUDGEON
TILLER (LASER-CUT)
1/8"
TAPER & ROUND FRONT
RUDDER
(TOP VIEW)
STERNPOST
(TOP VIEW)
GUDGEON
BRASS
STRIP
PIN IS OPTIONAL
PINTLE
SOLDER
OR
EPOXY PIN
FIG. B-3 JIG
FOR MAST HOLES
FIG. B-4 WATERWAY NIBBING STRAKE
FIG. B-6 WATERWAY STRIP
& WALE
MAST RAKE ANGLE
WOOD
BLOCK
DRILL
GUIDE
ANGLED
HOLE
ANGLED
HOLE
WATERWAY
CUT IF INCLUDING
THE NIBS
WATERWAY
STRIP
WATERWAY
INBOARD
WALE
CUT-OFF TO
ADD WATERWAY
TO EDGE
GLUE ON
TOP OR EDGE
SCORED DECKING
DRILL
GUIDE
WITH "V"
SLOT