Carving the hull, Carving the bulwarks, Carving the inside of the transom & counter – Model Shipways 2003 User Manual
Page 5
5
2. Carving the Hull
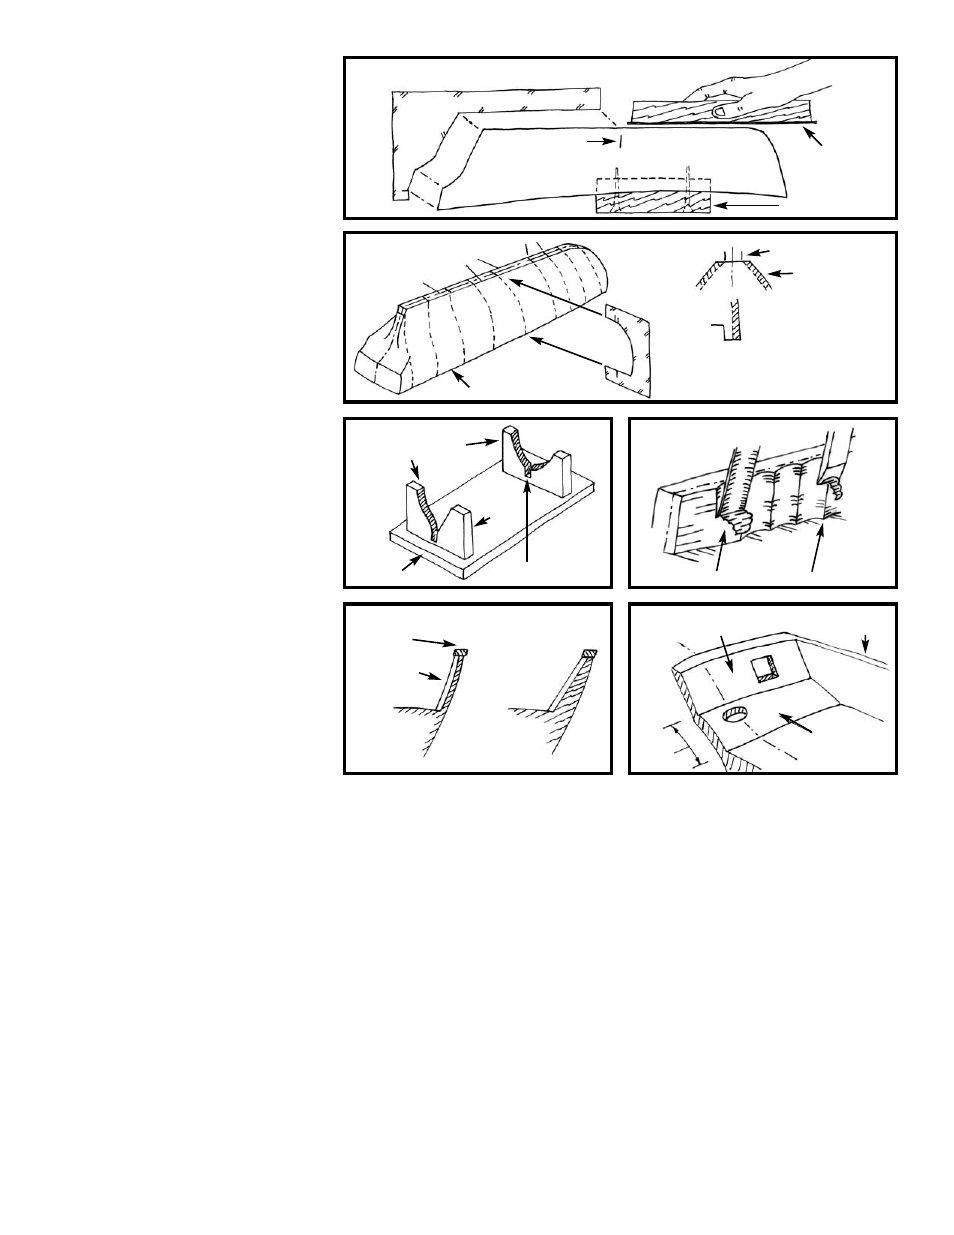
Cut a wooden block from scrap to about 3”
x 1” x 3/4” thick. Screw the block to the
deck so the model can be held in a bench
vise for carving. First, check the accuracy of
the profile and correct it as necessary, using a
long sanding block (Figure A-2).
Next, mark the centerline, rabbet lines
(where hull meets keel) and station lines on
the model (Figure A-3). Place the station
marks on the center of the hull bottom and
on top of the rails so the marks won’t be
carved off as you work. Also, add the
breadth marks on the rail if you elected the
option noted above.
Start carving approximately at Station 5
(maximum beam) and progress forward,
then aft, using chisels and gouges to cut
away excess wood. Avoid carving against the
grain by shifting forward or aft of Station 5
until you find a spot where you are going
with the grain. Basswood carves easily, so
you probably won’t have much problem with
the grain.
Carve very slowly and take off a little wood
at a time. Fit the templates as you go. Carve
until the template fits reasonably well, then
use sandpaper to obtain the final shape. At
first the templates will not fit very well. You
must compare the template to the hull and
visually decide where to remove wood. Cut a
little off, then re-check the template.
Finally, draw a few horizontal pencil lines
(like waterlines) and the vertical station lines
on the hull. Use these to visually check the
shape of the hull. Hold the hull at various
angles, and look to see if the pencil lines are
fair (even). If you have any unfairness, dips
or bump, they can usually be found with this
visual check. You can also use a stiff stick of
wood, about 1/8” square, and lay it on the
hull at various locations. Dips in the hull
will show up under the stick.
Sand the stern transom with a sanding block.
3. Carving the Bulwarks
Make yourself a temporary cradle to secure
the hull while carving (Figure A-4). This
cradle also will serve to hold the model for
most of the remaining work. Make the cra-
dle so the model sits in it with its waterline
parallel to the baseboard and table. The
tops of the cradle should be below the
waterline. Later, when you are ready to
paint, attach a pencil on top of a wooden
block and slide it along the table to mark
the location of the waterline.
The machine-carved hull has bulwarks thick-
er than scale so they won’t break while inside
the kit box. The upper surface is cut to the
underside of the cap rail. After you carve the
outside of the hull, the bulwarks will be
thinner. If more than 1/16" thick, it will be
necessary to carve the inside of the bulwarks.
This is the most difficult part, so work slow-
ly as you carve (Figure A-5). After carving,
sand the surfaces smooth. If you happen to
have or want to buy a powered rotary tool
like a Dremel, there are many cutters avail-
able to quickly reduce the bulwark thickness.
Note that bulwark stanchions go onto the
inboard side of the bulwarks. Together with
the bulwark (planks on a real ship) they
must fit under the cap rail which is only
5/32" wide. If the stanchions will not fit,
make them a little thinner, or better, sand
the inside of the bulwark a little more at the
top. You can then taper the inside down to
the deck without reducing the thickness at
the deck. You won’t really see that the bot-
tom is thicker than the top. Of course, you
could use a wider cap rail but don’t get it too
wide or the scale will not look proper. Figure
A-6 is a cross section through the bulwark
showing the options.
4. Carving the Inside of the
Transom & Counter
The top of the transom should be about
3/32" thick. If necessary, carve the transom
down on the inside, tapering to the counter
line. Like the bulwarks, a rail sits atop the
transom. The counter is that portion of the
stern from the transom down to the deck.
This should be a slightly curved shape. See
Figure A-7 for a transom and counter view.
The sketch also shows the openings that will
be cut later.
Transom Option - On a machine-carved
hull the wood grain at the stern is in the
wrong direction. If you are worried that the
transom might split, you could add a thin
basswood sheet on the outside to strengthen
it. You could even cut out the transom com-
pletely and add a sheet transom.
At this stage, the basic hull is fully carved.
Sand the entire hull with #220 grit sandpa-
per for the final smoothing. Be careful not to
round the upper edges of the rail or at the
rabbet. These should be sharp corners.
FIG. A-2 CORRECTING THE PROFILE
FIG. A-3
MARKING THE HULL
FIG. A-4 CRADLE
FIG. A-6 BULWARK SECTIONS
FIG. A-7 TRANSOM & COUNTER
FIG. A-5 CARVING
BULWARKS
TEMPLATE
MARK STATIONS
MARK RABBET
STA 4
STA 7
1/4"
3/8" PLYWOOD
CAP RAIL
CL
TRANSOM
SLIGHT
CURVE
BULWARK
COUNTER
DECK
STANCHION
UNIFORM THICKNESS
THICKER AT DECK
CUT SLOT
FOR KEEL
MARK
CENTER LINE
FIT TEMPLATES
USE GOUGE FIRST
SMOOTH WITH CHISEL
MARK STATIONS ON TOP OF RAIL
CROSS SECTION
RAIL
CL
RABBET
WOOD TO
BE CUT AWAY
SANDING BLOCK
BENCH VISE BLOCK
STATION
5