How to operate the mdlp2, con’t – McIntosh MDLP2 User Manual
Page 27
27
How to Operate the MDLP2, con’t
input signal. The remaining adjustments
are for RGB signals and are thus “grayed
out”.
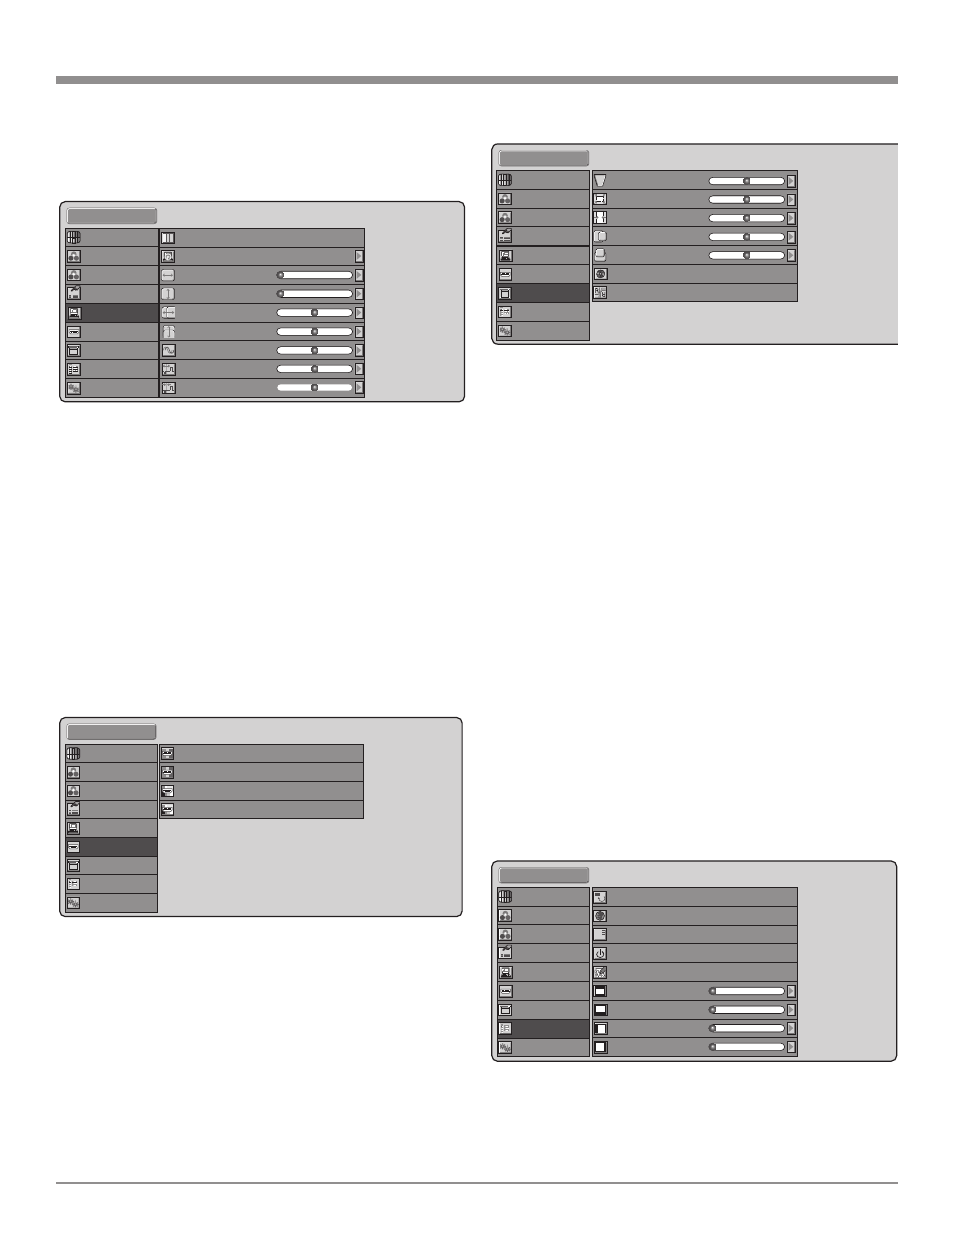
HDMI Menu Adjust
The HDMI Menu provides adjustments for matching the
Color Space and Deep Color settings of the MDLP2 to the
source component. Refer to figure 30.
CSC HDMI 1/2 - The Default setting is AUTO, however
there are several manual settings in the
event the source component is unable to
communicate the desired setting.
Deep Color HDMI 1/2 - The Default setting is AUTO,
however there are several manual
settings in the event the source
component is unable to communi-
cate the desired setting.
Display Menu Adjust
The Display Menu allows for electronic adjustments to
be made to the image to compensate for orientation of the
projector relative to the screen. Refer to figure 31.
Note: Before using the electronic adjustments, make sure all
of the Initial Setup Mechanical Adjustments have been
made first. Refer to pages 14 and 15.
Keystone - Refer to “Vertical Keystone Adjustment” on
page 23.
Scale - Reduces the image size without changing the aspect
ratio. The image can be reduced to about 70% of
the original size.
Width - Reduces the image width without changing the
image height. The width can be reduced to about
75% of the original size.
Position H, V - Adjust the position of the input signal. H
adjusts the horizontal position of the input
signal. V adjusts the vertical position of the
input signal.
Enable: Default mode.
Disable: Reduces the size of the image so the
edges of the video signal can be seen.
Color Wheel - Sets the rotation speed of the lamp source
color optical filter. x5 is the default setting.
Note: The on-screen image will momentarily
disappear during the speed change.
Installation - Refer to “Display Installation Orientation” on
page 23.
OSD/Blanking
The OSD (On-Screen Display) and Blanking Adjustments
default settings may be changed for personal preferences.
Refer to figure 32.
Menu Position - There are nine different positions On-
Screen to display the menus.
Standard 1
Mode
Readjust
Resolution H
Resolution V
Position H
Position V
Memory 1
0
0
0
0
Phase
Clamp Position
Clamp Width
0
0
0
123
Fine Menu 1
Fine Menu 2
Input Signal
RGB/HD Adjust
Display
OSD/Blanking
Config.
HDMI
Picture Adjust
Figure 29
Standard 1
Keystone
Scale
Width
Position H
Position V
Installation
0
0
0
0
0
Front
Color Wheel
x5
Fine Menu 1
Fine Menu 2
Input Signal
RGB/HD Adjust
Display
OSD/Blanking
Config.
HDMI
Picture Adjust
Figure 31
Standard 1
Menu Position
Language
Status Info.
Power-OFF Confirm.
Blanking Memory
Blanking Top
Top-L
English
Enable
Enable
Memory 1
0
0
0
0
Blanking Bottom
Blanking Left
Blanking Right
Fine Menu 1
Fine Menu 2
Input Signal
RGB/HD Adjust
Display
OSD/Blanking
Config.
HDMI
Picture Adjust
Figure 32
Figure 30
Standard 1
CSC HDMI 1
CSC HDMI 2
Deep Color HDMI 1
Deep Color HDMI 2
Auto
Auto
Auto
Auto
Picture Adjust
Fine Menu 1
Fine Menu 2
Input Signal
RGB/HD Adjust
Display
OSD/Blanking
Config.
HDMI