Mounting the ln-11s1a (on the ceiling), Setup – Marantz LN-11S1A User Manual
Page 13
9
B
EF
O
RE
U
SE
N
A
M
E
O
F
PA
RT
S
B
A
SI
C
O
PE
RA
TI
O
N
A
D
VA
N
CE
D
O
PE
RA
TI
O
N
RE
M
OT
E C
ON
TR
OL
LE
R
OP
ER
AT
IO
N
TR
OU
BL
ES
HO
OT
IN
G
O
TH
ER
S
SE
TU
P
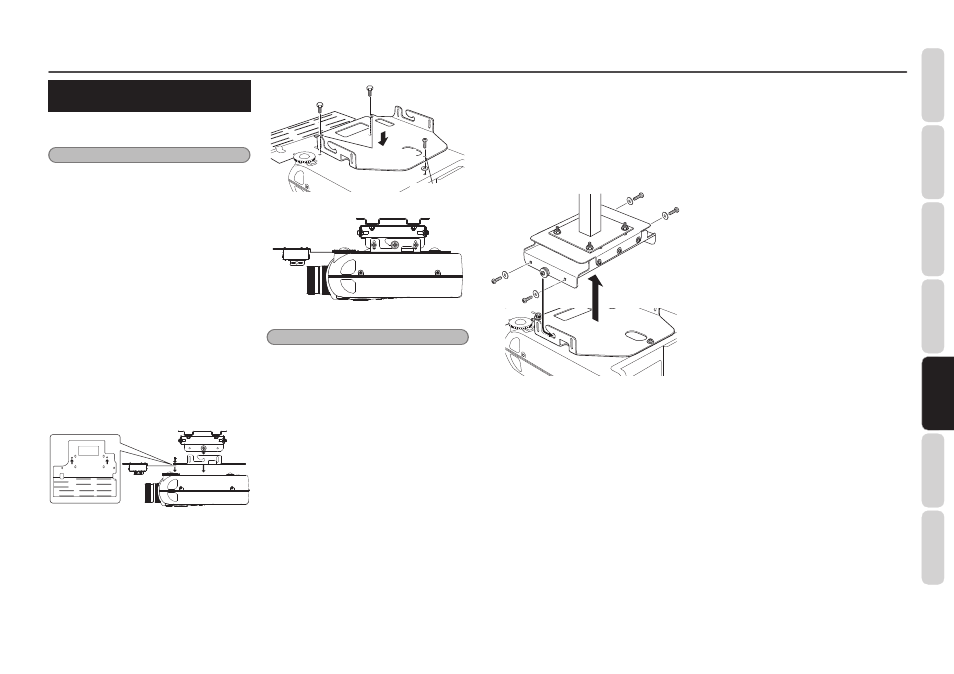
MOUNTING THE LN-11S1A
(ON THE CEILING)
Mount the assembled LN-11S1A and MOUNT20 to
the projector. Refer to Figure 16.
Note:
Plate #4 supplied with the MOUNT20 is located
in a separate shipping carton from the projector
or LN-11S1A.
1.
Spread a soft cloth on a stable, horizontal
surface to protect against scratching, and
carefully place the projector upside down
on the cloth.
Align the mounting holes on the LN-11S1A
base plate with the lens slider attached
with the two ceiling mount kit mounting
screw holes located on the lens side of the
projector. Refer to Figures 16 and 17. Align
one supplied 8-mm washer with the other
ceiling mount kit mounting screw hole
located on the projector unit. Gently place
Plate #4, supplied with the MOUNT20, and
attach securely at the two front locations
using two M8x10 hexagonal head bolt
supplied with the LN-11S1A and at the
one rear location using one 8-mm screw
supplied with the MOUNT20. Refer to
Figure 17.
Figure 16
Figure 17
Mountina slits
Mounting hole
Figure 18
Notes:
• When the projector is combined with the ceiling
mounting kit, the total weight is approximately 59
pounds (26.7kg). For safety, assembly should be
performed by two or more people.
• Be sure to check the maximum weight that can
be withstood by the ceiling before installation.
Also, even if the weight that can be withstood is
large enough, when installing in a location where
people will pass directly below the projector, be
sure to take measures against the projector from
possibly falling through the use of wires or other
means.
2.
Lift and slide the projector onto the 1/4-20
inch screws previously installed in the
metal studs of the plate on the ceiling (see
arrow in Figure 19).
Tighten the 1/4-20 inch screws on both
sides of the mount and install two 6mm
screws and washers into the side of the
projector Mounting Plate 4. Refer to Figure
19.
Projector side
20˚ tilt
Figure 19
3.
It is important to completely finish mounting
the projector and making initial settings
before mounting and adjusting the LN-
11S1A anamorphic lens. Perform necessary
procedures such as focus adjustment while
referring to the projector’s user’s guide.
Once the required projector settings have
been made, proceed with lens mounting
and adjustment.
SETUP