Troubleshooting procedures, Warning – Maytag MAH8700A User Manual
Page 7
Troubleshooting Procedures
!
WARNING
To avoid risk of electrical shock, personal injury or death; disconnect power to washer before servicing, unless
testing requires power.
June 2006
7
16026882
©2006 Maytag Services
RPL 16026127
#
IN
Service Mode
Service Mode
enables service personnel to verify the
operation of the washing machine and diagnose problems.
Service Mode
can be entered in the middle of any wash
cycle without interrupting the cycle.
While in Service
Mode
, the technician can cancel the current cycle, set a
continuous running mode, start a variety of special service
tests and view diagnostic displays.
Enter / Exit Service Mode
To enter Service Mode press the Chime and Extra Rinse
keys for 3 seconds or until the control beeps.
NOTE:
The washer must be ‘ON’ before Service Mode
can be entered.
The motor speed will be displayed when started (motor not
running display will be “0”). The present state of the
machine will not be changed (i.e., the current cycle in
progress will not be interrupted and only the display will
change). All LED’s will be turned ‘OFF’ except the Door
Lock
LED; it will continue to display the condition of the
door lock.
To exit Service Mode:
1) Press Chime and Extra Rinse keys for 3 seconds
again, or
2) Press Power Off button, or
3) Unplug the machine.
To pause while in Service Mode:
Pressing the Rotary Cycle Selector knob while running a
test will pause the individual test.
Access Service Tests and Diagnostic Features while in
Service Mode.
The following table summarizes special tests and features
available in Service Mode, along with methods of
activation and cancellation. A more detailed description of
each test can be found in the text following the table.
Reference the text or symbol indicated in the “Test or
Display” column, with the text and symbols indicated in the
text following the quick reference table for a more detailed
explanation.
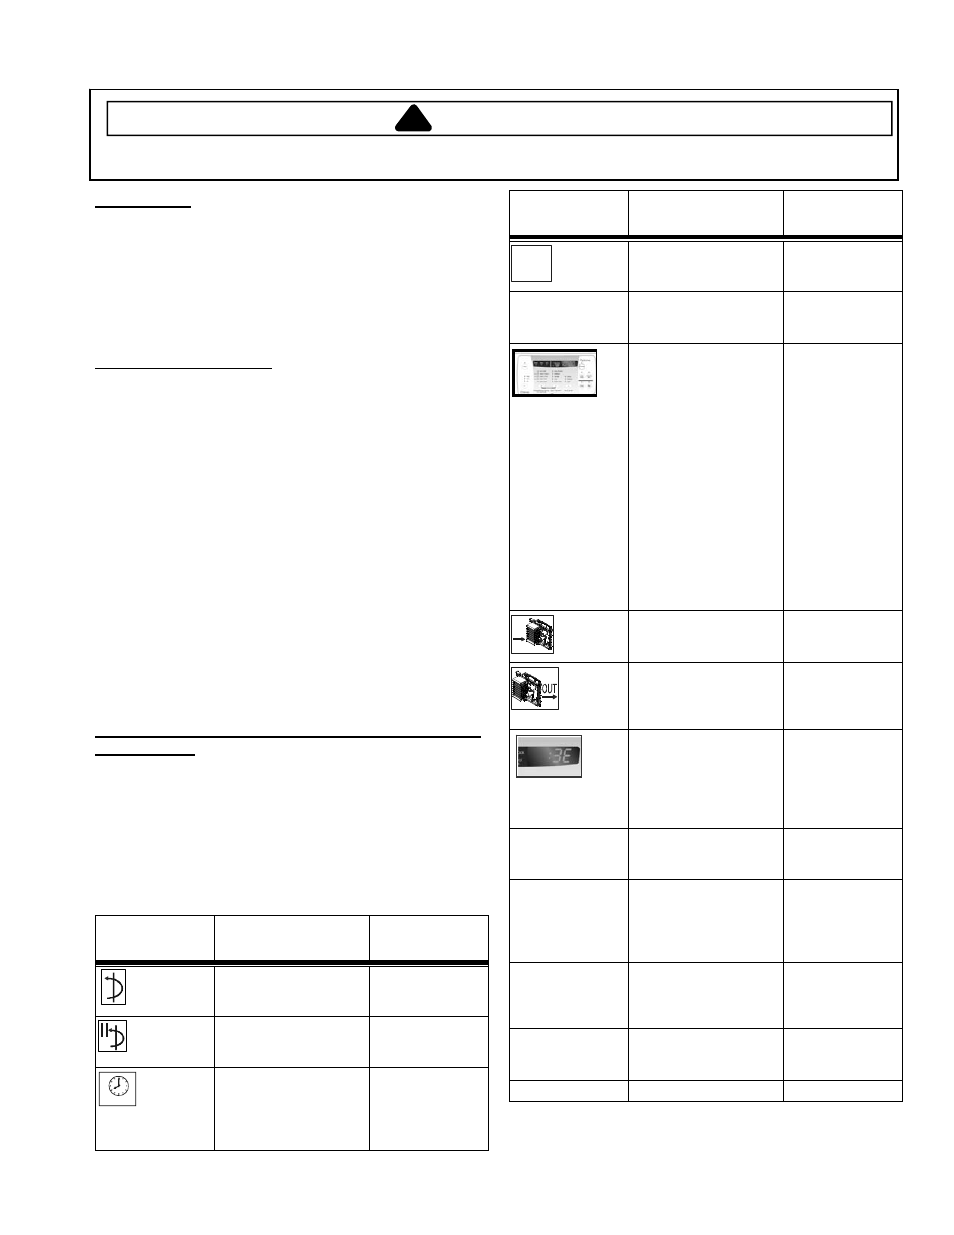
Test or Display
To Start
(or Hold)
To Cancel
(or resume)
Quick
Spin Test
Press Delay and
Rinse & Spin
Press Delay and
Rinse & Spin
or
press Power Off
Hold Quick
Spin Test
step
Press Rotary Cycle
Selector
(during test)
Press Rotary
Cycle Selector
Fast
Time-
Down
Test /
Advance
to next step
Press Wash/Rinse
Temp
to start test.
Press Wash/Rinse
Temp
during cycle to
advance.
Press Power Off
Test or Display
To Start
(or Hold)
To Cancel
(or resume)
Quick
Service
Cycle
Press Wash/Rinse
Temp
and Soil Level
Press Power Off
(also exits
Service Mode
)
Hold Quick
Service Cycle
Step
Press Rinse & Spin
and Spin Only
together
Press Rinse &
Spin
and Spin
Only
LED/Switch
Test
Press Delay for 3
seconds (then
individual buttons to
test) Turn Rotary
Cycle Selector
clockwise, the LED’s
around it will be
toggled. Turn Rotary
Cycle Selector
counterclockwise, the
7-segment LED’s
toggle. Press Rotary
Cycle Selector
, all of
the LED’s around the
Rotary Cycle
Selector
will be
toggled.
Press Power Off
twice after
starting test
Board
Input
Test
Press Spin Only
Press Spin Only
Board
Output
Test /
System Check
Press Spin Speed
Press Power
Off.
Diagnostic
Code Display
(Initial)
Press Rinse & Spin –
displays ‘d’
Press Rinse &
Spin
again
All Diagnostic
Codes
Rotate Rotary Cycle
Selector
either
direction
N/A
Cycle Count
No. for
Diagnostic
Code
Press and hold Rotary
Cycle Selector
, while
diagnostic code is
displayed
Release Rotary
Cycle Selector
(returns to
diagnostic code
display)
Clear All
Diagnostic
Codes
Press Delay and
Chime
together while
displaying diagnostic
codes
N/A
Display
Software
Version
Press Soil Level. Press
Soil
Level
.
Cycle Count
Press Chime
N/A