Using the parallel fence, Fitting the dust extraction adaptor, Maintenance – Global Machinery Company TTS5000M User Manual
Page 15
15
6. Always let the blade reach full speed (approximately
2 seconds) before you begin to cut into the workpiece.
7. Slowly lower the saw into the workpiece, using the front
of the base resting on the workpiece as a hinge point.
WARNING.
As soon as the blade starts cutting the material,
release the lower blade guard lever (23).
8. Once the base plate (12) is flat against the workpiece,
proceed cutting in a forward direction to the end of the cut.
9. After completing your cut, release the trigger switch (2) and
allow the blade to come to a complete stop. Do not remove
the saw from the workpiece while the blade is moving.
Note.
If the corners of your plunge cut are not completely
cut through, use a jigsaw or hack saw (with a masonry
cutting blade) to finish the corners.
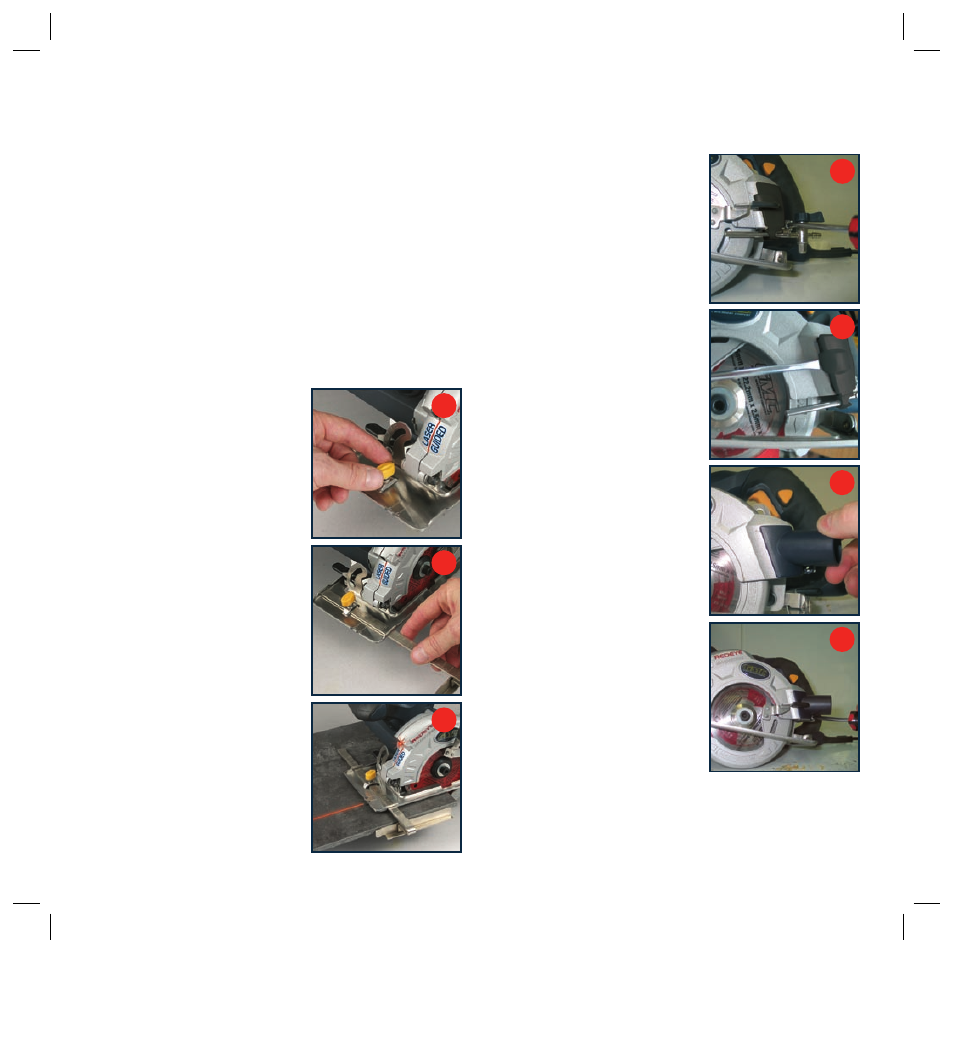
Using the parallel fence
The parallel fence (11) allows you
to make parallel cuts in a tile, all
at the same width.
CAUTION.
Always ensure that
the saw is switched off and
unplugged from the power supply
before making
any adjustments.
1. Loosen the parallel fence
locking knob (10) (Fig. Z).
2. Slide the parallel fence (11)
through the slots in the base
plate (27) (Fig. a).
3. Adjust the parallel fence to the
required width and secure it in
position with the parallel fence
locking knob (10).
4. Ensure that the parallel fence
rests against the tile along
its entire length to give a
consistent parallel cut (Fig. b).
Fitting the dust extraction adaptor
IMPORTANT.
Always remove the water cooling system
before cutting timber.
IMPORTANT.
Always remove and
clean the port of debris after use.
1. Remove the water system port
plug (21) by removing the fixing
screw (Fig. c) and sliding it from
the dust extraction port.
Note.
Use a flat headed
screwdriver at the front center of
the water system port plug and
lever outwards (Fig. d).
2. Fit the dust extraction adaptor
(32) into the dust extraction port
(Fig. e).
3. Slide the fixing screw through
the inlet on the adaptor (32)
and onto the bracket of the saw.
Ensure this is tight (Fig. f).
Maintenance
WARNING.
Always ensure that the
tool is switched off and the plug
is removed from the power point
before making any adjustments or
maintenance procedures.
Always wear sturdy gloves when
handling or changing blades as
they can be very sharp.
1. Keep the tool’s air vents
unclogged and clean at all
times.
2. Regularly check to see if any dust or foreign matter has
entered the grills near the motor and around the trigger
switch. Use a soft brush to remove any accumulated dust.
Wear safety glasses to protect your eyes whilst cleaning.
Z
b
a
c
d
e
f