Optional, Homelink® or c ar2u® progr amming – Genie INTELLIG 3024 User Manual
Page 9
©2010 The Genie Company
01/27/2010
9
P
R
O
G
R
A
M
S
ET
—
+
5 SECS
P
R
O
G
R
A
M
S
ET
—
+
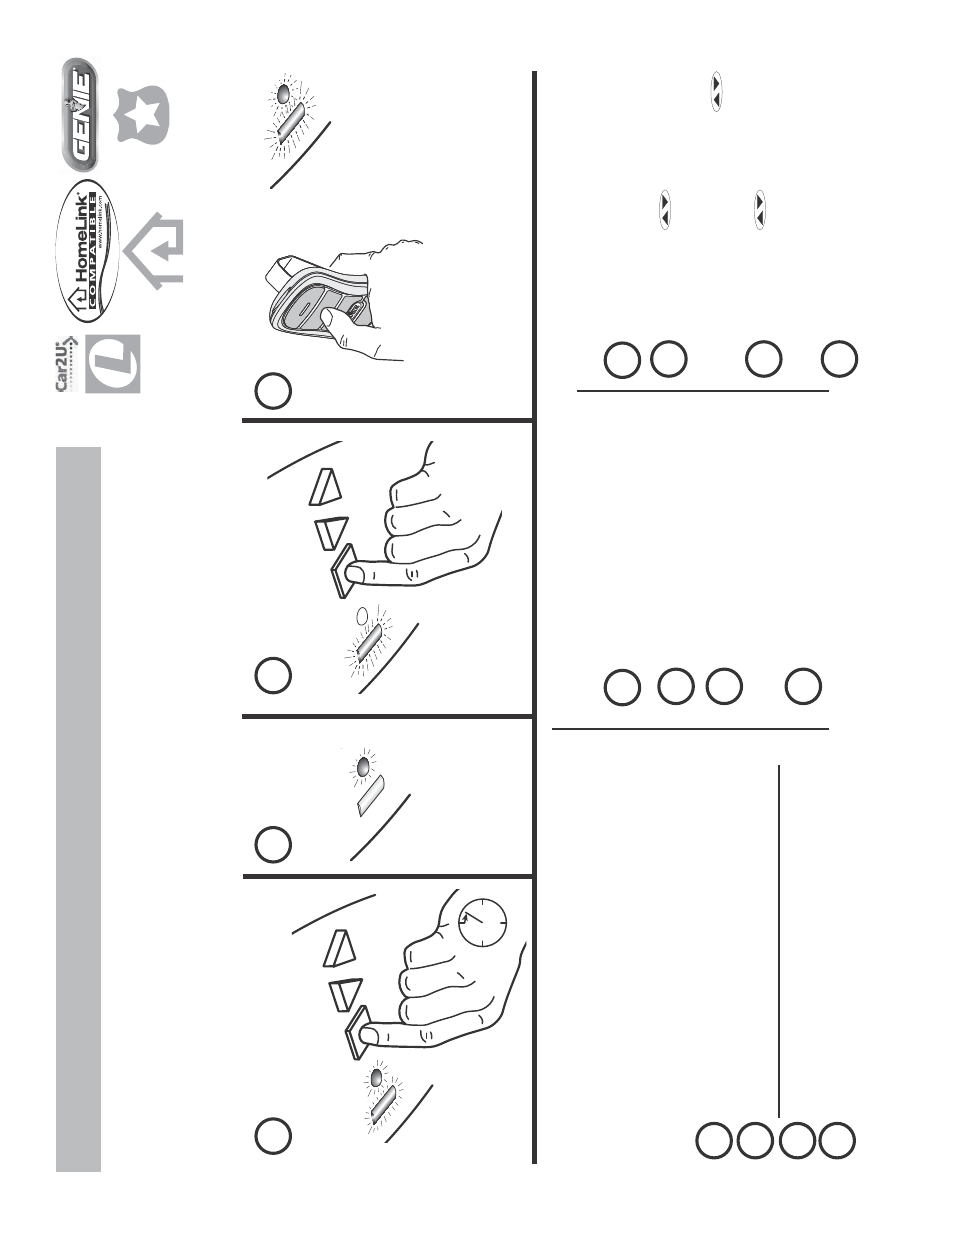
PRESS and HOLD
SEE BO
TH
Blue LEDs
come ON
SEE one
Blue LED
come ON
PRESS
a pr
eviously pr
ogr
ammed G
enie®
Int
elliC
ode® 2 r
emot
e butt
on on r
emot
e
. I
f y
ou
ar
e unsur
e which r
emot
e y
ou ha
v
e see page 15.
Remot
e must be Int
elliC
ode® 2 enabled
.
RELEASE
1
2
3
4
OPTIONAL
PR
OGR
AMMING PO
WER HEAD
T
O
Homelink®,
C
ar2U®,
or IntelliC
ode® 1 REMO
TES and SERIES II
WIRELESS KEYP
ADS
To c
omplet
e an
y of these tasks y
ou MUST ha
v
e at least one G
enie®
In
telliC
ode® 2
remot
e
button
alr
eady
pr
ogr
ammed t
o the po
w
er head
.
Homelink® or C
ar2U®:
Y
ou must also ha
v
e y
our
Homelink®
or
C
ar2U®
enabled v
ehicle pr
esent and their
pr
ogr
amming instruc
tions t
o per
form these pr
ogr
amming st
eps
.
G
enie® r
emote:
Y
ou must also ha
v
e y
our G
enie®
In
telliC
ode® 1
remot
e pr
esent.
G
enie® wir
eless k
e
ypad:
Y
ou must also ha
v
e y
our G
enie® wir
eless k
e
ypad installed and a PIN alr
eady pr
ogr
ammed int
o the k
e
ypad
.
PRESS and
RELEASE
5
On the Int
elliC
ode® 1 r
emot
e PRESS
a butt
on and RELEASE.
6
SEE both LEDs flash Blue
.
IntelliC
ode® 1 remote or wireless k
e
ypad progr
amming
7
On the Int
elliC
ode® 1 r
emot
e PRESS
the same butt
on and RELEASE.
T
he nex
t pr
ess of the r
emot
e will
o
p
e
ra
te
d
o
o
r.
5
Ent
er y
our
wireless k
e
ypad
PIN.
6
P
ress and hold
butt
on
(3 sec
onds)
on
wir
eless k
e
ypad
and
see
o
n
p
o
w
e
r h
e
a
d
long LED c
ome ON
Purple
. (
Y
ou ma
y ha
v
e t
o pr
ess
more than onc
e.)
8
Test.
Repeat as nec
essar
y f
or an
y
other Int
elliC
ode® 1 r
emot
es
.
7
P
ress and hold
butt
on
(3 sec
onds)
on wireless k
e
ypad
again
and see
o
n
p
o
w
e
r h
e
a
d
both LEDs
come ON
Blue
.
8
W
ait 30 sec
onds and t
est oper
ation.
G
enie® I
n
telliC
ode® 1
re
m
o
te
G
e
n
ie
®
I
n
telliC
ode® 1
w
ir
eless k
e
ypad
SEE long P
urple
LED flashing
SEE both LEDs
flash P
urple
A
ll optional pr
ogr
amming is c
omplete
.
Y
our gar
age door opener is r
eady to use
.
5
F
or
C
ar2U®
enabled v
ehicles f
ollo
w the
C
ar2U®
instruc
tions
.
6
Test.
Repeat as nec
essar
y f
or an
y other
C
ar2U®
enabled
v
ehicle
.
Homelink®
or
C
ar2U®
progr
amming
If y
our
Homelink®
has been pr
eviously pr
ogr
ammed t
o an
G
enie® opener begin with St
ep 5.
If y
our
Homelink®
has
not
y
et been linked t
o
a G
enie
®
opener then go t
o page 15 and change one r
emot
e butt
on
fr
om IntelliC
ode® 2 t
o
IntelliC
ode® 1,
then pr
ogr
am tha
t
butt
on t
o the po
w
er head and r
epeat st
eps 1-4 then
continue with
Homelink®
st
eps 5-6.
5
6
PRESS the
Homelink®
butt
on
twic
e
.
Test.
Repeat as nec
essar
y f
or an
y other
pre-
progr
ammed
Homelink®
enabled
v
ehicle
.